

How to Store Kitchen Knives Safely: 5 Smart Storage Methods

How to store kitchen knives safely using a knife block, magnetic strip, drawer organizer and blade guards

How to store kitchen knives safely using a knife block, magnetic strip, drawer organizer and blade guards
Safe kitchen knife storage methods include knife blocks, magnetic strips, in-drawer organizers and blade guards.


A sharp kitchen knife deserves a better home than the bottom of a crowded utensil drawer.

Proper knife storage isn’t only about keeping your kitchen organized. It helps protect the cutting edge, reduce accidental contact with sharp blades, keep knives dry and make the knife you need easier to reach safely.

For most home kitchens, the best options are a knife block, magnetic strip, in-drawer knife organizer or individual blade guard/sheath. The right choice depends on your available space, knife collection and whether you want your knives displayed or stored out of sight.

One method should generally be avoided:

Never leave good kitchen knives loose and unprotected in a drawer.

The blades can strike utensils and other knives, potentially damaging their edges, while exposed cutting edges create an unnecessary risk whenever someone reaches into the drawer.

This KnifeGenie guide is based on research into knife-care recommendations, storage designs and manufacturer guidance rather than personal testing of every storage product mentioned. The goal is to explain what makes a storage method safe and blade-friendly so you can choose the solution that makes sense in your kitchen.


🔽 Jump to What You Need

👉 Quick Answer
👉 Knife Storage Comparison
👉 Why Knife Storage Matters
👉 Knife Blocks
👉 Magnetic Knife Strips
👉 In-Drawer Knife Organizers
👉 Blade Guards & Sheaths
👉 Why Loose Drawers Are a Bad Idea
👉 Does Storage Affect Sharpness?
👉 Moisture & Knife Storage
👉 Knife Safety & Accessibility
👉 Which Storage Method Should You Choose?
👉 KnifeGenie Pro Tips
👉 Frequently Asked Questions
👉 Overall Recommendation


🏆 How Should You Store Kitchen Knives? The Quick Answer

For most home cooks, there isn’t one storage method that beats every other option.

🧲 Choose a Magnetic Strip If You Want:

✔ Easy access
✔ More counter space
✔ Flexible storage for different knife sizes
✔ Knives visible at a glance
✔ Good airflow around clean, dry blades

🗄️ Choose an In-Drawer Organizer If You Want:

✔ Knives kept out of sight
✔ Clear countertops and walls
✔ Individual protection for each blade
✔ A good solution for homes with limited counter space

🪵 Choose a Knife Block If You Want:

✔ Traditional countertop storage
✔ Fast, convenient access
✔ Dedicated slots for your everyday knives
✔ A self-contained storage system

🛡️ Choose Blade Guards or Sheaths If You Want:

✔ An inexpensive solution
✔ Protection for individual knives
✔ Safe drawer storage without a large organizer
✔ Protection while transporting knives

❌ Avoid:

Loose, uncovered knives mixed with utensils in a kitchen drawer.

🧙 KnifeGenie Tip: Good knife storage should accomplish four things: protect you, protect the cutting edge, keep the knife clean and dry, and make it easy to retrieve without grabbing near the blade.


KNIFE STORAGE METHODS COMPARED

Knife block, magnetic strip, in-drawer organizer and blade guard compared for safe kitchen knife storage
Knife blocks, magnetic strips, in-drawer organizers and blade guards can all protect kitchen knives when used correctly.


⚔️ Kitchen Knife Storage Methods Compared

Storage Method Blade Protection Accessibility Space Use Main Consideration
🪵 Knife block Very good Excellent Uses counter space Slots should stay clean and dry
🧲 Magnetic strip Excellent when used carefully Excellent Saves counter space Requires secure installation and careful removal
🗄️ In-drawer organizer Excellent Very good Uses drawer space Drawer must have adequate clearance
🛡️ Blade guard/sheath Very good Good Minimal Guard must fit the blade properly
❌ Loose drawer Poor Poor Appears convenient Exposed blades can contact utensils and hands

For many households, in-drawer organizers and properly installed magnetic strips provide an excellent balance of safety, edge protection and efficient use of space.

Traditional blocks remain perfectly practical when kept clean and dry, while blade guards are particularly useful if you already have drawer space and don’t want to install a complete storage system.


🔪 Why Proper Knife Storage Matters

A kitchen knife’s cutting edge is surprisingly small.

When you sharpen a knife, you’re creating two surfaces that meet at a very fine apex. That fine edge is what allows the blade to pass easily through food.

Now imagine throwing that carefully maintained edge into a drawer containing:

🍴 Forks
🥄 Spoons
✂️ Kitchen shears
🔧 Metal utensils
🔪 Other knives

Every time the drawer opens and closes, the knife can shift and make contact with harder objects.

That is exactly what you don’t want.

Victorinox specifically advises against storing knives loosely in a drawer because unprotected blades can rub against one another, reducing sharpness and potentially damaging their cutting edges.

Proper storage therefore contributes to three important goals:

Safety → Edge protection → Knife longevity

Storage won’t eliminate the need for honing or sharpening, but it can help prevent unnecessary edge damage between uses.


PROTECT THE EDGE
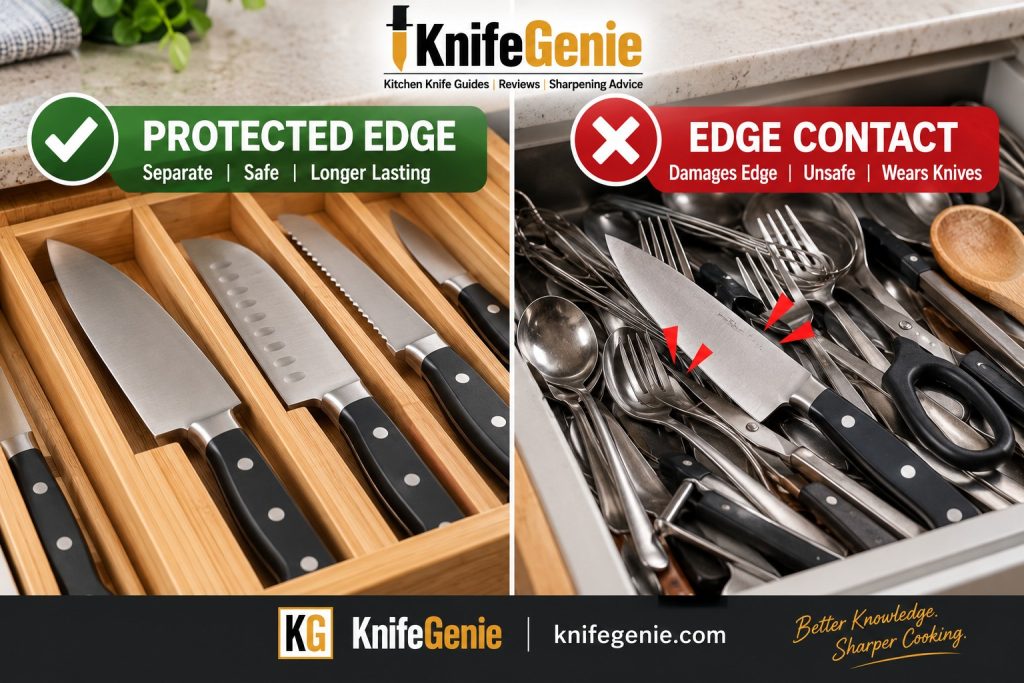
Protected kitchen knife edges in wooden organizer compared with loose knives contacting metal utensils in a drawer
Keeping kitchen knife edges separated from other utensils helps prevent unnecessary contact, damage and unsafe handling.


🪵 Knife Blocks: Traditional and Convenient

The classic wooden knife block remains popular for a reason.

It keeps several knives together, places them within easy reach and prevents their cutting edges from bouncing around against other utensils.

✅ Advantages

✔ Convenient countertop access
✔ Individual slots protect blades
✔ Easy to organize
✔ Available for complete knife sets
✔ No wall installation required
✔ Can also accommodate shears and honing tools

❌ Disadvantages

✘ Takes up counter space
✘ Fixed slots may not fit unusual knives
✘ Slots can collect debris
✘ Moisture can become a problem if damp knives are inserted
✘ Interior slots can be difficult to inspect and clean

One important habit makes a major difference:

Never put a wet knife into a knife block.

Wash the knife, dry the blade and handle thoroughly, and only then return it to storage.

Knife blocks should also be cleaned periodically, especially if crumbs or debris collect inside the slots.

🧙 KnifeGenie Tip

If your block uses horizontal slots, store the knife with its edge facing upward where the design allows it. That reduces unnecessary contact between the cutting edge and the slot as the knife slides in and out.

With vertical slots, avoid dragging the cutting edge heavily against the wood. Insert and remove the knife with control.


CORRECT KNIFE BLOCK STORAGE

Home cook drying a chef knife before safely placing it in a wooden knife block
Clean and completely dry kitchen knives before returning them to a knife block for storage.


🧲 Magnetic Knife Strips: Excellent for Accessibility

A good magnetic strip solves several storage problems at once.

It frees counter and drawer space, accommodates knives of different shapes and keeps your collection visible.

Instead of searching for the right knife, you can immediately see your chef knife, Santoku, bread knife and paring knife.

A magnetic strip can therefore be particularly useful in a small kitchen.

✅ Advantages

✔ Saves counter space
✔ Excellent accessibility
✔ Fits many knife shapes and sizes
✔ Easy to see which knife you’re selecting
✔ Allows air circulation around the blade
✔ Doesn’t require fixed slots

❌ Disadvantages

✘ Must be mounted securely
✘ Exposed knives may not suit every household
✘ Poor removal technique can cause the blade to strike the strip
✘ Placement matters where children are present
✘ Some strips may hold more aggressively than others

The important detail is how you remove the knife.

Don’t simply yank the blade straight toward yourself.

Grip the handle securely and gently rotate or roll the knife away so the spine releases before the cutting edge.

This gives you more control and reduces unnecessary edge contact.

⚠️ Think About Who Uses the Kitchen

A wall full of exposed knives may look fantastic.

That doesn’t automatically make it appropriate for every household.

If young children can reach the strip—or can climb onto nearby furniture or countertops—an enclosed or inaccessible storage solution may be more appropriate.

The strip should also be firmly anchored according to its installation instructions. A magnetic strip is only a safe storage system if the strip itself is securely attached.


MAGNETIC STRIP TECHNIQUE – How to Remove Knife From Magnetic Strip

Three-step method for safely removing a kitchen knife from a magnetic knife strip
Grip the handle securely, rotate the knife spine away first, then lift the blade cleanly from the magnetic strip.


🗄️ In-Drawer Knife Organizers: Safe and Discreet

An in-drawer organizer gives you the clean appearance of ordinary drawer storage without the disadvantages of leaving blades loose.

Instead of knives sliding around, individual slots or dividers separate them.

Manufacturers such as ZWILLING specifically design in-drawer organizers so individual slots hold knives securely while protecting blades from dulling. Because you need to protect your knife edge from premature dulling.

✅ Advantages

✔ Keeps blades covered and separated
✔ Clears countertop space
✔ Keeps knives out of immediate view
✔ Protects edges from other utensils
✔ Organized and easy to understand
✔ No wall installation required

❌ Disadvantages

✘ Uses valuable drawer space
✘ Organizer must fit the drawer
✘ Deep handles may interfere with drawer clearance
✘ Very large knives may not fit standard organizers

Before buying one, measure:

Drawer width × depth × internal height

Don’t forget the height.

A tall knife handle sitting in an organizer can prevent a shallow drawer from closing even when the organizer itself fits perfectly.

🧙 KnifeGenie Tip

Don’t turn an organized knife drawer into another junk drawer.

If forks, peelers, scissors and miscellaneous utensils are piled on top of your knife organizer, you’ve defeated much of its purpose.

Give the knives their own protected area.


IN-DRAWER STORAGE – Safe In-Drawer Knife Organizer

Chef knife, Santoku, bread knife and paring knife safely separated in a wooden in-drawer knife organizer
An in-drawer organizer keeps kitchen knives separated, protected and organized while preventing their blades from contacting other utensils.


🛡️ Blade Guards & Sheaths: Simple Individual Protection

You don’t necessarily need a large storage system.

If you own only a few good knives, individual blade guards can be a practical solution.

A properly fitted guard covers the cutting edge and allows the protected knife to be stored in a drawer without exposing the edge to your hands or nearby utensils.

Victorinox describes blade guards as providing both safety and cutting-edge protection, while ZWILLING offers sheaths specifically for protected drawer storage.

Blade Guards Work Well For:

🔪 Individual chef knives
🔪 Santokus
🔪 Utility knives
🔪 Specialty knives
🔪 Knives transported in cases or rolls
🔪 Small collections without a dedicated block

Choose the correct guard for the length and height of the blade.

A chef knife shouldn’t be squeezed into a guard designed for a narrow utility knife.

And don’t treat the guard as a substitute for drying.

⚠️ Dry Before Covering

A sheath encloses part of the blade.

If you put the knife away wet, you’re potentially trapping moisture against the metal.

Clean → dry thoroughly → cover → store.

That’s the safer sequence.


BLADE GUARD
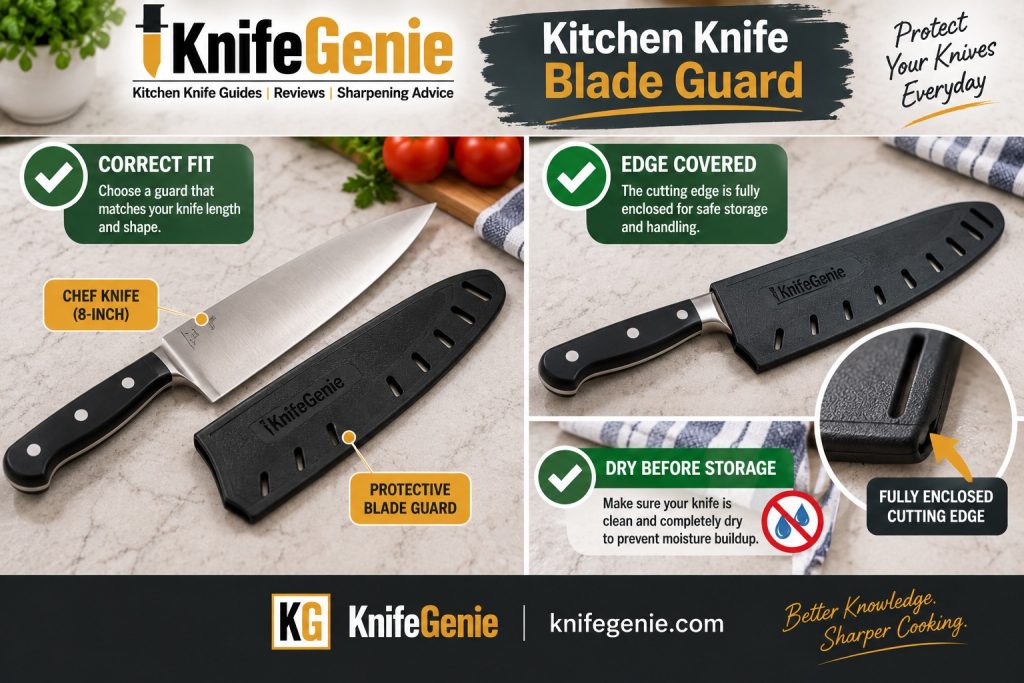
Chef knife with correctly fitted blade guard covering the cutting edge for safe storage
A correctly fitted blade guard protects the cutting edge during storage. Always clean and completely dry the knife before fitting the guard.


Why Loose-Drawer Knife Storage Is a Bad Idea

A loose utensil drawer creates two obvious problems: exposed blades are harder to retrieve safely, and the cutting edge can repeatedly strike other utensils as the drawer opens and closes.

🩹 Problem #1: Safety

Someone reaching into the drawer may contact an exposed cutting edge before realizing where the knife is.

This becomes particularly concerning in a shared kitchen where another person may not know a sharp knife has been placed underneath other utensils.

🔪 Problem #2: Edge Damage

The knife edge can strike:

Metal utensils → other knives → scissors → hard drawer components.

Those repeated contacts are completely unnecessary.

Victorinox explicitly warns that loose drawer storage allows unprotected blades to rub against one another and can damage their cutting edges. Shun likewise advises that knives should not be stored unsheathed in a drawer.

If drawer storage is your only practical option, that’s fine.

Protect the blade first.

Use an organizer, sheath or blade guard.


UNSAFE STORAGE
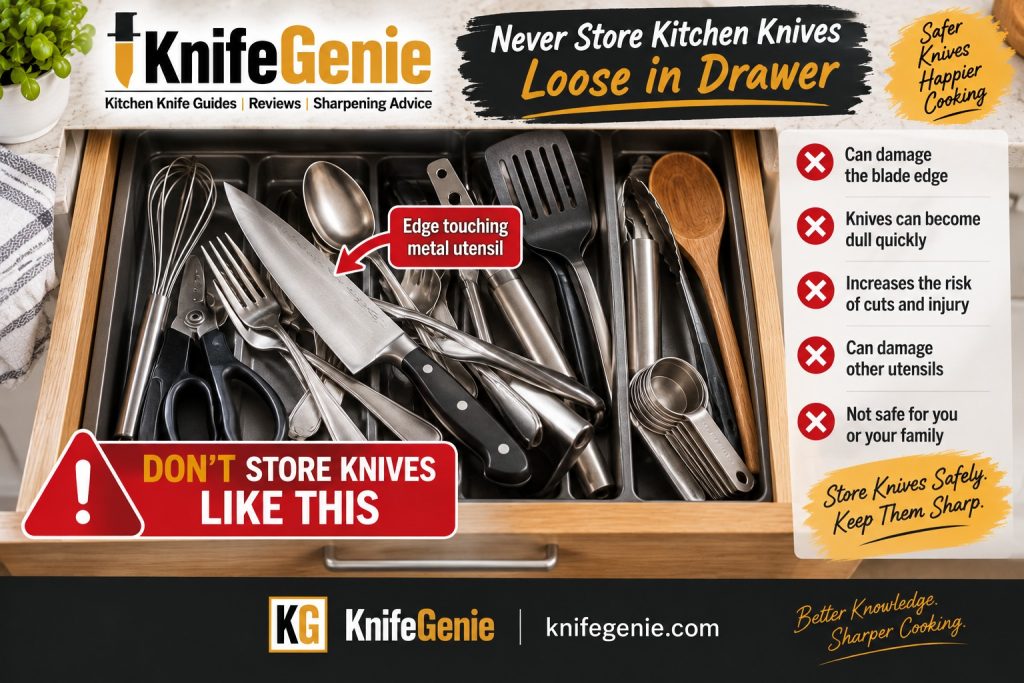
Chef knife stored loose in a drawer with its cutting edge touching metal kitchen utensils
Storing kitchen knives loose among metal utensils can damage the cutting edge and increase the risk of accidental cuts.


⚔️ Does Knife Storage Affect Sharpness?

Yes—but indirectly.

Simply placing a knife in a block or drawer organizer doesn’t make it sharper.

Good storage instead helps prevent avoidable damage to an already sharpened edge.

Think of edge retention as a chain:

Sharpen properly → use a knife-friendly cutting board → avoid abusive cutting → clean carefully → dry completely → store safely.

Break enough links in that chain and even a very good knife can seem to become dull surprisingly quickly.

Poor storage can introduce unnecessary metal-to-metal or edge-to-hard-surface contact between cooking sessions.

Good storage minimizes that contact.

That means your sharpening work isn’t being undermined while the knife isn’t even being used.

👉 KnifeGenie related guide: How Often Should You Sharpen Kitchen Knives?

👉 Also see: Honing vs Sharpening: What’s the Difference?


EDGE RETENTION
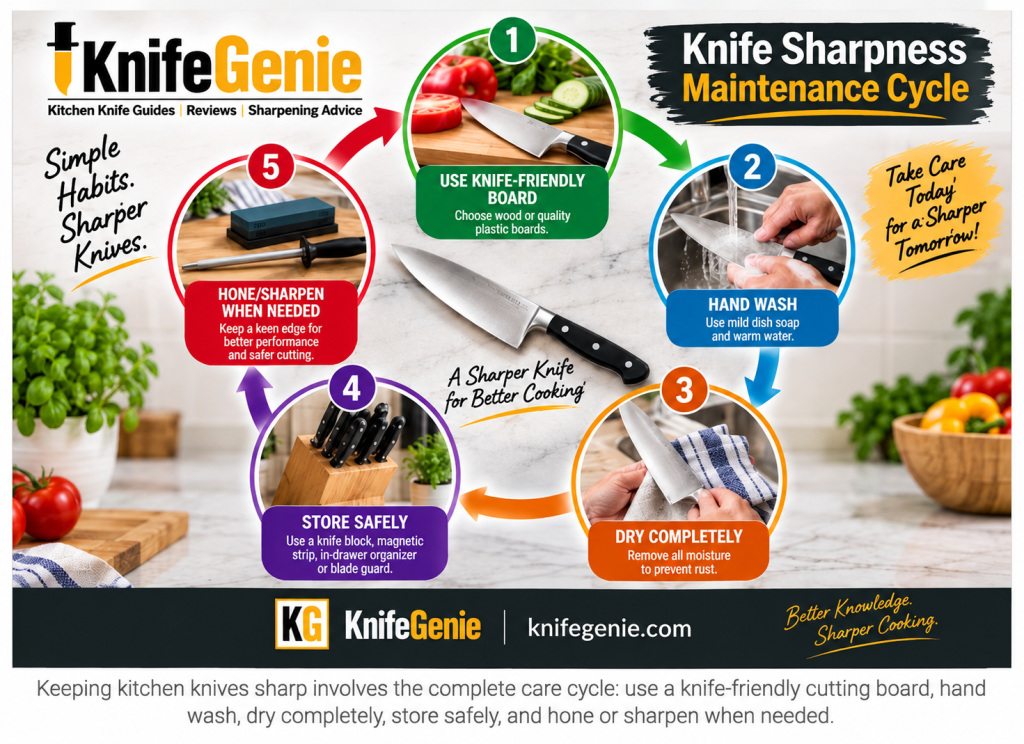
Five-step kitchen knife maintenance cycle covering cutting boards, hand washing, drying, safe storage and sharpening


💧 Moisture & Knife Storage: Dry First, Store Second

Storage isn’t only about physical contact.

Moisture matters too.

Even stainless steel is better described as stain resistant, not completely immune to corrosion under every condition.

Carbon-steel knives require even more attention.

After washing:

  1. Rinse the knife.
  2. Dry the blade thoroughly.
  3. Dry around the handle and bolster.
  4. Check that no water remains on the edge.
  5. Only then return it to storage.

Shun’s current care guidance similarly recommends towel-drying knives immediately and removing moisture completely before storage.

This is especially important with:

🪵 Enclosed wooden blocks
🛡️ Blade guards
🗡️ Wooden sayas
🧳 Knife cases and rolls

Don’t deliberately trap moisture against the blade.

And if you’re already taking care to dry your knives properly, don’t undo that work by storing them in a damp or dirty holder.

👉 Read next: Can Kitchen Knives Go in the Dishwasher?


Knife Safety & Accessibility

There’s a useful balance to find here.

You want a knife to be easy to retrieve when cooking.

But you don’t want the blade exposed where someone can accidentally touch it.

Ask yourself:

Who uses this kitchen?

A magnetic strip might provide superb access for an experienced adult cook.

A drawer organizer might make more sense in another household because the knives are less visually exposed.

Likewise, a countertop block near your prep area may be extremely convenient—but it shouldn’t sit somewhere it can easily be knocked over or reached by a small child.

A good storage position should be:

✔ Stable
✔ Dry
✔ Away from accidental bumps
✔ Convenient for the cook
✔ Appropriate for other household members
✔ Positioned so you can grip the handle without touching the blade

Safety isn’t just about what stores the knife.

It’s also about where you put it.


🛒 Which Knife Storage Method Should You Choose?

Here’s a simple way to decide.

Your Situation Storage Method to Consider
Small kitchen with little counter space 🧲 Magnetic strip
Want knives hidden from view 🗄️ In-drawer organizer
Traditional kitchen setup 🪵 Knife block
Only own 1–3 quality knives 🛡️ Blade guards
Mixed collection of unusual knife sizes 🧲 Magnetic strip
Can’t drill into the wall 🪵 Block or 🗄️ drawer organizer
Need to transport knives 🛡️ Guards + suitable knife case/roll
Family/shared kitchen 🗄️ Protected in-drawer storage can be particularly practical
Knives currently loose in a drawer 🛡️ Add guards or an organizer

🧙 KnifeGenie Recommendation

For many home cooks, an in-drawer organizer is an excellent all-around solution because it keeps blades separated, protected and off the countertop.

If easy visibility and quick access are priorities, a properly installed magnetic strip is equally compelling.

A knife block remains a perfectly good traditional choice when it fits your collection and is kept clean and dry.

And if you only own a few quality knives?

Individual blade guards may be all you need.


STORAGE DECISION — Best Knife Storage Method Decision Guide
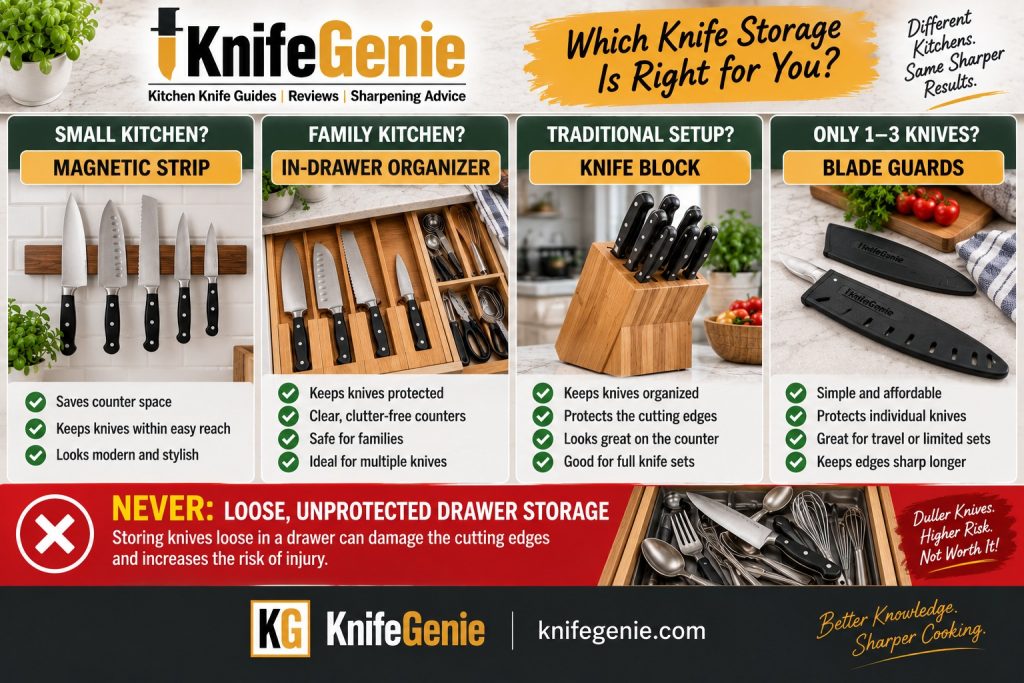
Guide comparing magnetic strips, in-drawer organizers, knife blocks and blade guards for kitchen knife storage
The best kitchen knife storage method depends on your space, knife collection and household. Keep blades separated and avoid loose, unprotected drawer storage.


🧙 KnifeGenie Pro Tips

🔪 Never store good knives loose. Separate the cutting edge from other utensils.

💧 Dry before storing. Don’t place a damp knife into a block, sheath, organizer or case.

🧲 Use magnetic strips carefully. Secure mounting and controlled knife removal matter.

🪵 Clean knife blocks periodically. Storage equipment needs maintenance too.

🛡️ Match blade guards to the knife. The entire cutting edge should be properly protected.

🗄️ Measure drawers before buying organizers. Check width, depth and height.

⚔️ Don’t confuse storage with sharpening. Proper storage protects an edge; it doesn’t restore a dull one.

🧼 Store only clean knives. Food residue and enclosed storage are a poor combination.

👨‍👩‍👧 Consider the household. The most convenient storage system isn’t necessarily the most appropriate if young children can reach it.

🔪 Build a complete maintenance routine. Cutting surface, washing, drying, storage, honing and sharpening all contribute to long-term knife performance.


Frequently Asked Questions

What is the safest way to store kitchen knives?

A knife block, securely installed magnetic strip, in-drawer knife organizer or correctly fitted blade guard can all provide safe storage when used properly.

The important principle is that the sharp cutting edge should be protected from accidental contact and from other utensils.

Is it bad to store kitchen knives in a drawer?

Not if they’re properly protected.

An in-drawer knife organizer or individual blade guards can make drawer storage very practical.

The problem is storing uncovered knives loose among other utensils.

Do knife blocks dull knives?

A properly used knife block shouldn’t automatically dull a knife. However, repeatedly dragging the cutting edge against a hard slot can contribute to unnecessary contact.

Insert and remove knives carefully and keep the block clean and dry.

Are magnetic knife strips bad for knives?

A suitable magnetic strip can be an excellent storage system.

The important considerations are secure mounting, sufficient holding strength and careful removal so you aren’t repeatedly striking or dragging the cutting edge against the holder.

Should knives be stored blade up or blade down in a block?

Follow the design of your particular block.

With horizontal slots, positioning the cutting edge so it isn’t bearing against the slot can reduce unnecessary edge contact. With conventional vertical blocks, simply insert and remove the knife carefully rather than dragging the edge heavily against the slot.

Can I put a wet knife into a knife block?

You shouldn’t.

Dry the knife completely before storage. Moisture trapped inside a block or against a blade can encourage staining, corrosion or unwanted moisture inside the holder.

Are blade guards good for kitchen knives?

Yes. A correctly sized blade guard is a simple way to protect the cutting edge and make drawer storage safer.

The knife should be clean and completely dry before the guard is fitted.

What is the best knife storage method for a small kitchen?

A wall-mounted magnetic strip can be particularly space-efficient because it uses neither countertop nor drawer space.

If wall mounting isn’t possible, an in-drawer organizer is another excellent space-saving solution.

How should expensive Japanese knives be stored?

The same core principles apply: keep the blade clean, dry, separated and protected.

A suitable block, magnetic holder, in-drawer organizer, sheath or traditional wooden saya can work depending on the particular knife.

Hard, thin Japanese edges especially benefit from avoiding unnecessary impacts with other objects.

👉 See KnifeGenie’s German vs Japanese Kitchen Knives guide for more about differences in edge geometry and maintenance.

Does proper storage keep knives sharp longer?

Proper storage can help preserve an edge by preventing unnecessary contact with other knives, utensils and hard surfaces.

It doesn’t replace sharpening, but it helps ensure you’re not damaging the edge between uses.

Read: How Often Should You Sharpen Kitchen Knives?


🏆 Overall Recommendation: Store the Edge, Not Just the Knife

The best kitchen knife storage system isn’t necessarily the most expensive or attractive one.

It’s the one you’ll use correctly every day.

For most home kitchens, KnifeGenie recommends choosing among:

🗄️ In-drawer organizer — excellent all-around protected storage

🧲 Magnetic strip — excellent for space efficiency and accessibility

🪵 Knife block — excellent traditional countertop storage

🛡️ Blade guard/sheath — excellent simple protection for individual knives

The one method we would avoid is:

Loose, uncovered knives mixed with other utensils in a drawer.

Your knife spends far more time stored than it does cutting food.

Protecting the blade during those hours is one of the simplest habits you can adopt to support safety and preserve the cutting edge.

A good knife-care routine is straightforward:

Use it properly → wash it carefully → dry it completely → store it safely → maintain the edge when needed.

Do those things consistently and you’re giving your kitchen knives a much better chance of performing properly for years.


SAFE KNIFE STORAGE — How to Store Kitchen Knives Safely: Final Recommendation

Home cook drying a chef knife with magnetic strip, knife block and in-drawer organizer for safe storage
Clean, dry, separate and protect your kitchen knives to support safe storage and help preserve the cutting edge.


Can Kitchen Knives Go in the Dishwasher?

Can kitchen knives go in the dishwasher
Hand washing is the best choice for protecting quality kitchen knives from unnecessary edge, blade and handle damage.

Putting a dirty kitchen knife straight into the dishwasher is tempting. After all, if the machine can clean greasy pans, plates and forks, surely it can handle a chef’s knife.

But can kitchen knives go in the dishwasher without being damaged?

For most quality kitchen knives, the safest answer is no.

Even when a manufacturer describes a knife as dishwasher-safe, regularly washing it in a dishwasher can expose the blade and handle to high temperatures, strong detergents, prolonged moisture and contact with other utensils.

That doesn’t necessarily mean your knife will be ruined after one accidental dishwasher cycle. The bigger concern is what repeated cycles can do over time.

This guide explains why dishwashers can be hard on kitchen knives, which knives are most vulnerable, what “dishwasher-safe” really means, and the simple hand-washing routine that can help your knives stay sharp and attractive for longer.


👉 Quick Answer

Most good kitchen knives should be washed by hand rather than in the dishwasher.

Dishwasher cycles can expose a knife to:

  • 🔥 Heat
  • 💦 Prolonged moisture
  • 🧪 Strong detergents
  • ⚔️ Contact with other metal utensils
  • 🪵 Conditions that can damage some handles

The cutting edge is particularly vulnerable because it is the thinnest and most delicate part of the blade.

Best practice: Wash your knife shortly after use with warm water, mild dish soap and a soft sponge or cloth. Rinse it and dry it immediately before returning it to safe storage.

A knife marked dishwasher-safe may survive machine washing, but that does not automatically make the dishwasher the best way to care for it.

🧞 KNIFEGENIE TIP: Think of “dishwasher-safe” as permission rather than a recommendation. If you want a quality knife to stay in its best condition, hand washing is usually the better habit.


📌 In This Guide

👉 Quick Answer
👉 Why Dishwashers Can Damage Kitchen Knives
👉 Does the Dishwasher Make Knives Dull?
👉 Can Dishwasher Detergent Damage a Knife?
👉 Can Kitchen Knives Rust in the Dishwasher?
👉 What Happens to Knife Handles?
👉 Are Any Kitchen Knives Dishwasher-Safe?
👉 Which Knives Should Never Go in the Dishwasher?
👉 What If You Accidentally Put a Knife in the Dishwasher?
👉 How to Wash Kitchen Knives Properly
👉 Common Knife-Cleaning Mistakes
👉 Frequently Asked Questions
👉 Overall Recommendation


Why Dishwashers Can Damage Kitchen Knives

A dishwasher isn’t necessarily dangerous to a knife because of one single factor. The problem is the combination of conditions inside the machine.

During a typical cycle, a knife may spend a long time exposed to hot water, detergent, moisture and movement.

If it is sitting beside forks, spoons or other metal utensils, the blade can also knock or rub against them.

A dinner fork probably won’t suffer much from that treatment.

A finely sharpened kitchen knife is different.

Its cutting edge is extremely thin, and maintaining that thin edge is exactly what allows the knife to cut efficiently.

The five main concerns are:

1. Edge damage
Contact with other hard objects can nick, roll or otherwise damage the fine cutting edge.

2. Detergent exposure
Dishwasher detergents can be considerably more aggressive than ordinary mild hand-washing soap.

3. Heat
Repeated exposure to hot wash and drying cycles can be hard on certain handle materials and adhesives.

4. Moisture
Leaving steel wet for extended periods can encourage staining or corrosion under the wrong conditions.

5. Handle deterioration
Wood and some composite or bonded handle materials are particularly poorly suited to repeated dishwasher cycles.

WHAT HAPPENS INSIDE A DISHWASHER

Dishwasher conditions that can damage kitchen knives
Heat, strong detergent, prolonged moisture and contact with other utensils can make a dishwasher a harsh environment for quality kitchen knives.


Does the Dishwasher Make Knives Dull?

It can contribute to a knife losing its sharp cutting performance, but the explanation is more complicated than simply saying that hot water “removes” sharpness.

One of the bigger practical problems is physical contact.

If the cutting edge knocks against forks, spoons, another knife, a rack or other hard objects during repeated wash cycles, the very fine edge can suffer microscopic damage.

You may not see that damage with your eyes.

Instead, you notice the result when the knife that once slipped easily through a tomato begins crushing the skin before cutting it.

This is one reason a knife can feel dull even though the blade still looks perfectly normal. Read what would make kitchen knives dull faster.

SHARP EDGE VS DAMAGED EDGE

Clean kitchen knife edge compared with a damaged knife edge
A kitchen knife’s fine cutting edge can be damaged by repeated contact with hard utensils and dishwasher components.

If your knife has already lost its edge, see our guide to How Often Should You Sharpen Kitchen Knives? and our Best Knife Sharpeners for Beginners guide.

Also remember that honing and sharpening aren’t the same thing. Our Honing vs Sharpening guide explains when each is appropriate.


Can Dishwasher Detergent Damage a Knife?

Another important difference between hand washing and machine washing is the detergent.

When you wash a knife by hand, you normally use a small amount of mild liquid dish soap and rinse it away quickly.

Dishwasher detergents are formulated for a much tougher job.

They need to remove dried-on food and grease from an entire load without somebody scrubbing each item individually.

That can make the dishwasher a considerably harsher chemical environment for a knife.

ZWILLING, for example, warns that dishwasher tablets can contain aggressive chemicals capable of damaging steel and plastic surfaces and recommends hand cleaning to help prevent premature wear.

The practical lesson is simple:

You don’t need aggressive cleaning to keep an everyday kitchen knife hygienically clean.

For routine home use, prompt hand washing with mild soap is normally the gentler approach.


Can Kitchen Knives Rust in the Dishwasher?

Yes — even a stainless-steel kitchen knife can develop rust spots, staining or corrosion.

The word stainless sometimes causes confusion.

Stainless steel is designed to be highly resistant to corrosion. It isn’t necessarily completely immune to it.

A number of factors can increase the chance of corrosion, including:

  • Prolonged moisture
  • Salt
  • Acidic food residue
  • Aggressive cleaning products
  • Contact with other metals
  • Failure to dry the blade properly

This is particularly important after cutting foods such as tomatoes, citrus fruit and other acidic ingredients.

Rather than leaving the dirty knife sitting around, wash it reasonably soon after use and dry it.

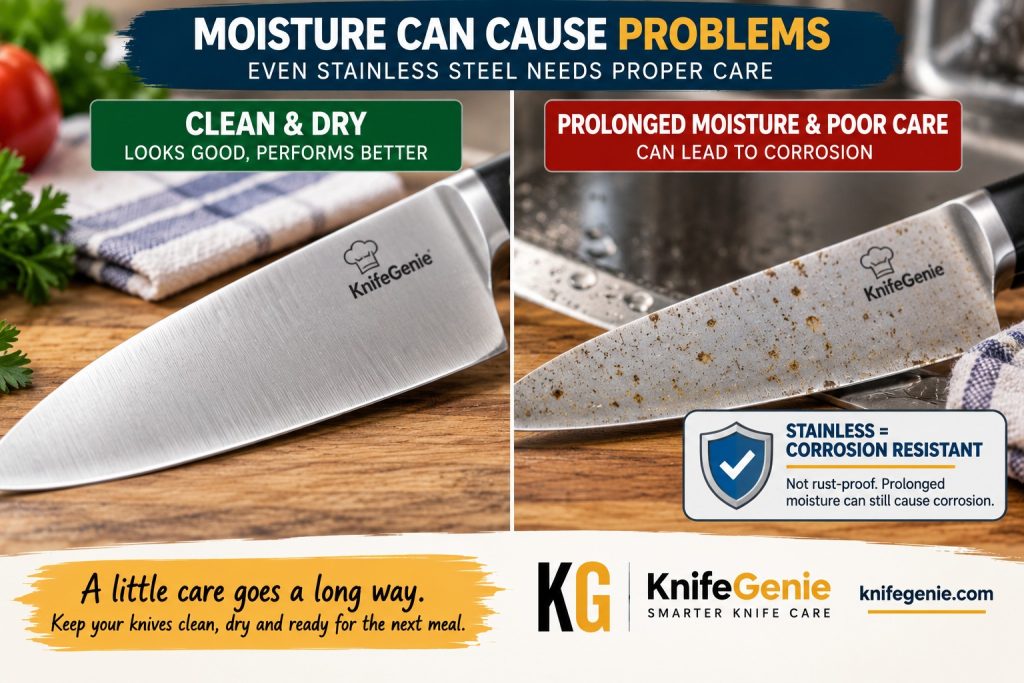
STAINLESS DOES NOT MEAN RUST-PROOF

Stainless kitchen knife showing possible rust and corrosion
Stainless steel is corrosion resistant, not rust-proof. Prolonged moisture and poor care can still cause staining and corrosion.

That simple routine is one of the easiest forms of knife maintenance.


What Happens to Knife Handles in the Dishwasher?

The blade isn’t the only part you need to protect.

🪵 Wooden handles

Wooden-handled knives are among the clearest examples of knives that should stay out of the dishwasher.

Repeated exposure to water, heat and drying can cause wood to swell, shrink, dry out, fade or eventually crack.

Water can also affect areas around rivets and joints.

A quality wooden handle should instead be cleaned carefully by hand and dried promptly.

🧱 Synthetic handles

Synthetic materials are generally more water resistant.

Some manufacturers specifically rate certain synthetic-handled knives as dishwasher-safe.

That still doesn’t mean every synthetic handle should automatically go into the machine. Follow the manufacturer’s instructions for your particular knife.

🔩 Riveted and bonded handles

Repeated heat and moisture can also be undesirable around handle scales, rivets, adhesives and joints.

A knife may continue functioning perfectly well for a long time while small signs of deterioration gradually appear.

Hand washing avoids most of these concerns.

HANDLE MATERIALS

Wood synthetic and riveted kitchen knife handles dishwasher care
Wooden knife handles should be hand washed, while dishwasher guidance for synthetic and composite handles depends on the manufacturer.


Are Any Kitchen Knives Dishwasher-Safe?

Yes.

This is where a blanket statement such as “no kitchen knife can ever go in a dishwasher” becomes misleading.

Some manufacturers specifically describe particular knives as dishwasher-safe.

For example, Victorinox states that its household knives with synthetic handles are dishwasher-safe. However, it still recommends hand washing large knives and notes that gentler hand cleaning can help keep blades sharper longer.

ZWILLING similarly notes that some of its knives are technically dishwasher-safe under specified temperature conditions, while recommending hand washing as the better care method.

So there are really two separate questions:

Question Answer
Can this knife physically be washed in a dishwasher? Sometimes, if the manufacturer says so.
Is dishwashing the best way to preserve the knife? Usually not.

That’s an important distinction.

What does “dishwasher-safe” mean?

It generally tells you that the manufacturer considers the materials capable of tolerating dishwasher cleaning under its stated conditions.

It doesn’t necessarily promise that repeated dishwasher use is the best possible treatment for edge retention, appearance or maximum service life.

When in doubt, check the care instructions supplied with your particular knife.


Which Knives Should Never Go in the Dishwasher?

Some knives deserve an especially firm hand-wash-only rule.

❌ Wooden-handled knives

Water and repeated temperature changes are poor partners for natural wood.

❌ High-quality chef’s knives

Even when the blade itself is highly corrosion-resistant, protecting the cutting edge makes hand washing worthwhile.

❌ Carbon-steel knives

Carbon steel generally demands more attention to moisture and corrosion than stainless steel. Wash it promptly and dry it thoroughly.

❌ Many Japanese kitchen knives

Premium Japanese knives can combine very hard, thin cutting edges with natural wooden handles or steels requiring careful maintenance.

If you use Japanese knives, our German vs Japanese Kitchen Knives comparison explains some of the differences in steel, edge geometry, and general care expectations.

❌ Knives specifically marked “hand wash only”

This one should be obvious, but the manufacturer’s care instructions take priority.

If the manufacturer says hand wash only, don’t put the knife in the dishwasher.

DISHWASHER DECISION GUIDE

Dishwasher care guide for different types of kitchen knives
Wooden-handled and carbon-steel knives should stay out of the dishwasher, while manufacturer instructions should be checked for dishwasher-safe synthetic knives.


What If You Accidentally Put a Knife in the Dishwasher?

Don’t panic.

One trip through the dishwasher does not automatically mean you’ve destroyed your knife.

Remove it carefully and inspect it.

Check the blade

Look for:

  • Rust spots
  • Staining
  • Discoloration
  • Small chips
  • An obviously damaged cutting edge

Check the handle

Look for:

  • Cracks
  • Swelling
  • Gaps
  • Loose rivets
  • Warping
  • Changes around the blade-to-handle joint

Dry it thoroughly

If the knife is still damp, carefully dry the blade and handle.

Then test its cutting performance safely on an appropriate food item.

If the knife simply seems less sharp, it may need honing or sharpening rather than replacement.

🧞 KNIFEGENIE TIP: An accidental dishwasher cycle is usually a reason to inspect the knife, not throw it away.


How to Wash Kitchen Knives Properly

Hand washing a knife doesn’t need to become a major kitchen chore.

In fact, it often takes less than a minute.

Step 1 — Don’t leave it dirty for hours

After you’ve finished using the knife, clean it reasonably soon — particularly after cutting salty or acidic foods.

Step 2 — Use warm water and mild soap

You don’t need harsh cleaners for normal kitchen use.

Step 3 — Clean with a soft sponge or cloth

Keep the sharp edge visible and facing safely away from your fingers.

Never blindly reach into cloudy or soapy sink water for a knife.

Step 4 — Rinse thoroughly

Remove the soap and food residue.

Step 5 — Dry immediately

Use a clean, soft towel and carefully dry both the blade and handle.

Step 6 — Store safely

Put the knife into appropriate storage rather than tossing it loose into a utensil drawer.

A knife block, magnetic storage system, suitable drawer organizer or blade guard can prevent the edge from repeatedly hitting other utensils.

Read: How to Store Kitchen Knives Safely guide.

HOW TO HAND WASH A KNIFE

How to wash a kitchen knife safely by hand
Wash kitchen knives with mild soap and warm water, rinse thoroughly, and dry immediately to help protect the blade, edge and handle.


7 Common Knife-Cleaning Mistakes

Even cooks who avoid the dishwasher can accidentally shorten the life of their knives.

1. Leaving the knife soaking in the sink

This increases moisture exposure and creates a serious safety hazard for anyone reaching into the water.

2. Using abrasive scrubbers

A harsh scouring pad can scratch blade finishes.

3. Leaving food on the blade

Acidic and salty residues shouldn’t sit on the steel unnecessarily.

4. Air-drying the knife

Drying the knife immediately gives you greater control over moisture and helps prevent water spots.

5. Throwing the knife into a drawer

The edge can hit other metal objects and become damaged.

6. Using the dishwasher just because the knife is stainless

Stainless steel is corrosion resistant, not indestructible.

7. Ignoring the manufacturer’s instructions

Different knives use different steels, handle materials and construction methods.

The care instructions for your specific knife should always win.


🧼 Hand Washing vs Dishwasher

Factor Hand Washing Dishwasher
Edge protection ⭐⭐⭐⭐⭐ ⭐⭐
Control over cleaning ⭐⭐⭐⭐⭐ ⭐⭐⭐
Wooden handles ✅ Suitable with careful washing ❌ Avoid
Exposure to strong detergent Low Higher
Prolonged moisture Low when dried promptly Possible
Convenience ⭐⭐⭐ ⭐⭐⭐⭐⭐
Best choice for quality knives Yes Usually no

If you want an inexpensive utility knife specifically approved for dishwasher cleaning, convenience may matter more.

For a quality chef’s knife that you want to use for many years, the extra minute spent hand washing is a very small investment.


Frequently Asked Questions

Can stainless-steel kitchen knives go in the dishwasher?

Some stainless-steel knives are rated dishwasher-safe, particularly certain models with synthetic handles. However, stainless steel can still stain or corrode under unfavorable conditions, and the edge can be damaged by contact with other objects. Check the manufacturer’s instructions and hand wash quality knives when possible.

Does putting knives in the dishwasher make them blunt?

Dishwasher use can contribute to reduced edge performance, particularly when the cutting edge repeatedly contacts utensils, racks or other hard objects. Harsh dishwasher conditions can also be less favorable for long-term knife care than gentle hand washing.

Can wooden-handled knives go in the dishwasher?

No. Wooden-handled kitchen knives should normally be hand washed. Repeated moisture and temperature changes can cause wood to swell, shrink, dry out or crack.

Why do my knives get rust spots after the dishwasher?

Prolonged moisture, food residue, salt, detergent chemistry and contact with other metals can contribute to staining or corrosion. Stainless steel resists corrosion but is not completely rust-proof.

What should I do if my knife accidentally went through the dishwasher?

Inspect the blade and handle for rust, staining, cracks, loose parts or edge damage. Dry it thoroughly. A single accidental cycle does not automatically mean the knife has been ruined.

Should knives point up or down in the dishwasher?

For a quality kitchen knife, the better solution is to avoid putting it in the dishwasher altogether. This also removes the unloading hazard created by an exposed sharp blade.

Are cheap kitchen knives okay in the dishwasher?

Possibly. Some inexpensive synthetic-handled stainless knives are specifically manufactured and labeled for dishwasher use. Follow the manufacturer’s instructions. Even then, hand washing may help preserve the cutting edge.

Is it safe to put Japanese knives in the dishwasher?

As a general care rule, quality Japanese kitchen knives should be washed by hand and dried promptly. This is particularly important for knives with wooden handles, carbon-steel components or very thin, hard cutting edges.


Overall Recommendation

Can kitchen knives go in the dishwasher?

Some can.

But for a good kitchen knife, hand washing is the better default.

The dishwasher saves you a small amount of effort, while exposing the knife to conditions that may be unnecessarily harsh on its edge, blade finish and handle.

Instead:

Wash it. Rinse it. Dry it. Store it.

That’s usually all the maintenance required after everyday food preparation.

If the manufacturer specifically labels an inexpensive synthetic-handled knife dishwasher-safe, occasional machine washing may be perfectly acceptable within those instructions.

But the better the knife — especially a quality chef’s knife, Japanese knife, carbon-steel blade or wooden-handled knife — the stronger the case for washing it by hand.

OVERALL RECOMMENDATION

Hand washing a kitchen knife compared with using a dishwasher
Hand washing is the best everyday choice for quality kitchen knives. Use a dishwasher only when the knife manufacturer specifically approves it.


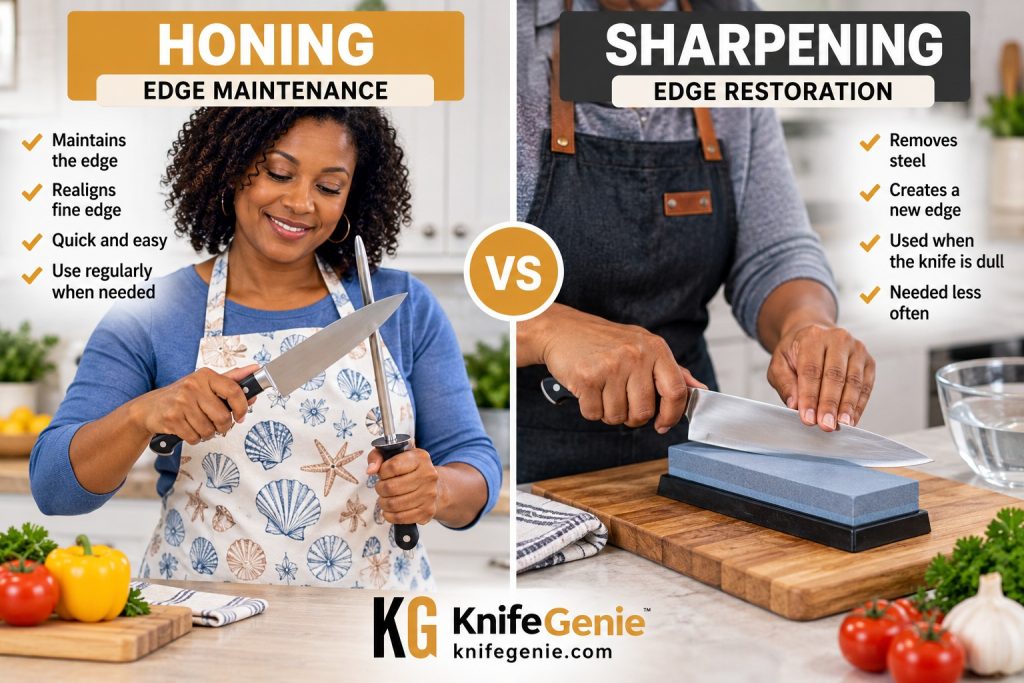
Honing vs Sharpening: What’s the Difference?

Honing vs sharpening kitchen knives showing edge maintenance and edge restoration

Honing vs sharpening kitchen knives showing the difference

If your kitchen knife isn’t cutting as cleanly as it used to, you might assume it needs sharpening.

But not necessarily.

Sometimes the edge simply needs honing.

Although the words honing and sharpening are often used interchangeably, they describe two different types of knife maintenance.

Honing primarily maintains or corrects an existing edge. Sharpening restores a worn edge by removing blade material to form a new cutting edge.

Knowing the difference between honing and sharpening can help you decide when to hone a knife and when to sharpen a knife, while avoiding unnecessary steel removal.


🔽 In This Honing vs Sharpening Guide

👉 Quick Answer
👉 Honing vs Sharpening at a Glance
👉 What Is Honing?
👉 What Is Sharpening?
👉 What Actually Happens to a Knife Edge?
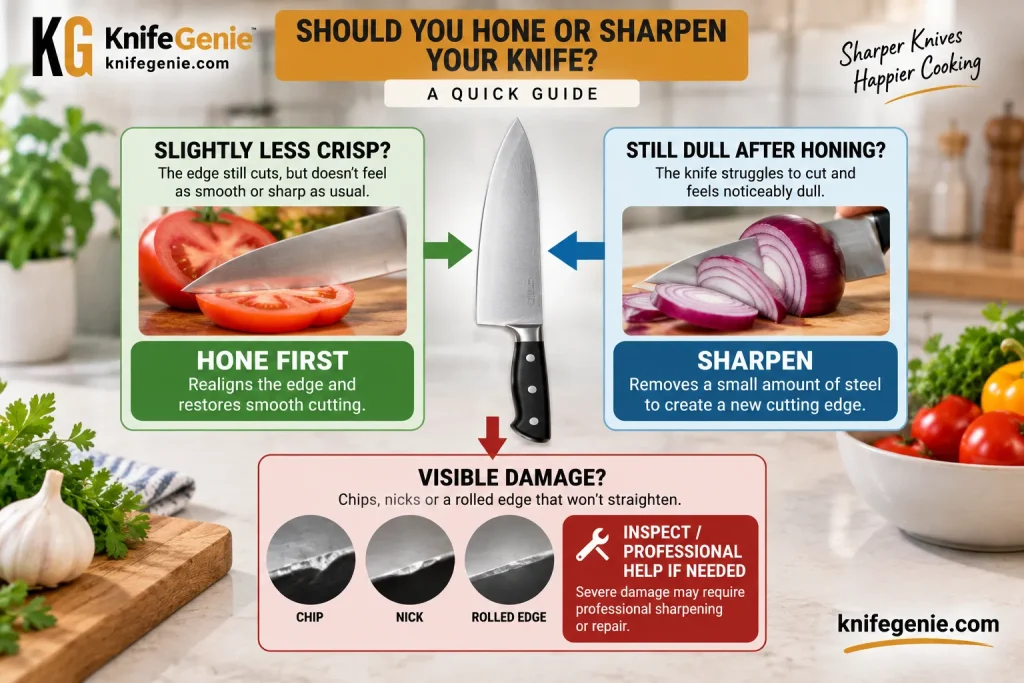
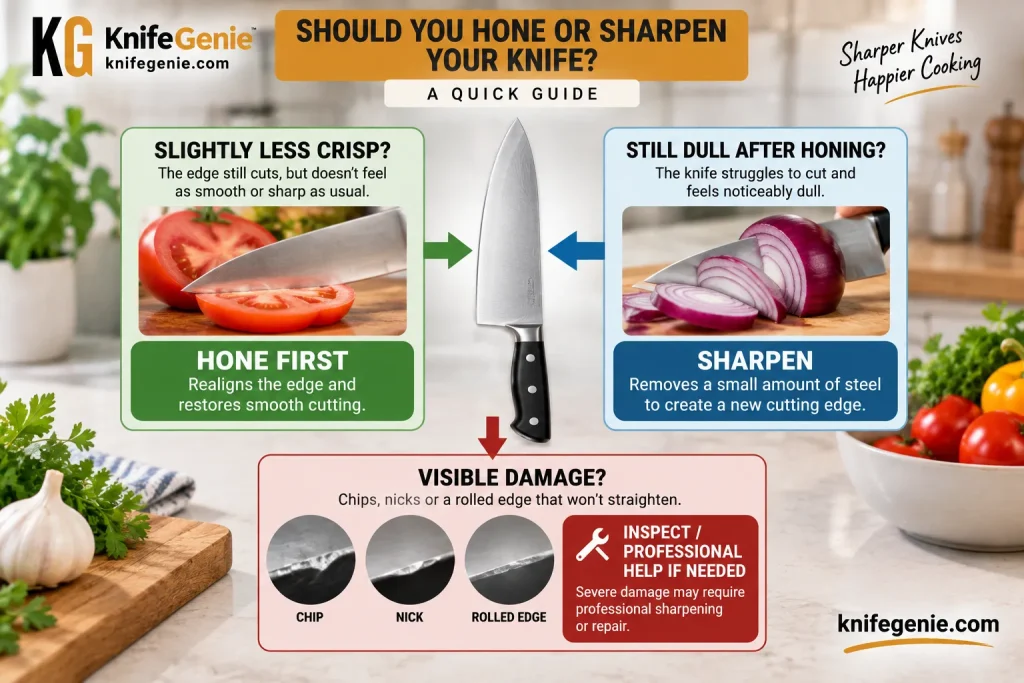
👉 How to Tell Whether You Should Hone or Sharpen
👉 How Often Should You Hone?
👉 How Often Should You Sharpen?
👉 Types of Honing Rods
👉 Common Knife Sharpening Methods
👉 Can Honing Damage a Knife?
👉 Can You Sharpen Too Often?
👉 What About Japanese Knives?
👉 Common Honing and Sharpening Mistakes
👉 Simple Knife Maintenance Routine
👉 Frequently Asked Questions
👉 Overall Recommendation


🏆 Honing vs Sharpening: The Quick Answer

Here’s the simplest way to remember the difference:

🔧 Honing = Edge Maintenance

Honing helps maintain an existing cutting edge and can correct slight deformation or misalignment at the very edge.

🪨 Sharpening = Edge Restoration

Sharpening uses an abrasive to remove steel and create a fresh cutting edge.

Think of it this way:

Knife still reasonably sharp but doesn’t feel quite as crisp?

👉 Try honing.

Honing restores the cutting performance?

👉 Keep using the knife.

Knife remains dull after appropriate honing?

👉 It probably needs sharpening.

See our Why kitchen knives become dull guide.

🧙 KnifeGenie Rule

Hone to maintain. Sharpen to restore.

That’s the basic difference.

There are some important exceptions, however—particularly when ceramic and diamond honing rods enter the discussion.


HONING VS SHARPENING – Best knife sharpeners for beginners


📊 Honing vs Sharpening at a Glance

Feature 🔧 Honing 🪨 Sharpening
Main purpose Maintain the edge Restore the edge
Removes steel? Minimal or none with many traditional steels* Yes
Creates a new edge? Generally no Yes
Used for Slight loss of cutting performance A genuinely dull or damaged edge
Typical tools Honing steel, ceramic rod Whetstone, guided sharpener, abrasive system
Frequency Relatively often when appropriate Much less frequently
Skill required Low to moderate Depends heavily on method
Best description Maintenance Restoration

*Important: Not every tool called a “honing rod” behaves the same way. Ceramic and especially diamond-coated rods are abrasive and can remove some steel.

That distinction is important because the common claim that “honing never removes metal” is too absolute.


🔧 What Is Honing?

Honing is primarily a maintenance process.

As a knife is used, the extremely thin area at its cutting edge experiences repeated contact with food and the cutting board.

The knife may gradually feel less crisp even though the edge isn’t completely worn away.

A suitable honing rod can help maintain or improve that edge before full sharpening becomes necessary.

Traditional honing steels are particularly associated with maintaining Western-style kitchen knives.

What Honing Can Do

Depending on the knife and honing tool, honing can:

✔ Maintain cutting performance
✔ Correct minor edge deformation
✔ Help an edge feel crisp again
✔ Extend the useful interval between full sharpenings
✔ Reduce unnecessary sharpening

But honing has limits.

It cannot indefinitely restore an edge that has become genuinely blunt, rounded, chipped, or badly damaged.

At that point, you need to remove material and recreate the cutting edge.

That’s sharpening.

Read: Serrated vs plain edge kitchen knives


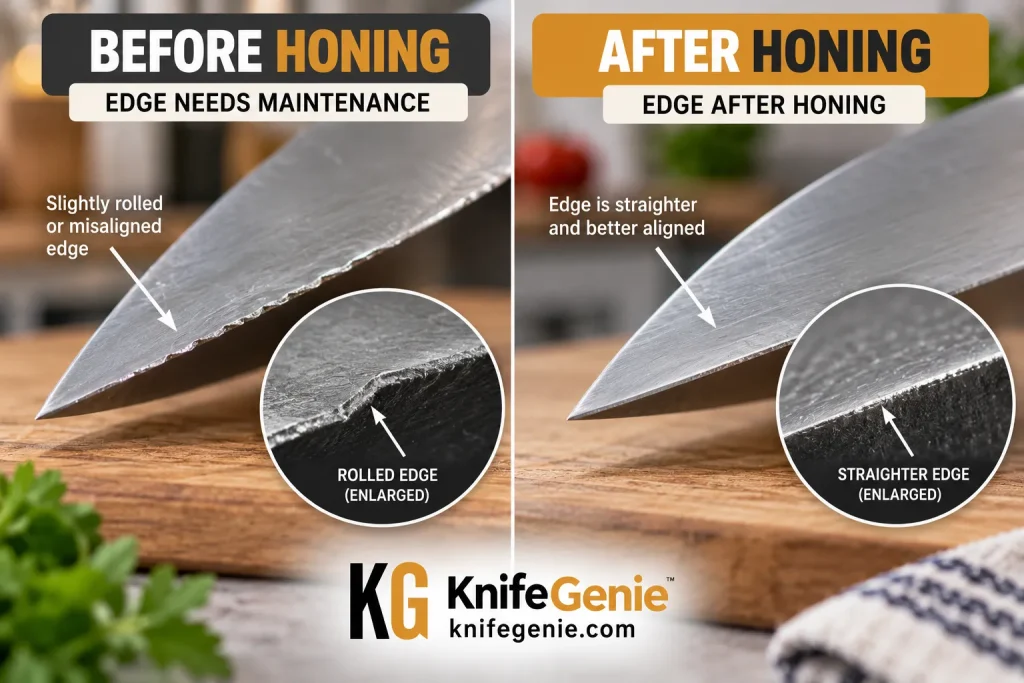
WHAT HONING DOES

What honing does to a kitchen knife edge
Honing can help maintain or correct a slightly deformed cutting edge without performing a full sharpening.

For many home cooks, knife honing is one of the simplest forms of routine kitchen knife maintenance, particularly when using a traditional Western chef’s knife.


🪨 What Is Sharpening?

Sharpening goes further.

Instead of simply maintaining the existing edge, sharpening uses an abrasive surface to remove a controlled amount of steel.

Material is removed from the bevels until they meet to form a fresh cutting edge.

Depending on the method, sharpening may be performed using:

🪨 Whetstones
🔧 Guided sharpening systems
⚙️ Manual pull-through sharpeners
⚡ Electric sharpeners
👨‍🔧 Professional sharpening equipment

The principle remains essentially the same:

Steel is removed to restore the cutting geometry.

That’s why sharpening works when honing no longer does.

It is also why you shouldn’t sharpen a knife unnecessarily.


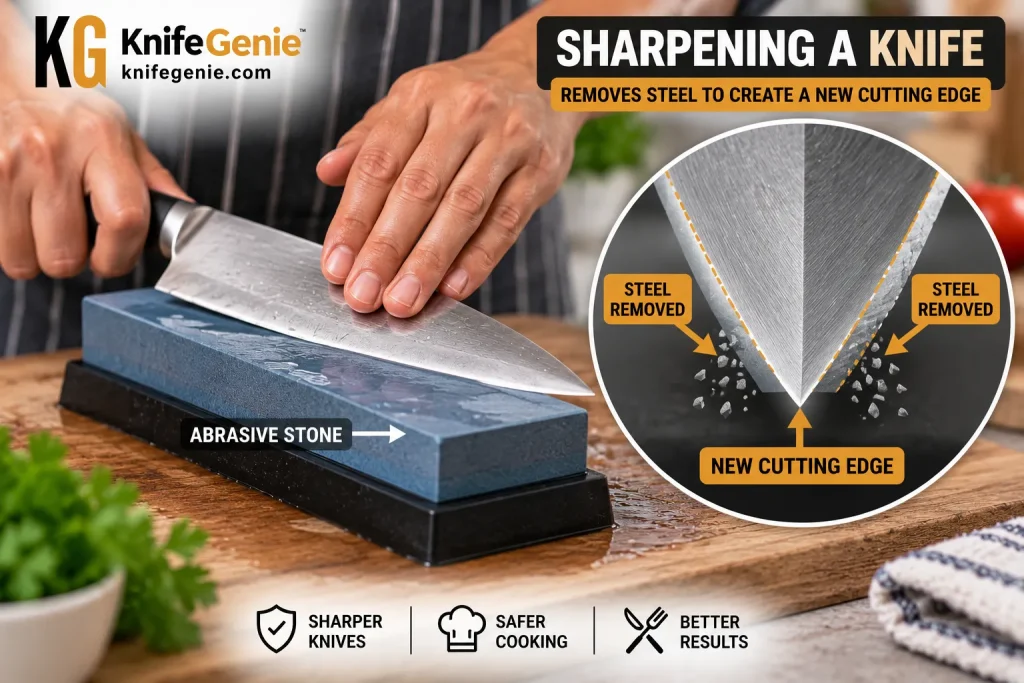
HOW SHARPENING WORKS

How sharpening restores a dull kitchen knife edge
Sharpening removes a controlled amount of blade material to recreate a sharp cutting edge.


🔬 What Actually Happens to a Knife Edge?

A knife edge looks substantial to the naked eye.

At its very apex, however, it becomes extremely thin.

Every time you slice an onion, chop a carrot or portion boneless meat, that fine edge experiences stress.

Over time, several things can happen.

The edge may:

🔹 Become slightly deformed
🔹 Develop microscopic wear
🔹 Gradually round over
🔹 Develop small chips
🔹 Lose its original geometry

This explains why “my knife is dull” doesn’t always describe exactly the same problem.

A knife experiencing relatively minor edge deterioration may respond well to honing.

A heavily worn edge needs sharpening.

A badly chipped or damaged blade may require more substantial sharpening or professional repair.

Think Maintenance Before Restoration

If your knife is still reasonably sharp but has lost some of its crisp cutting feel, appropriate honing is often the logical first step.

If honing makes little or no difference, sharpening becomes the next step.


🧐 How to Tell Whether You Should Hone or Sharpen

You don’t need a microscope.

Pay attention to how the knife cuts.

🔧 Try Honing First If:

✔ The knife was sharp fairly recently
✔ Cutting performance has only declined slightly
✔ The edge isn’t visibly damaged
✔ The knife feels less crisp rather than completely blunt
✔ You use a knife designed to respond well to honing

After honing, carefully test the knife on normal food.

A ripe tomato is particularly revealing.

If the knife can start the cut cleanly without excessive pressure, the edge may simply have needed maintenance.

🪨 Sharpen If:

✘ Honing doesn’t restore satisfactory performance
✘ The knife slides over tomato skin rather than biting into it
✘ Onions require noticeably more pressure
✘ The edge has become rounded or genuinely dull
✘ Minor edge damage needs to be removed
✘ It has been a long time since the knife received proper sharpening

⚠️ Don’t Use Your Finger as a Sharpness Test

Avoid dragging a fingertip along the cutting edge.

Use food or another safe testing method instead.


HONE OR SHARPEN?

When to hone vs sharpen a kitchen knife

If a knife has only lost a little cutting performance, try honing first. If honing doesn’t restore the edge, it may be time to sharpen.


🔁 How Often Should You Hone?

There isn’t one schedule that works for every kitchen knife.

How frequently a knife benefits from honing depends on:

🔪 Blade steel
📐 Edge geometry
🍳 How frequently you cook
🥕 What you cut
🪵 Your cutting-board material
✋ Cutting technique
🔧 Type of honing tool

For a conventional Western chef’s knife that responds well to a honing steel, honing can be performed relatively regularly as cutting performance begins to decline.

But don’t turn honing into a ritual you perform automatically every time you pick up a knife.

Better Rule

Hone when the knife needs edge maintenance.

If the knife is already performing beautifully, there is little reason to keep running it over a rod.


🗓️ How Often Should You Sharpen?

Sharpening should generally happen much less frequently than routine edge maintenance.

For many home cooks, sharpening roughly once or twice a year can be a reasonable starting point, but that is not a rule.

Some knives may need it sooner.

Others may go considerably longer.

A cook preparing meals several times every day will wear an edge differently from someone using a chef’s knife twice a week.

Instead of sharpening according to a rigid calendar:

See: How Often Should You Sharpen guide.

Ask These Questions

Has cutting performance declined?

Does appropriate honing restore it?

YES → Keep using the knife.

NO → Consider sharpening.

This avoids grinding away steel simply because six months have passed since the last sharpening.


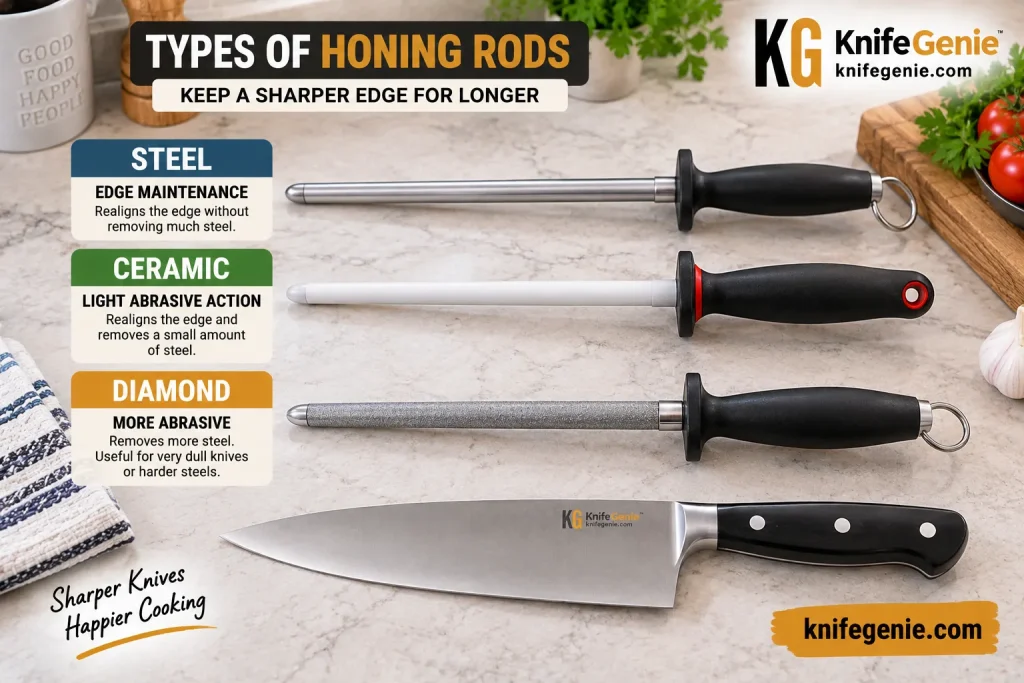
🪄 Types of Honing Rods

This is where the honing-versus-sharpening discussion gets more interesting.

Not every rod works the same way.

🔩 Traditional Steel Honing Rod

A conventional steel rod is primarily an edge-maintenance tool.

It is particularly familiar to owners of traditional Western kitchen knives.

⚪ Ceramic Honing Rod

Ceramic rods are abrasive.

They can provide relatively gentle edge refinement while removing a small amount of material.

That means the boundary between honing and sharpening starts becoming less clear.

💎 Diamond-Coated Rod

Diamond-coated rods are considerably more abrasive.

They can remove steel rather than merely maintaining or realigning an edge.

Consequently, don’t assume every rod-shaped tool should be used as frequently as a traditional honing steel.

🧙 KnifeGenie Tip

Choose the maintenance tool for the knife—not simply the tool that came with your old knife block.


HONING ROD TYPES

Steel ceramic and diamond honing rods compared
Steel, ceramic and diamond rods do not affect a knife edge in exactly the same way.


🪨 Common Knife Sharpening Methods

Once your knife genuinely needs sharpening, you have several choices.

🪨 Whetstone

A whetstone gives the user substantial control over the sharpening process.

Advantages

✔ Excellent control
✔ Works with many knives
✔ Different grits allow sharpening and refinement
✔ Can produce excellent results

Challenges

✘ Requires technique
✘ Maintaining a consistent angle takes practice
✘ Slower for beginners

A whetstone—also commonly called a sharpening stone—removes steel gradually as you work along the knife’s edge.

🎯 Guided Sharpener

Guided systems help control the sharpening angle.

Maintaining the correct knife sharpening angle is important because changing the angle too much can alter the original edge geometry.

Advantages

✔ Easier angle consistency
✔ Beginner friendly
✔ Repeatable results

Challenges

✘ Compatibility varies
✘ Some systems are relatively expensive
✘ Not every knife geometry fits every system

⚙️ Pull-Through Sharpener

Pull-through sharpeners prioritize convenience.

Advantages

✔ Fast
✔ Easy to understand
✔ Convenient

Challenges

✘ Less control
✘ Fixed angles may not suit every knife
✘ Aggressive models can remove more steel than necessary

👨‍🔧 Professional Sharpening

Professional sharpening makes sense when:

✔ You own an expensive knife and aren’t confident sharpening it
✔ The edge is chipped or damaged
✔ The knife has unusual geometry
✔ You simply don’t want to learn sharpening

But choose the sharpener carefully.

“Professional” describes a service—not automatically the quality of the work.

Work Sharp — Honing vs Sharpening guidance (Professional knife sharpeners)


⚠️ Can Honing Damage a Knife?

Yes, particularly when technique or equipment is inappropriate.

Common problems include:

❌ Using excessive pressure
❌ Holding the knife at an unsuitable angle
❌ Striking the blade rapidly against the rod
❌ Using an aggressive rod unnecessarily
❌ Honing a knife the manufacturer doesn’t recommend honing this way

You don’t need to imitate the lightning-fast honing technique sometimes seen on television.

For a home cook, slow and controlled beats fast and dramatic.


⚠️ Can You Sharpen a Knife Too Often?

Yes.

See our guide on how often should you sharpen kitchen knives.

Sharpening works by removing steel.

A tiny amount of material must disappear for a new edge to be created.

That’s perfectly normal.

But sharpening unnecessarily means removing steel that didn’t need to be removed.

The Goal Isn’t to Avoid Sharpening

Kitchen knives are tools.

Eventually, an actively used knife will need sharpening.

The goal is simply to sharpen when necessary rather than excessively.

🧙 KnifeGenie Rule

Don’t sharpen because the calendar says so. Sharpen because the edge says so. 

Read: Sharpening a boning knife…


🇯🇵 What About Japanese Kitchen Knives?

This deserves special attention.

Don’t assume the honing routine you use for a traditional German chef’s knife automatically applies to every Japanese knife.

Japanese kitchen knives can differ considerably in:

🧱 Steel hardness
📐 Edge angle
🔪 Blade geometry
⚖️ Blade thickness
↔️ Bevel configuration

Some harder, thinner edges may not respond to a traditional grooved honing steel in the same way as a tougher Western chef’s knife.

Single-bevel knives require additional consideration.

Before Honing or Sharpening an Expensive Knife

Check the knife manufacturer’s maintenance recommendations.

You don’t want to spend hundreds of dollars on a precision kitchen knife and then force its carefully designed edge through an inappropriate sharpener.

Japanese knife honing deserves extra care because harder steels and thinner edge geometries may not be suitable for the same honing technique used on softer Western knives.


GERMAN VS JAPANESE EDGE MAINTENANCE

German and Japanese knife honing and sharpening comparison
Different steels and edge geometries can require different maintenance approaches, so check the manufacturer’s recommendations.

See our German and Japanese kitchen knives guide.


Common Honing and Sharpening Mistakes

❌ Mistake #1: Assuming Honing and Sharpening Are the Same

They aren’t.

Knowing the difference prevents unnecessary sharpening.

❌ Mistake #2: Sharpening Every Time the Knife Feels Slightly Dull

Try appropriate honing first when the edge only seems slightly less crisp.

❌ Mistake #3: Assuming Honing Never Removes Steel

Traditional honing steels may remove very little material, but ceramic and diamond rods can be abrasive.

❌ Mistake #4: Using Too Much Pressure

More pressure doesn’t automatically produce a better edge.

Control matters more.

❌ Mistake #5: Guessing the Sharpening Angle

Don’t automatically use the same angle for every knife.

❌ Mistake #6: Using One Sharpener for Every Knife

An inexpensive Western chef’s knife, hard Japanese gyuto and serrated bread knife should not automatically receive identical treatment.

❌ Mistake #7: Ignoring Your Cutting Board

A freshly sharpened knife can lose performance faster when repeatedly used on unsuitable hard surfaces.

❌ Mistake #8: Expecting Honing to Repair Damage

A honing rod isn’t a magic wand.

Chips and heavily worn edges require sharpening or repair.


🔄 A Simple Knife Maintenance Routine

For most home cooks, knife maintenance doesn’t need to be complicated.

Step 1 — Use the Knife Normally

Pay attention to cutting performance.

Step 2 — Notice the Change

Does an onion require more pressure?

Does tomato skin resist the edge?

Does the knife simply feel less crisp?

Step 3 — Inspect the Edge

Look for obvious chips or damage.

Step 4 — Hone When Appropriate

If the knife and manufacturer support honing, use the appropriate tool and controlled technique.

Step 5 — Test Again

Has normal cutting performance returned?

Yes?

👉 Keep cooking.

No?

👉 The knife may need sharpening.

Step 6 — Sharpen Appropriately

Use a method suited to the knife and maintain its intended edge geometry.

Step 7 — Protect the Restored Edge

Use a knife-friendly cutting board, appropriate storage and sensible cutting technique.

That simple routine can prevent a lot of unnecessary sharpening.

See our How to Store Kitchen Knives Safely guide.


KNIFE MAINTENANCE ROUTINE

Kitchen knife honing and sharpening maintenance routine
A simple maintenance routine helps determine whether your knife needs honing or actual sharpening.


🧠 Research & Editorial Note

KnifeGenie’s guidance in this article is based on research into knife-edge maintenance principles, manufacturer guidance, and established sharpening practices rather than personal hands-on testing of every honing or sharpening product or method mentioned.

No specific honing rod, whetstone or sharpening system is being presented here as having been personally tested unless that is explicitly stated.

The purpose of this guide is to explain how honing and sharpening differ, when each process is appropriate, and what home cooks should consider before choosing a maintenance method.

Individual knives can require different care depending on their steel, hardness, bevel geometry, and manufacturer’s recommendations.


Frequently Asked Questions

Is honing the same as sharpening?

No.

Honing primarily maintains an existing edge, while sharpening uses an abrasive to remove material and restore the cutting edge.

However, abrasive ceramic and diamond rods blur the distinction because they can remove some steel while refining the edge.

Should I hone or sharpen my knife first?

If your knife has simply lost some of its crisp cutting performance and is suitable for honing, try honing first.

If performance isn’t restored, the edge may need sharpening.

Does a honing steel actually sharpen a knife?

A traditional honing steel is primarily an edge-maintenance tool rather than a replacement for actual sharpening.

The terminology becomes confusing because some rods marketed for honing are abrasive. Ceramic and diamond-coated rods can remove material.

How often should I hone my kitchen knife?

There is no universal schedule.

Hone when an appropriate knife begins showing a modest decline in cutting performance rather than automatically honing before every use.

How often should I sharpen my kitchen knives?

For many home cooks, once or twice a year can be a useful starting point, but usage matters more than the calendar.

If honing no longer restores satisfactory performance, it’s probably time to sharpen.

Can honing replace sharpening?

No.

Honing can help maintain an edge and potentially extend the interval between sharpenings, but eventually normal wear changes the edge enough that sharpening becomes necessary.

Can you hone a Japanese knife?

Sometimes, but don’t assume every Japanese knife should be maintained using a conventional grooved steel.

Steel hardness, edge geometry and manufacturer recommendations matter. Check the instructions for your particular knife.

Does sharpening remove metal?

Yes.

Sharpening uses abrasive material to remove a controlled amount of steel so the bevels meet at a fresh cutting edge.

Can you sharpen a knife too much?

Yes.

Because sharpening removes steel, unnecessary sharpening gradually removes more blade material than required.

Is a ceramic rod for honing or sharpening?

It can perform aspects of both.

Ceramic is abrasive, so a ceramic rod can refine an edge while also removing a small amount of material. That makes it different from a conventional smooth or lightly grooved honing steel.


🏆 Overall Recommendation

The difference between honing and sharpening becomes much easier once you stop thinking of both processes as ways to “make a knife sharp.”

Think instead:

🔧 HONING = MAINTAIN

Use appropriate honing to help maintain an edge that still has useful sharpness.

🪨 SHARPENING = RESTORE

Sharpen when the cutting edge has genuinely worn enough that maintenance no longer restores satisfactory performance.

For the average home cook, the simplest sequence is:

Use → Notice declining performance → Hone if appropriate → Test → Sharpen when honing no longer works.

You don’t need to sharpen a good kitchen knife every time it feels slightly different.

And you don’t need to endlessly hone an edge that has genuinely become dull.

Learn to recognize what the knife is telling you.

🧙 KnifeGenie Final Verdict

If honing restores the edge, keep cooking.

If honing doesn’t restore the edge, it’s time to sharpen.

Knowing that difference is one of the simplest ways to take better care of your kitchen knives.


OVERALL RECOMMENDATION

Honing vs sharpening overall kitchen knife recommendation
Hone to maintain a suitable knife’s edge; sharpen when the edge is genuinely dull and honing no longer restores performance.