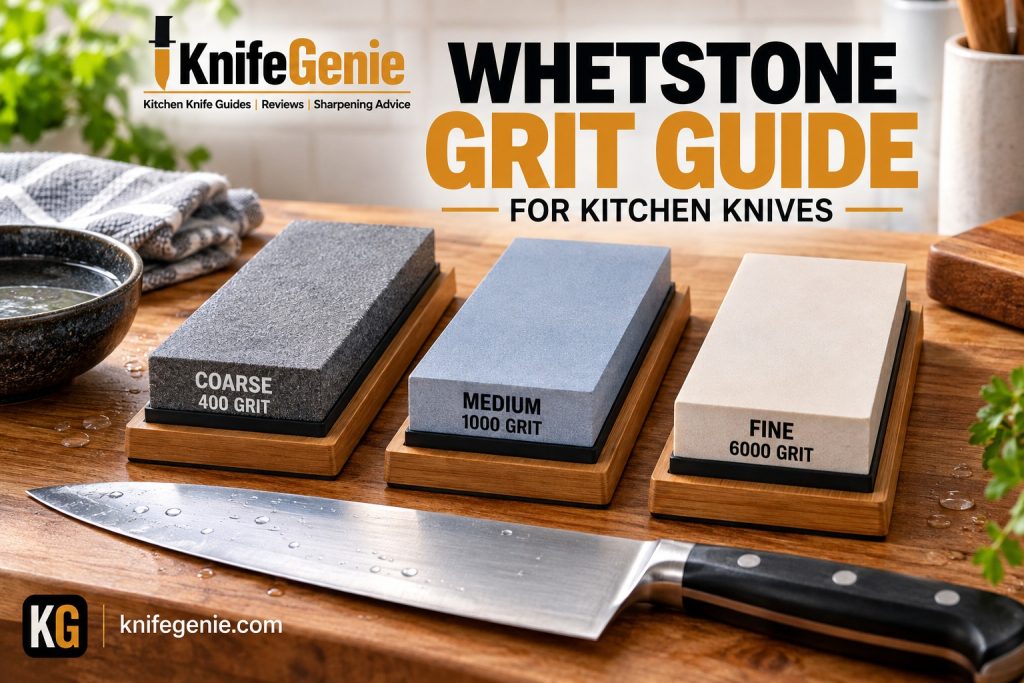
Choosing a whetstone can feel confusing when you see numbers such as 400, 1000, 3000, and 6000 printed on the packaging. This guide will show you, how to choose the right whetstone grit for kitchen knives.
Is a higher number always better? Do you need several stones? And what grit should you use when your chef knife is simply getting dull?
The good news is that most home cooks do not need a complicated collection of sharpening stones. The right starting point depends mainly on the condition of the knife and the amount of work the edge needs.
A coarse stone removes metal relatively quickly. A medium stone is useful for general sharpening. A fine stone refines an edge that has already been sharpened.
In this guide, we’ll explain what whetstone grit numbers mean, how to choose a practical setup, and how to care for your stones so they continue to work effectively.
🧙 KnifeGenie editorial note: This guide is based on published sharpening principles and manufacturer guidance. It does not claim hands-on testing of any particular sharpening stone.
🔽 Jump to What You Need
👉 Quick Answer
👉 What Whetstone Grit Means
👉 Coarse, Medium, and Fine Grits
👉 Choose a Grit for Your Knife
👉 One Stone or Several?
👉 Water, Oil, and Diamond Stones
👉 Clean and Flatten Your Stones
👉 Frequently Asked Questions
👉 Final Verdict
🏆 Quick Answer: What Whetstone Grit Should You Choose?
For many home cooks sharpening an ordinarily dull kitchen knife, a medium water stone around 1000 grit is a practical starting point.
Choose your stone according to the job:
- Approximately 220–400 grit: For significant dullness, minor edge repair, or reshaping when appropriate. These stones remove metal quickly.
- Approximately 800–1200 grit: For general sharpening and restoring an ordinarily dull edge.
- Approximately 2000–3000 grit: For refining an edge after medium-grit sharpening.
- Approximately 4000–6000 grit: For finer finishing when you want a more polished edge.
- 8000 grit and above: For specialized polishing; generally unnecessary for ordinary home cooking.
These ranges are approximate, not universal standards. Different manufacturers and grit-rating systems may describe abrasives differently.
🧙 KnifeGenie Quick Verdict: If you are buying your first stone, begin with a suitable medium-grit stone and learn to create a consistent, clean edge. Add other grits when you have a clear reason to use them.
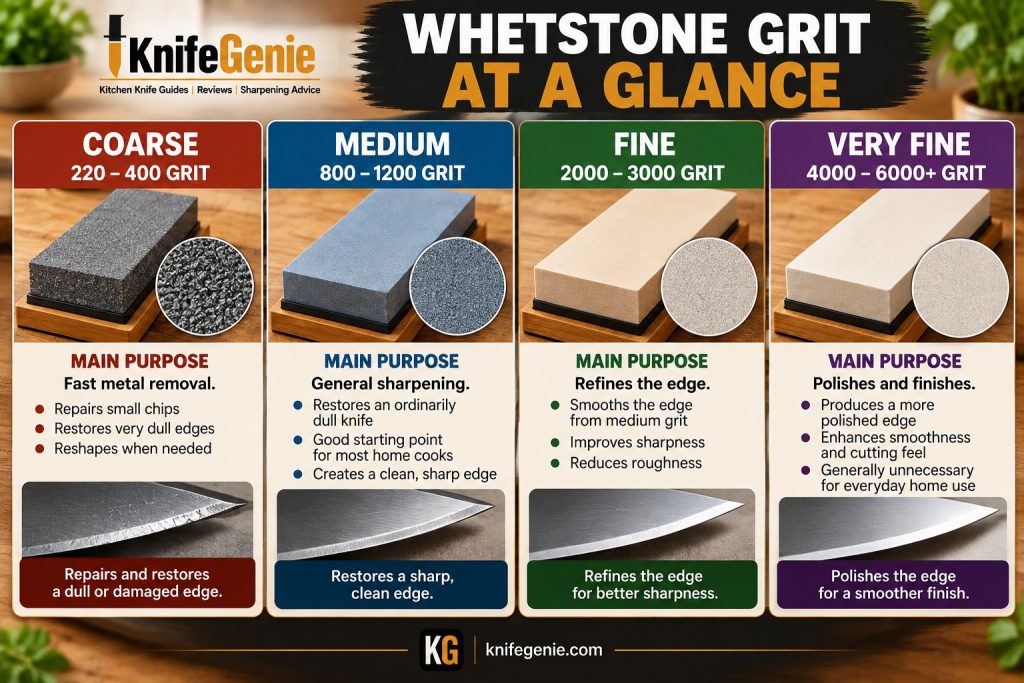
WHETSTONE GRIT OVERVIEW
🪨 What Does Whetstone Grit for Kitchen Knives Mean?
Whetstone grit describes the size of the abrasive particles used to grind or refine a knife edge.
In general:
- Lower grit numbers indicate a coarser abrasive.
- Higher grit numbers indicate a finer abrasive.
A coarse abrasive usually removes metal faster and leaves a rougher scratch pattern. A finer abrasive removes metal more slowly and produces a finer surface finish.
Think of the process as working from restoring the edge toward refining the edge.
Why Grit Numbers Are Only a Starting Point
A grit number is useful, but it does not tell you everything about how a stone will behave.
Cutting speed and feel can also depend on:
- The abrasive material.
- How the abrasive is bonded.
- The hardness and condition of the stone.
- The knife’s steel and edge geometry.
- The amount of pressure used.
- Whether the stone is clean and flat.
Different manufacturers may use different grit scales or testing methods. A “1000-grit” stone from one brand will not necessarily feel or cut exactly like a 1000-grit stone from another.
🧙 KnifeGenie Tip: Use the grit number to understand a stone’s general purpose, then follow the manufacturer’s recommendations for that specific stone.
⚔️ Whetstone Grit Comparison
| Approximate grit | General category | Main purpose | Typical kitchen knife use |
|---|---|---|---|
| 220–400 | Coarse | Fast metal removal | Repairing small chips, reshaping, or restoring a very dull edge |
| 800–1200 | Medium | General sharpening | Restoring an ordinarily dull kitchen knife |
| 2000–3000 | Medium-fine / fine | Refinement | Smoothing the edge after general sharpening |
| 4000–6000 | Fine | Fine finishing | Producing a more refined edge |
| 8000+ | Very fine | Specialized polishing | Highly refined finishes for specific preferences or tools |
The numbers are broad guides. Stone performance varies by product, and not every kitchen knife needs every stage.
🔨 Coarse Grit: Approximately 220–400
A coarse stone is useful when a knife needs more than ordinary sharpening.
You might consider one when:
- The edge has small chips that need to be removed.
- The knife is extremely dull.
- The bevel needs deliberate reshaping.
- A medium stone is making very little progress.
Because coarse stones remove steel quickly, they also make it easier to remove more material than intended.
For a valuable knife, a large chip, a broken tip, or an edge with unfamiliar geometry, consider professional sharpening or manufacturer guidance.
⚠️ Beginner caution: Do not reach for a coarse stone simply because you want to sharpen faster. Start with the least aggressive stone that can do the job reasonably well.
🔪 Medium Grit: Approximately 800–1200
A medium stone is the most useful starting point for many home cooks.
Around 1000 grit is commonly chosen for restoring an ordinarily dull kitchen knife because it provides a balance between reasonable metal removal and a practical working edge.
A properly sharpened and deburred knife can perform everyday kitchen tasks well with a medium-grit finish.
You may not need another stone immediately.
✨ Fine Grit: Approximately 2000–6000
A finer stone can refine an edge after it has been established on a medium stone.
You might use one to:
- Smooth the scratch pattern left by the previous stone.
- Produce a more refined edge.
- Experiment with a cutting feel you prefer.
- Follow a knife or stone manufacturer’s instructions.
A fine stone is not a substitute for proper sharpening on an appropriate starting grit. If the medium stone has not reached the cutting edge, moving to a finer stone will not fix that underlying problem efficiently.
💎 Very Fine Grit: 8000 and Above
Very fine stones can produce highly refined finishes, but they are not essential for most everyday kitchen knives.
A more polished edge is not automatically better for every ingredient or every cook. Cutting performance also depends on edge geometry, steel, deburring, and how the knife is used.
For most beginners, learning good technique on a suitable medium stone is a better first priority than buying the highest grit available.
🎯 How to Choose a Grit for Your Knife
The easiest way to choose is to start with the edge’s condition.
1. The Knife Is Slightly Dull
If the knife still cuts reasonably well but no longer feels as crisp, a suitable medium or medium-fine stone may be enough.
Before removing metal, consider whether the knife is compatible with a honing rod and whether appropriate honing might restore its cutting performance.
Our guide to Honing vs Sharpening explains the difference between routine edge maintenance and removing metal to restore an edge.
2. The Knife Is Ordinarily Dull
If everyday foods require noticeably more pressure and suitable honing no longer helps, begin with a medium stone around 800–1200 grit.
Work carefully and check your progress. Your goal is to restore the cutting edge, then remove the burr.
For the complete technique, see How to Sharpen a Chef Knife With a Whetstone.
3. The Knife Is Extremely Dull
A coarse stone may save time when a knife is badly worn, but it requires control.
If you are new to sharpening, first determine whether the knife really needs aggressive metal removal. A slow medium-grit session may be a safer learning exercise.
If the bevel is severely uneven or the knife has substantial damage, professional help can prevent unnecessary loss of steel.
4. The Edge Has Small Chips
A coarse stone can sometimes remove small chips by reshaping the edge until the damaged area is gone.
However, the deeper the chip, the more metal may need to be removed across the edge. Large chips, broken tips, and expensive or specialty knives are better assessed by a professional or the manufacturer.
5. The Knife Is Already Sharp but You Want a Finer Finish
A 2000–3000 grit stone or finer finishing stone may be useful after the edge has been properly sharpened.
Use light, controlled strokes and pay attention to burr removal. A finer finish will not compensate for an edge that has not been formed correctly.
WHETSTONE GRIT DECISION GUIDE
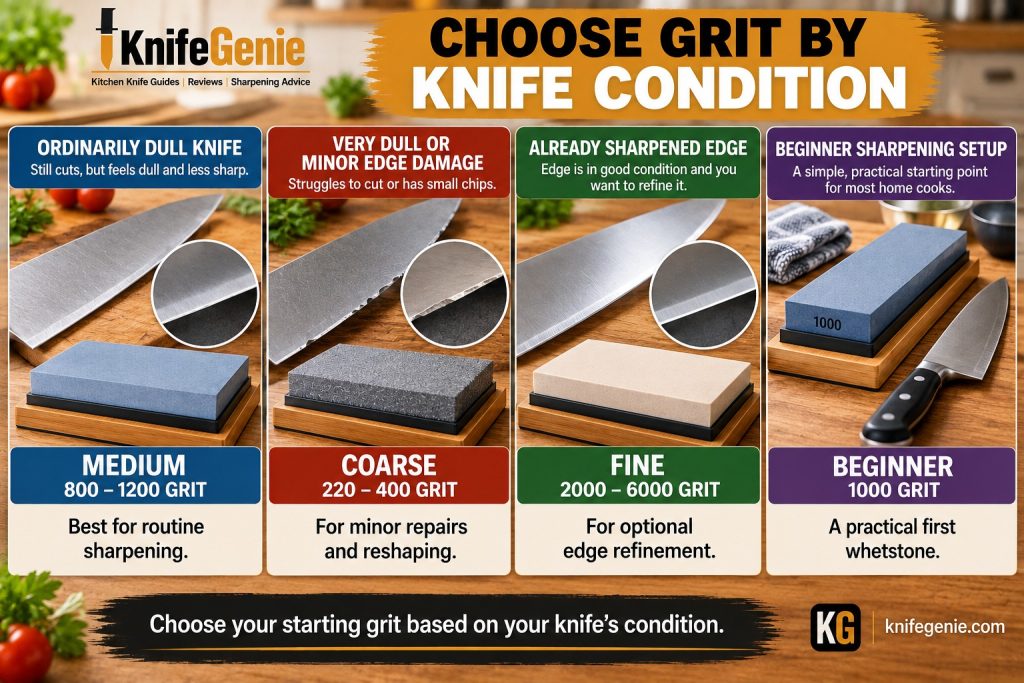
🧰 Do You Need One Whetstone or Several?
A Simple One-Stone Setup
In selecting a whetstone grit for kitchen knives, a single medium stone around 1000 grit can be enough for many home cooks.
It can restore an ordinarily dull edge and produce a useful working finish when the knife is properly sharpened and deburred.
A single stone also lets you concentrate on the most important skills:
- Holding a consistent bevel angle.
- Sharpening the entire edge.
- Recognizing a small burr.
- Removing the burr.
- Testing the finished knife safely.
A Practical Two-Stone Setup
A common two-stone approach combines:
- A medium stone, around 800–1200 grit, for general sharpening.
- A finer stone, around 2000–6000 grit, for additional refinement.
For example, a 1000/3000 combination can be a practical setup for someone who wants a medium working edge and an optional refinement stage.
A 1000/6000 combination can also be useful, although the finer side is optional for many kitchen tasks.
When a Coarse Stone Makes Sense
A coarse stone becomes more useful when you regularly repair minor edge damage or restore very dull knives.
It does not have to be the first stone every beginner buys.
| Your situation | Practical starting setup |
|---|---|
| You want to learn basic sharpening | One medium stone around 1000 grit |
| You want a more refined finish | Medium stone plus a suitable finer stone |
| You regularly restore badly dull edges | Coarse stone plus a medium stone |
| You own a valuable or specialty knife | Follow manufacturer guidance or consult a professional |
For other sharpening tools and their tradeoffs, read Best Knife Sharpeners for Beginners.
🔄 How to Progress From One Grit to Another
When you use more than one stone, the normal progression is from coarser to finer:
COARSE, IF NEEDED → MEDIUM → FINE, IF DESIRED
Each stage has a job.
- Start with a suitable grit. Choose a stone that can address the edge’s condition without unnecessary metal removal.
- Establish the edge. Maintain the intended bevel angle and work the full cutting edge.
- Check your progress. A small, continuous burr can indicate that you have reached the edge along its length.
- Move finer if needed. Use the next stone to refine the edge rather than starting the process over with heavy pressure.
- Finish and deburr. Use appropriate light strokes and inspect the edge carefully.
- Test safely. Try a controlled paper cut or an ordinary food-preparation task.
Clean the knife, your hands, and the work area between stones. Coarse abrasive carried onto a finer stone can leave unwanted scratches.
Avoid touching or moving a finger along the cutting edge to test sharpness.
🧙 KnifeGenie Tip: Moving to the next grit too early is a common source of frustration. Make sure the current stone has done its job first.
💧 Water Stones, Oil Stones, and Diamond Plates
Grit is important, but the type of sharpening surface also affects preparation and maintenance.
Water Stones
Water stones use water according to their manufacturer’s instructions.
Some require soaking; others are designed for quick use with water applied to the surface. Do not assume that every water stone should remain submerged.
Many water stones gradually wear unevenly and need periodic flattening.
For example, Shapton’s care guidance describes product-specific preparation and warns against prolonged soaking and rapid drying for its stones.
Oil Stones
Oil stones use the lubricant specified for that particular stone. Oil helps carry away metal and abrasive particles during sharpening.
After use, wipe away residue as directed by the manufacturer. Some oil stones may need more thorough cleaning or flattening, but the appropriate method depends on the material and product.
Do not assume a stone designed for oil can be treated exactly like a water stone.
Diamond Plates
Diamond sharpening plates generally have abrasive diamond particles bonded to a firm backing.
They do not wear and dish in the same way as a conventional water stone, although the abrasive surface can wear over time.
Follow the manufacturer’s directions for lubrication, cleaning, and pressure. Do not routinely flatten a diamond sharpening plate. Confirm compatibility before using any diamond plate to flatten a water stone; a diamond sharpening plate and a dedicated flattening plate are not automatically interchangeable.
| Sharpening surface | Typical lubricant | Flatness and care |
|---|---|---|
| Water stone | Water, as specified | Often needs periodic flatness checks and flattening |
| Oil stone | Manufacturer-specified oil | Clean and maintain according to the stone’s instructions |
| Diamond plate | Product-dependent | Clean as directed; generally does not need flattening |
🧽 How to Clean and Flatten Your Whetstone
Grit selection matters, but even the right stone can be frustrating to use if its surface is clogged or uneven.
This section gives you the essentials. For the full step-by-step lesson, read How to Clean and Flatten a Whetstone.
Remove Sharpening Residue
Sharpening can leave a mixture of metal particles, abrasive material, and lubricant on the stone.
For a water stone, follow the manufacturer’s instructions for rinsing and cleaning. A soft brush or sponge may be suitable for some products.
For an oil stone, wipe away used oil and residue as directed. For diamond plates, use the cleaning method recommended by the manufacturer.
Avoid detergents, harsh chemicals, or abrasive cleaners unless the product instructions specifically allow them.
Check the Stone for Dishing
A water stone can gradually wear into a shallow hollow, often called dishing.
To check:
- Clean the stone’s surface.
- Place a suitable straightedge across it in several directions.
- Look for visible gaps between the straightedge and the stone.
- If appropriate for your stone, draw a light pencil grid across the surface as a guide during flattening.
A stone does not need to look dramatically hollow before its uneven surface affects sharpening.
Choose an Appropriate Flattening Plate
Use a flattening plate or lapping system recommended for your stone’s material and grit.
Check the manufacturer’s instructions for:
- Compatible stone types.
- The range of grits the plate can handle.
- Required water or other lubrication.
- The surface finish needed for finer stones.
A very coarse flattening surface may leave a fine stone rougher than intended. Some systems use different finishing powders or stages for different stones. Shapton’s lapping guidance illustrates why the flattening method should match the stone. SHAPTON Co., Ltd.
Correct Dishing Carefully
If the manufacturer approves the method:
- Prepare the stone and flattening tool as directed.
- Secure the flattening tool on a stable surface.
- Draw a light pencil grid across the stone.
- Move the stone across the flattening surface using the recommended motion and light, even pressure.
- Continue until the grid has disappeared evenly, adding lubricant as directed.
- Rinse or clean both surfaces according to their instructions and check flatness again.
The grid shows where the surfaces have made contact. If lines remain in the middle, the low area has not yet been reached.
Dry and Store Stones Properly
After cleaning, follow the manufacturer’s drying and storage instructions.
For many water stones, allow them to dry gradually in a suitable place away from direct heat and sudden temperature changes. Do not assume every stone should be stored wet or sealed while damp.
Oil stones and diamond plates may have different storage requirements. Clean and protect them as directed by their manufacturers.
STONE CARE CHECKLIST
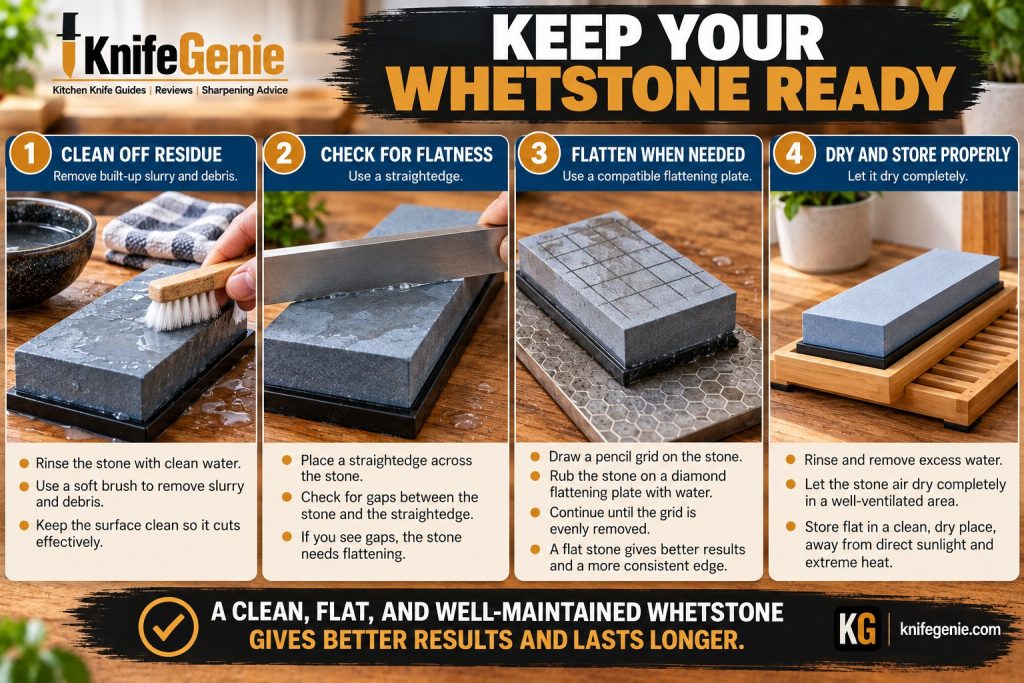
⚠️ Common Whetstone Grit Mistakes
❌ Starting With a Stone That Is Too Coarse
Coarse stones remove metal quickly and can make beginner errors more costly.
Better approach: Begin with a medium stone for an ordinarily dull knife. Use coarse grit when the edge condition justifies it.
❌ Assuming Higher Grit Always Means a Better Edge
A highly polished edge is not automatically the best choice for every kitchen task.
Better approach: Choose a finish that suits your knife, food, and preferences. A well-made medium-grit edge can be very effective.
❌ Moving to a Fine Stone Too Soon
If the previous stone has not reached the edge, a finer stone may simply polish an incompletely sharpened bevel.
Better approach: Check your progress along the entire edge before changing stones.
❌ Using Heavy Pressure on Every Stone
Excessive pressure can make angle control difficult and contribute to an oversized burr.
Better approach: Use controlled pressure and lighten your strokes as you finish and deburr.
❌ Ignoring a Dished or Clogged Stone
An uneven or clogged surface can make sharpening less consistent.
Better approach: Inspect, clean, and flatten the stone using a compatible method when necessary.
❌ Ignoring the Knife Manufacturer’s Advice
Not every kitchen knife has the same edge geometry or sharpening requirements.
Better approach: Follow the manufacturer’s recommendations for your knife, especially for specialty or asymmetric blades.
🧙 KnifeGenie Pro Tips
✔ Start with the edge condition. A dull knife and a chipped knife may need different starting grits.
✔ Buy for the work you actually do. One good medium stone may be more useful than several stones you do not need.
✔ Keep the bevel angle consistent. The correct grit cannot compensate for uncontrolled sharpening technique.
✔ Check the entire edge. Pay attention to the heel, middle, and tip.
✔ Remove the burr. A clean, stable edge matters more than a polished appearance alone.
✔ Keep your stones flat and clean. Follow product-specific care instructions.
✔ Sharpen when the edge needs it. Our guide to how often to sharpen kitchen knives explains why condition matters more than a rigid calendar.
✔ Build a complete care routine. Explore the Sharpen & Care hub for more maintenance guidance.
❓ Frequently Asked Questions
What grit whetstone is best for beginners?
A medium stone around 1000 grit is a practical starting point for many beginners sharpening ordinarily dull kitchen knives. It can restore a useful edge without requiring a large collection of stones.
Is 400 grit too coarse for a kitchen knife?
Not always. Around 400 grit can be useful for a very dull edge, small chips, or deliberate reshaping. It removes metal relatively quickly, so use it carefully and only when the knife’s condition calls for it.
Is 1000 grit enough for a chef knife?
Yes. A chef knife sharpened and properly deburred on a suitable 1000-grit stone can perform very well in everyday kitchen tasks. A finer stone is optional.
Do I need a 6000-grit whetstone?
Not necessarily. A 6000-grit stone can refine the edge, but many home cooks are satisfied with a well-finished medium-grit edge.
Should I use a coarse stone every time I sharpen?
No. Start with a grit appropriate for the edge’s condition. Routine sharpening often does not require a coarse repair stone.
Can I sharpen a damaged knife on a fine stone?
A fine stone is generally inefficient for removing significant damage. A coarse stone may be appropriate for small chips, but substantial damage or a valuable knife may be better handled professionally.
Can I use a diamond plate to flatten a water stone?
Some diamond plates are designed or approved for flattening certain water stones. Check the instructions for both products. Not every diamond sharpening plate is intended for flattening, and compatibility can depend on the stone’s grit.
How often should I flatten a water stone?
Check the surface regularly and flatten it when needed, following the manufacturer’s instructions. Wear varies with the stone, knife, pressure, and frequency of use.
Should I soak every water stone?
No. Some stones require soaking, while others are designed for surface water or have specific preparation instructions. Follow the directions for your exact stone.
Can I use the same cleaning method for water stones, oil stones, and diamond plates?
Do not assume so. Their materials and lubricants differ. Use the cleaning and storage method recommended for each product.
🏆 Final Verdict: Which Whetstone Grit Should You Buy?
For many home cooks, the best first choice is a medium stone around 1000 grit.
It gives you a practical starting point for learning how to restore an ordinarily dull kitchen knife. Once you are comfortable with the technique, you can decide whether you need a coarser stone for repair or a finer stone for additional refinement.
Remember the KnifeGenie formula:
KNIFE CONDITION → CHOOSE THE STARTING GRIT → SHARPEN → DEBURR → REFINE IF NEEDED
Keep the stone clean and appropriately flat, respect the knife’s intended bevel, and follow the instructions for your particular sharpening equipment.
🧙 KnifeGenie Overall Recommendation: Choose a suitable medium stone first, practice slowly, and add other grits only when your knives or preferred finish give you a reason to do so. That’s the best way to choose a whetstone grit for kitchen knives.
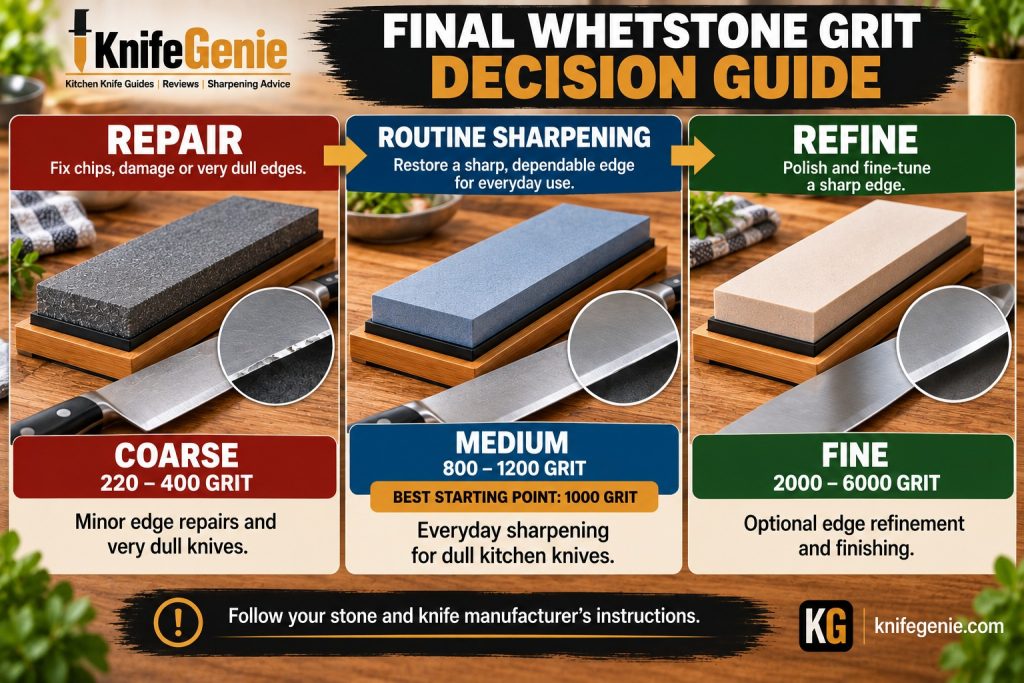
FINAL GRIT DECISION GUIDE