A sharp boning knife can make trimming meat, removing silverskin and working around joints feel controlled and precise.
A dull one?
That is when a simple job can become frustrating.
The narrow blade may slide instead of biting cleanly, you may find yourself using more pressure, and delicate trimming becomes much harder than it needs to be.
Fortunately, learning how to sharpen a boning knife isn’t particularly complicated.
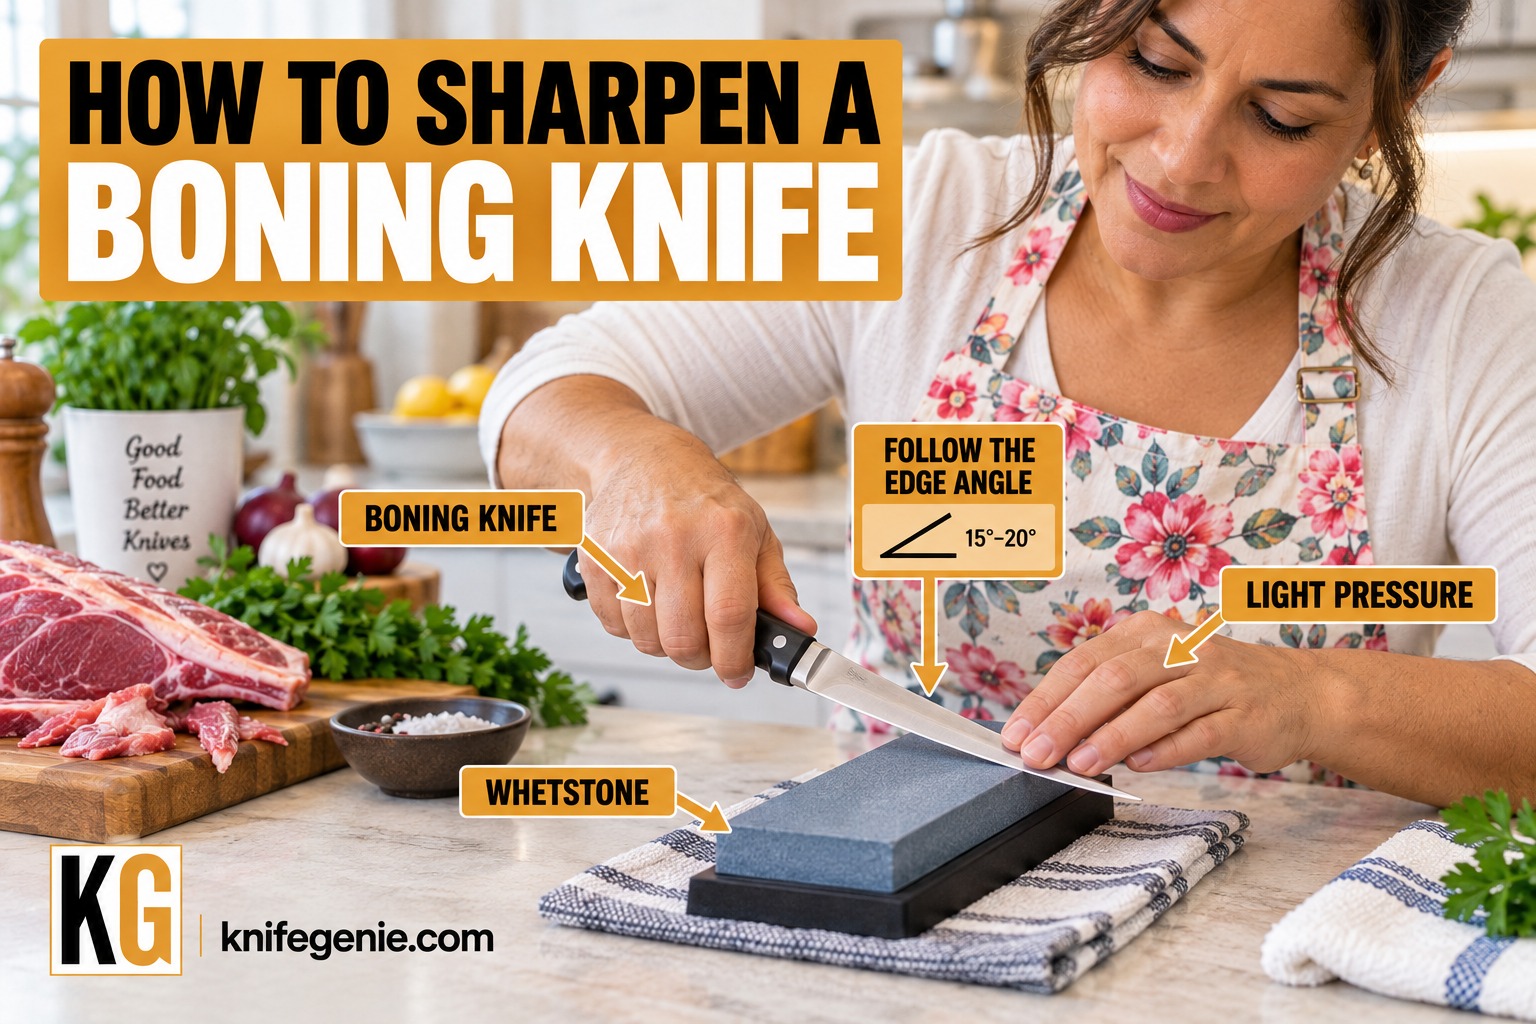
For most ordinary double-bevel boning knives, a whetstone gives you excellent control. The important part is maintaining the knife’s existing edge angle, using light pressure and paying extra attention to the curved tip.
And there’s one rule worth remembering before you begin:
🧙 KnifeGenie Tip: Don’t automatically sharpen every boning knife at the same angle. Preserve the existing bevel or use the sharpening angle recommended by the knife manufacturer.
🔽 Jump to What You Need
👉 Quick Answer
👉 What You Need
👉 Sharpening vs Honing
👉 Best Sharpening Method
👉 What Angle Should You Use?
👉 How to Sharpen a Boning Knife Step by Step
👉 How to Sharpen the Curved Tip
👉 How to Know When You’re Finished
👉 Whetstone vs Other Sharpeners
👉 Flexible vs Stiff Boning Knives
👉 Common Sharpening Mistakes
👉 How Often Should You Sharpen?
👉 Keeping a Boning Knife Sharp Longer
👉 When to Use a Professional
👉 Frequently Asked Questions
👉 Overall Recommendation
🏆 How to Sharpen a Boning Knife: The Quick Answer
For a conventional double-bevel boning knife, the basic process is:
- Check the manufacturer’s recommended sharpening angle or inspect the existing bevel.
- Prepare your whetstone according to its instructions.
- Place the knife against the stone at the correct angle.
- Sharpen from heel toward the tip using light, controlled strokes.
- Follow the curve of the blade as you approach the tip.
- Work until you form a small, consistent burr along the opposite side.
- Repeat on the other side.
- Move to a finer stone to refine the edge.
- Remove the remaining burr.
- Clean and dry the knife thoroughly.
- Test the edge carefully before returning the knife to use.
🧙 KnifeGenie Quick Verdict
Best method for control: 🪨 Whetstone
Easiest method for beginners: 🔧 Compatible guided sharpener
Best option for an expensive knife when you’re unsure: 👨🔧 Professional sharpening
Biggest mistake: 📐 Guessing the sharpening angle
🧰 What You Need to Sharpen a Boning Knife
You don’t need a workbench full of specialist equipment.
For the whetstone method, gather:
✔ Your boning knife
✔ A suitable sharpening stone
✔ Non-slip stone holder or damp towel
✔ Water or lubricant if required by the stone manufacturer
✔ Clean towel
✔ Good lighting
✔ Optional angle guide
A medium sharpening stone followed by a finer finishing stone is sufficient for routine sharpening in many home kitchens.
If the knife is extremely dull or has edge damage, a coarser abrasive may be required.
But don’t automatically reach for the coarsest stone you own.
Coarse abrasives remove steel quickly.
For routine maintenance, you generally want to remove only enough metal to restore the cutting edge.
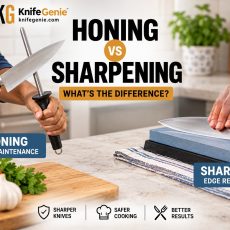
🆚 Sharpening vs Honing: Know the Difference First
Before putting your boning knife on a whetstone, make sure it actually needs sharpening.
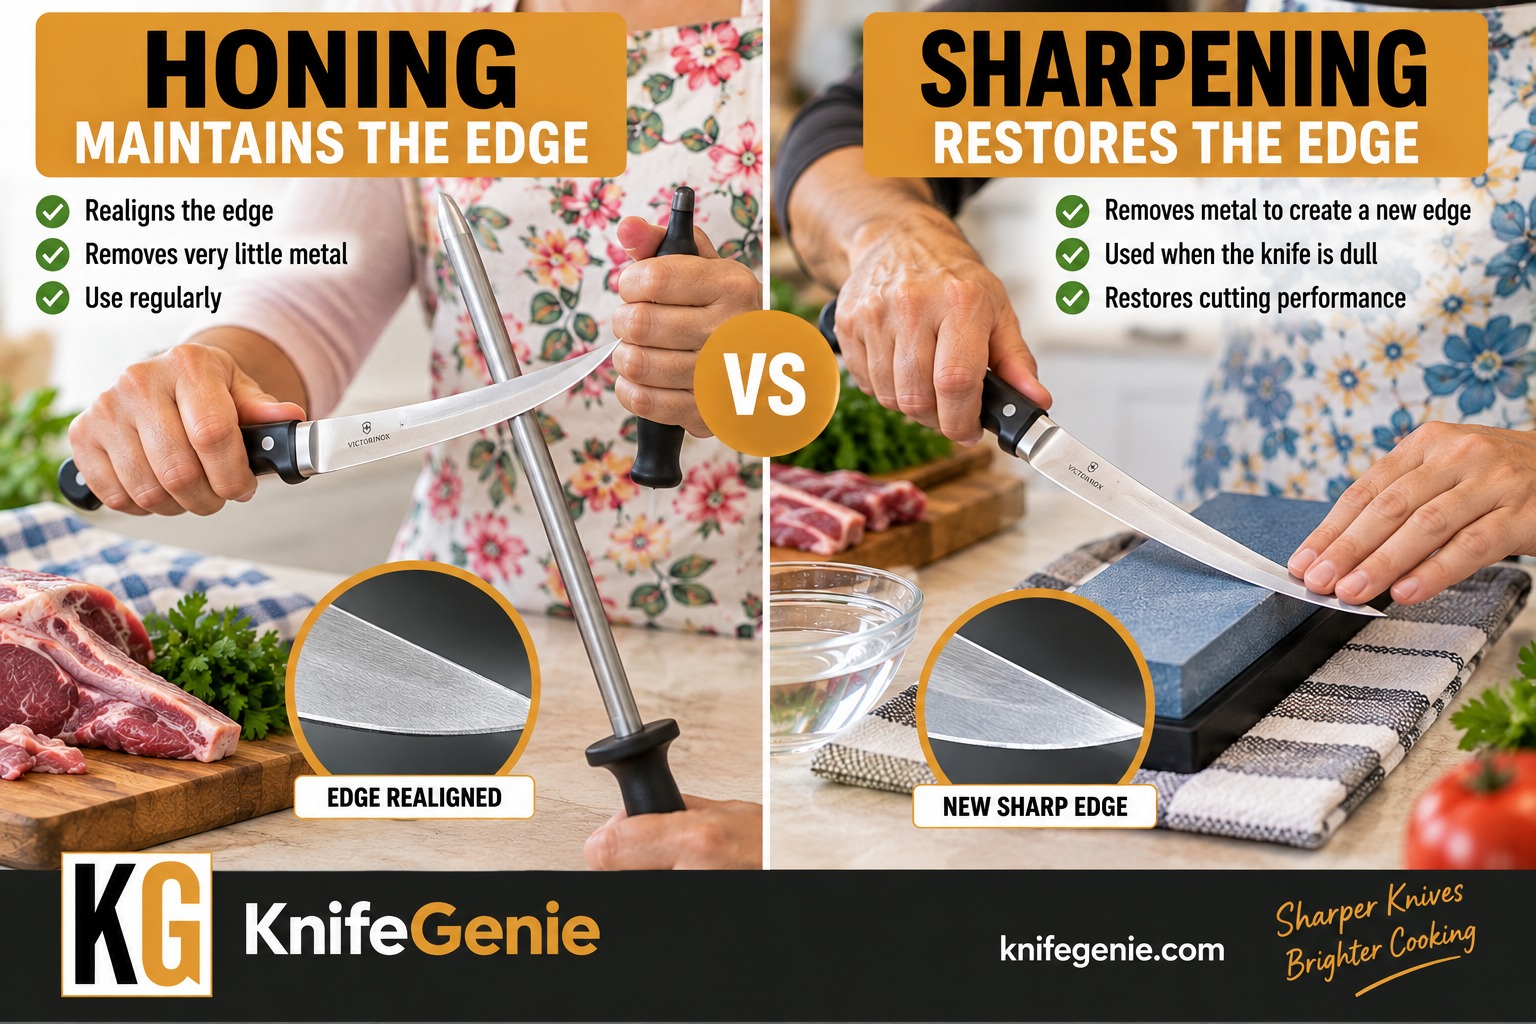
🔧 Honing
Honing maintains or realigns an existing edge.
It removes little material compared with actual sharpening.
Think:
Honing = edge maintenance
🪨 Sharpening
Sharpening uses an abrasive to remove steel and recreate or restore the cutting edge.
Think:
Sharpening = edge restoration
This distinction matters because repeatedly grinding away steel when the knife merely needs routine edge maintenance shortens the useful life of the blade unnecessarily.
If you’re wondering how often you should sharpen kitchen knives, cutting performance is usually a better guide than simply sharpening according to a fixed calendar.
HONING VS SHARPENING
Victorinox sharpening guidance…
🪨 What’s the Best Way to Sharpen a Boning Knife?
For a home cook willing to learn the technique, a whetstone is one of the best choices.
Why?
Because a boning knife isn’t shaped like a chef’s knife.
Its blade is typically:
🔪 Narrow
↪ Curved toward the tip
📏 Relatively short
🪶 Sometimes flexible
🎯 Designed for controlled work around meat and joints
That shape makes control especially important.
A whetstone allows you to follow the entire cutting edge manually rather than forcing the blade through a fixed slot that may or may not suit its geometry.
Why I Prefer a Whetstone
✔ Excellent angle control
✔ Works with many blade shapes
✔ Lets you follow a curved tip
✔ Removes only as much steel as necessary when used correctly
✔ Can produce an excellent edge
✔ Suitable for many quality knives
The Catch
You have to learn to hold a reasonably consistent angle.
Fortunately, you don’t need robotic precision.
Consistency matters more than speed.
And whether a knife is forged or stamped doesn’t by itself determine how sharp it can become. Our forged vs stamped knives guide explains why steel, heat treatment and blade geometry matter just as much.
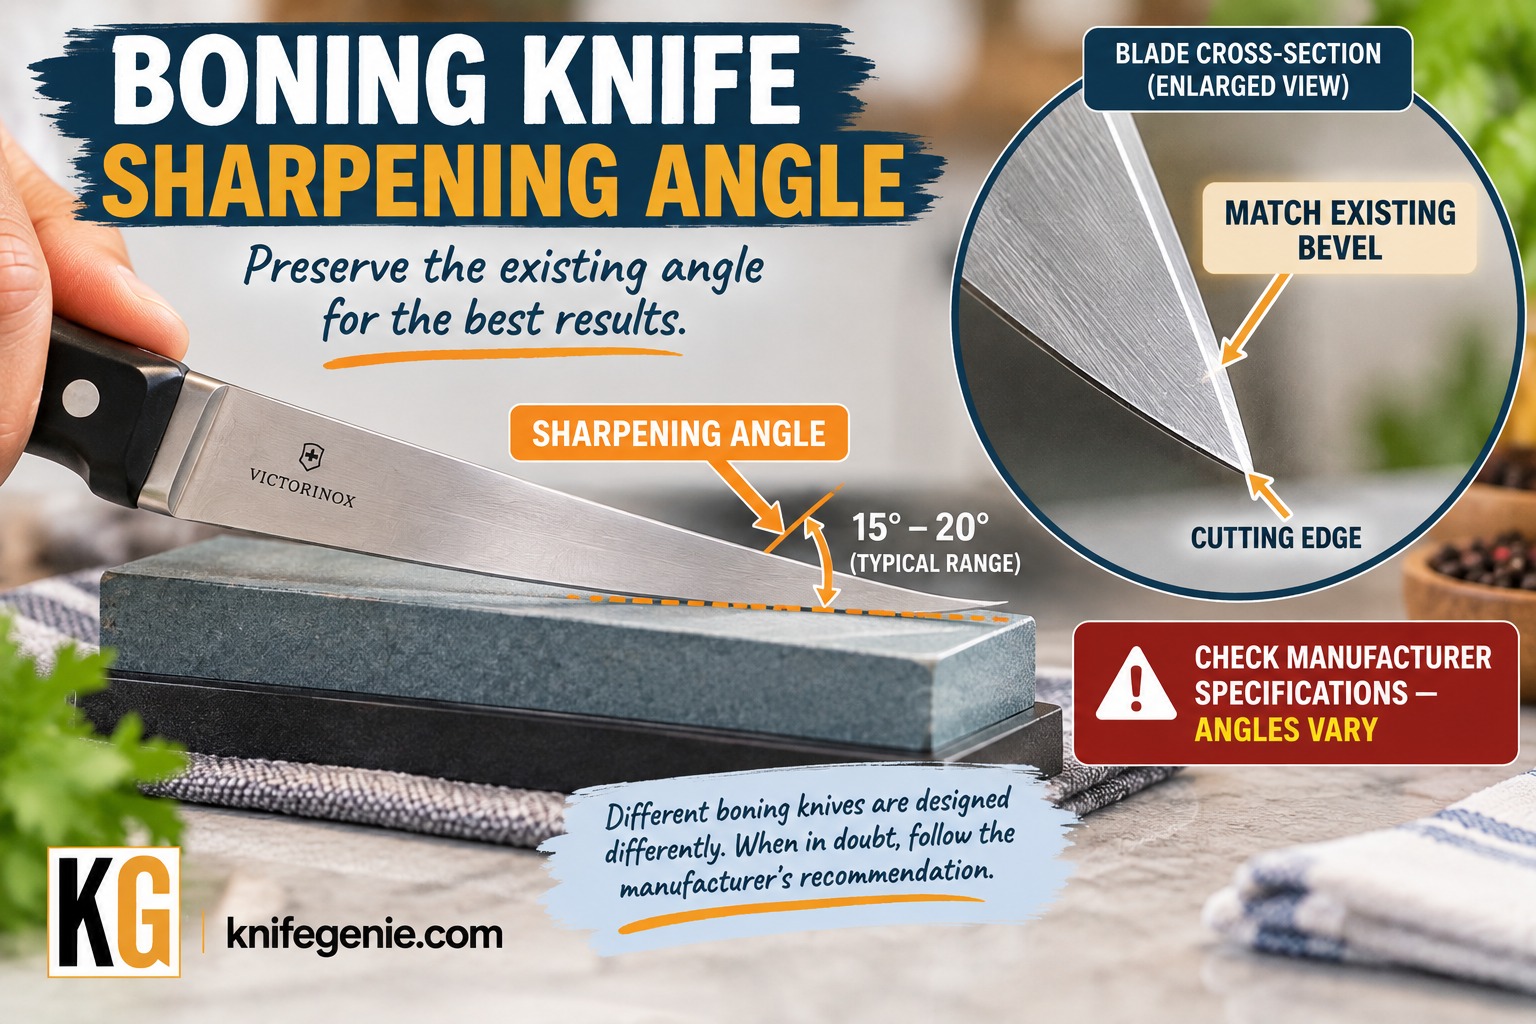
📐 What Angle Should You Sharpen a Boning Knife?
This is where overly simple sharpening advice can cause problems.
You may see recommendations online telling you that every boning knife should be sharpened at one particular angle.
Don’t assume that.
Different manufacturers use different edge geometries.
You can see the same principle when comparing German vs Japanese kitchen knives: blade geometry, steel, intended use and manufacturer specifications can all influence how an edge should be maintained.
Even different knife ranges from the same manufacturer can have different specifications.
For example, some Western kitchen knives use edges in the mid-teens per side, while some boning knives are designed with more robust edge geometry.
🧙 KnifeGenie Rule
Manufacturer specification → existing factory bevel → generic advice
Follow them in that order.
If the manufacturer specifies an angle, use it.
If you don’t know the angle, inspect the existing bevel and try to follow it rather than deliberately making the edge dramatically thinner or thicker.
Don’t confuse the knife’s primary blade grind with its small sharpening bevel, either. If your knife uses a hollow grind, routine sharpening normally maintains the cutting edge rather than trying to recreate the entire hollow-ground blade profile.
Why Not Make the Edge as Thin as Possible?
Because a boning knife often works close to:
🦴 Joints
🍖 Dense connective tissue
🥩 Meat
🔪 Cutting boards
A very acute edge may feel wonderfully sharp but can sacrifice durability.
The goal isn’t to create the thinnest imaginable edge.
The goal is to restore the edge the knife was designed to use.
BONING KNIFE SHARPENING ANGLE
🔪 How to Sharpen a Boning Knife Step by Step
Now we can actually sharpen the knife.
1️⃣ Inspect the Blade
Start by looking carefully at the cutting edge under good lighting.
Look for:
🔍 Flat or reflective spots
🔍 Small rolls
🔍 Minor chips
🔍 Uneven bevels
🔍 Damage near the tip
If the knife has large chips, a bent tip, significant deformation or other serious damage, routine home sharpening may not be the right solution.
Consider professional repair.
2️⃣ Prepare Your Whetstone
Follow the instructions supplied with your particular stone.
Some water stones require soaking.
Others are splash-and-go.
Some sharpening stones use oil instead.
Don’t assume every stone should be soaked simply because you’ve seen somebody doing it in a video.
Place the stone on a stable, non-slip surface.
A stone that slides around while you’re holding a sharp knife is something you definitely don’t want.
3️⃣ Find the Existing Bevel
Place the edge gently against the stone.
You want the existing bevel to sit naturally against the abrasive surface.
If you’re unsure of the angle, a useful learning technique is to color the bevel lightly with a permanent marker.
Make a couple of gentle sharpening passes.
Then inspect it.
If you’re removing marker from the entire bevel reasonably evenly, you’re close to the existing angle.
If you’re removing material only at the shoulder or only at the very edge, adjust accordingly.
🧙 KnifeGenie Tip: The marker trick is especially useful when you don’t know the factory sharpening angle.
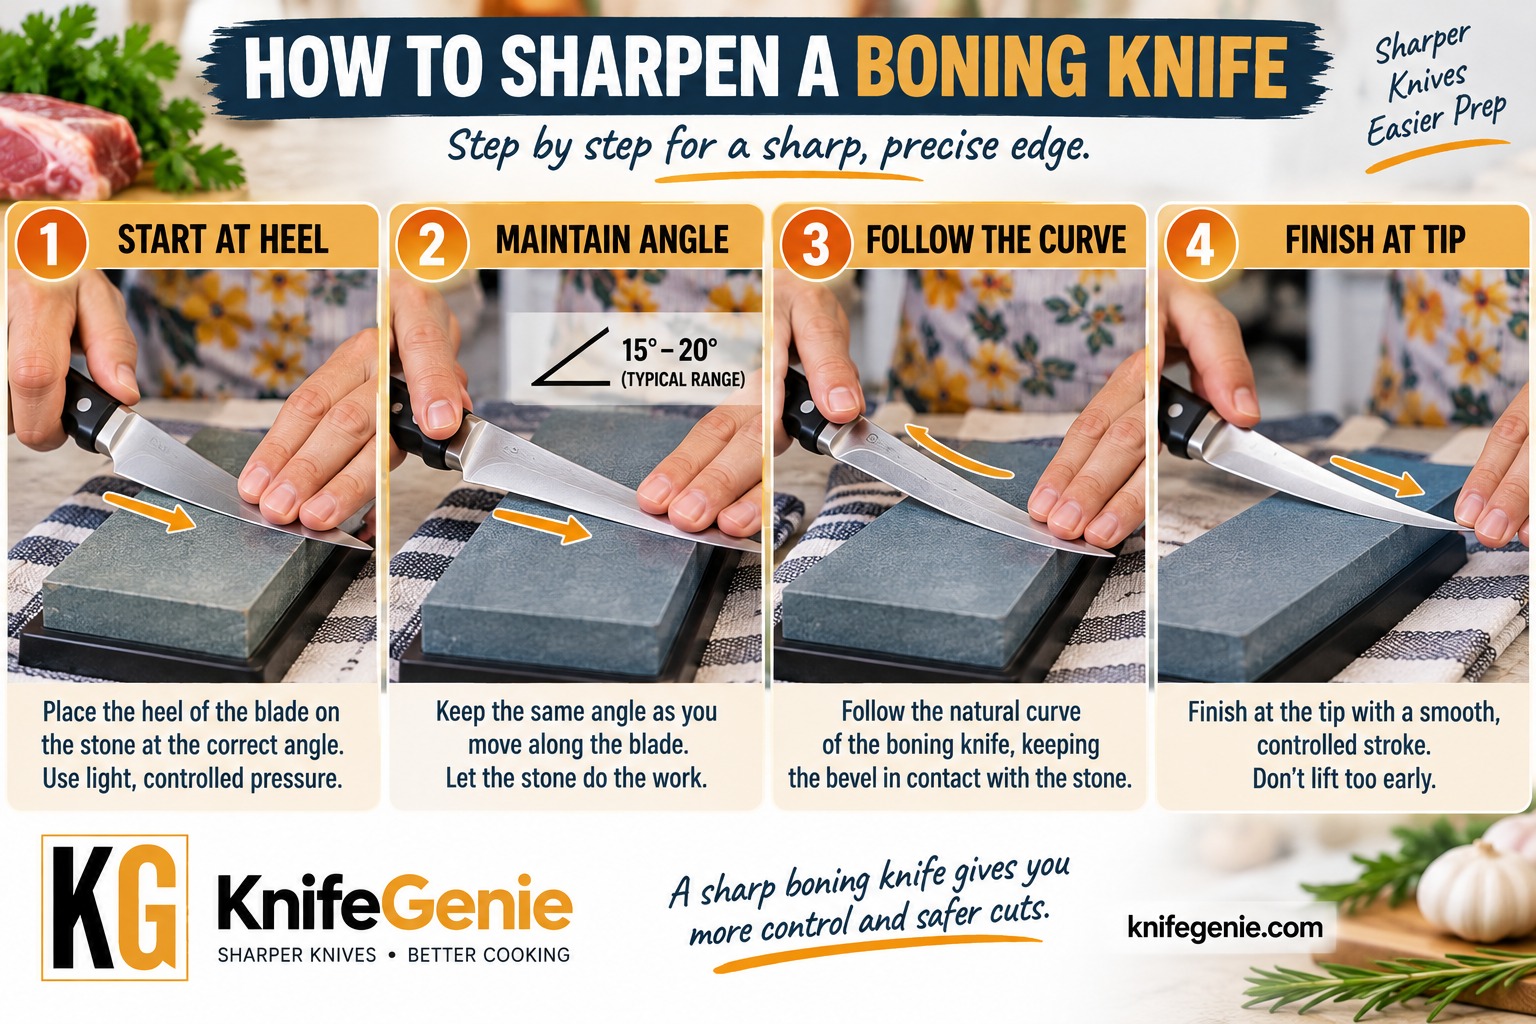
4️⃣ Start at the Heel
Hold the handle securely with your dominant hand.
Use your other hand to provide light, controlled pressure on the blade where appropriate, keeping fingers safely away from the cutting edge.
Start near the heel.
Move the edge across the stone in a controlled sharpening stroke.
Don’t race.
Your objective is:
Angle → contact → control → consistency
Not speed.
5️⃣ Follow the Blade Toward the Tip
Gradually work along the cutting edge.
Because a boning knife narrows and curves toward its tip, your hand position needs to change slightly as you progress.
Maintain contact with the edge while following the curvature.
This is one of the main differences between sharpening a narrow boning knife and sharpening a broad chef’s knife.
STEP-BY-STEP SHARPENING
6️⃣ Feel for a Burr
As you sharpen one side, a tiny burr should eventually form along the opposite side of the cutting edge.
A burr is a very small ridge of metal created as you abrade the edge.
You don’t need a huge burr.
You’re looking for a small, reasonably consistent burr along the edge.
Be extremely careful when checking.
Move your fingertip across and away from the edge, never along the cutting edge.
If you’re uncomfortable checking manually, use visual inspection instead.
7️⃣ Sharpen the Other Side
Turn the knife over.
Repeat the process on the second bevel.
Again:
✔ Maintain the angle
✔ Use controlled pressure
✔ Work along the complete edge
✔ Follow the curve
✔ Don’t forget the tip
Try to keep your work reasonably balanced between both sides unless your knife is specifically designed with an asymmetric bevel.
8️⃣ Move to the Finer Stone
Once you’ve restored the basic edge, move to your finer abrasive.
Use lighter pressure.
At this stage, you’re refining the edge rather than aggressively removing steel.
Think:
Coarser abrasive = establish/repair
Finer abrasive = refine
Finish with increasingly light strokes.
9️⃣ Remove the Burr
A knife isn’t finished simply because you’ve created a burr.
You also need to remove it.
Use very light alternating strokes on the finer stone until the edge feels clean and consistent.
A remaining wire edge can make a knife initially seem extremely sharp but deteriorate quickly during use.
🔟 Clean and Dry the Knife
Sharpening creates abrasive and metal residue.
Wash or rinse the blade appropriately after sharpening and dry it thoroughly before using it for food preparation.
Never leave a carbon-steel blade wet.
↪ How to Sharpen the Curved Tip of a Boning Knife
The tip is where beginners commonly struggle.
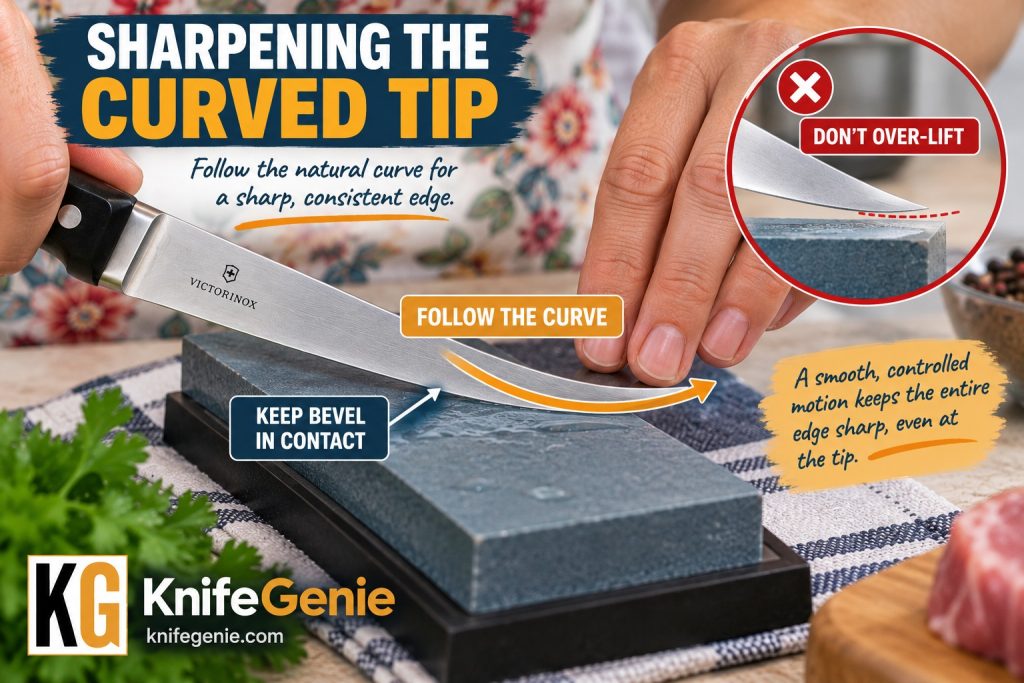
A boning knife’s cutting edge curves upward as it approaches the point.
If you keep your hands completely fixed while sharpening, part of that curve may lose contact with the stone.
The solution is a small, controlled adjustment.
As your sharpening stroke moves toward the tip:
- Follow the curvature of the edge.
- Slightly adjust or lift the handle as necessary to maintain bevel contact.
- Keep the movement smooth.
- Don’t dramatically increase the sharpening angle.
- Don’t grind the tip excessively.
Think of the stone as following the shape already built into the knife.
You aren’t trying to redesign it.
SHARPENING THE CURVED TIP
🧪 How Do You Know When the Boning Knife Is Sharp?
Don’t test sharpness with your thumb.
There are much better methods.
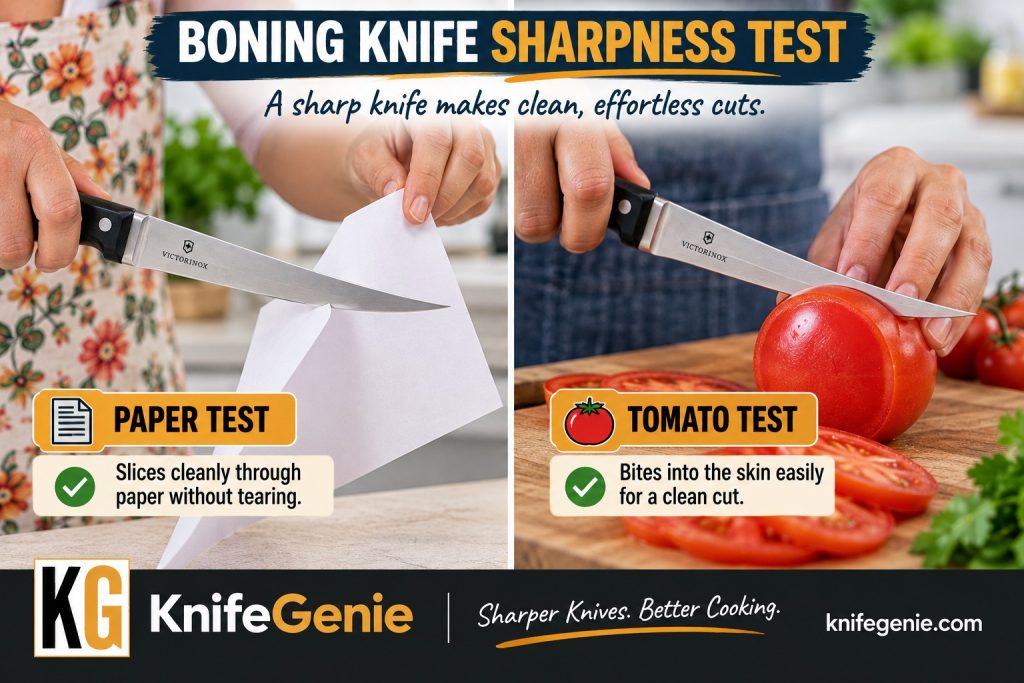
📄 Paper Test
Carefully try slicing through ordinary paper.
A properly sharpened plain-edge boning knife should begin the cut readily and move through without repeatedly tearing or snagging.
🍅 Tomato Test
A ripe tomato is another useful kitchen test.
The knife should bite into the skin without requiring excessive downward force.
🥩 Real-World Test
Ultimately, a boning knife needs to work well on the foods it was designed for.
When trimming boneless meat, it should make controlled cuts without requiring excessive force.
The goal isn’t simply to make the knife “razor sharp.”
It’s to create a clean, stable and useful working edge.
BONING KNIFE SHARPNESS TEST
⚔️ Whetstone vs Other Boning Knife Sharpeners
There isn’t only one way to sharpen a boning knife.
Here’s how the common options compare.
| Method | Control | Learning Curve | Curved Blade | Steel Removal | KnifeGenie Take |
|---|---|---|---|---|---|
| 🪨 Whetstone | ⭐⭐⭐⭐⭐ | Moderate | Excellent | Controllable | Best overall |
| 🔧 Guided system | ⭐⭐⭐⭐⭐ | Low–moderate | Usually good | Controllable | Excellent choice |
| 🖐 Handheld sharpener | ⭐⭐⭐ | Easy | Depends on design | Can be higher | Convenient |
| ⚡ Electric sharpener | ⭐⭐–⭐⭐⭐ | Easy | Model dependent | Can remove more steel | Use carefully |
| 💎 Diamond/ceramic rod | ⭐⭐⭐ | Moderate | Good | Depends on rod | Useful for touch-ups |
| 👨🔧 Professional service | ⭐⭐⭐⭐⭐ | None | Excellent | Professional control | Best for damage/uncertainty |
🏆 KnifeGenie Choice
For the home cook who wants to learn:
Whetstone.
For somebody who struggles to maintain a consistent angle:
A compatible guided system can be an excellent alternative.
For an expensive knife with serious edge damage:
Professional sharpening.
↔️ Flexible vs Stiff Boning Knives: Does Sharpening Change?
Yes, slightly.
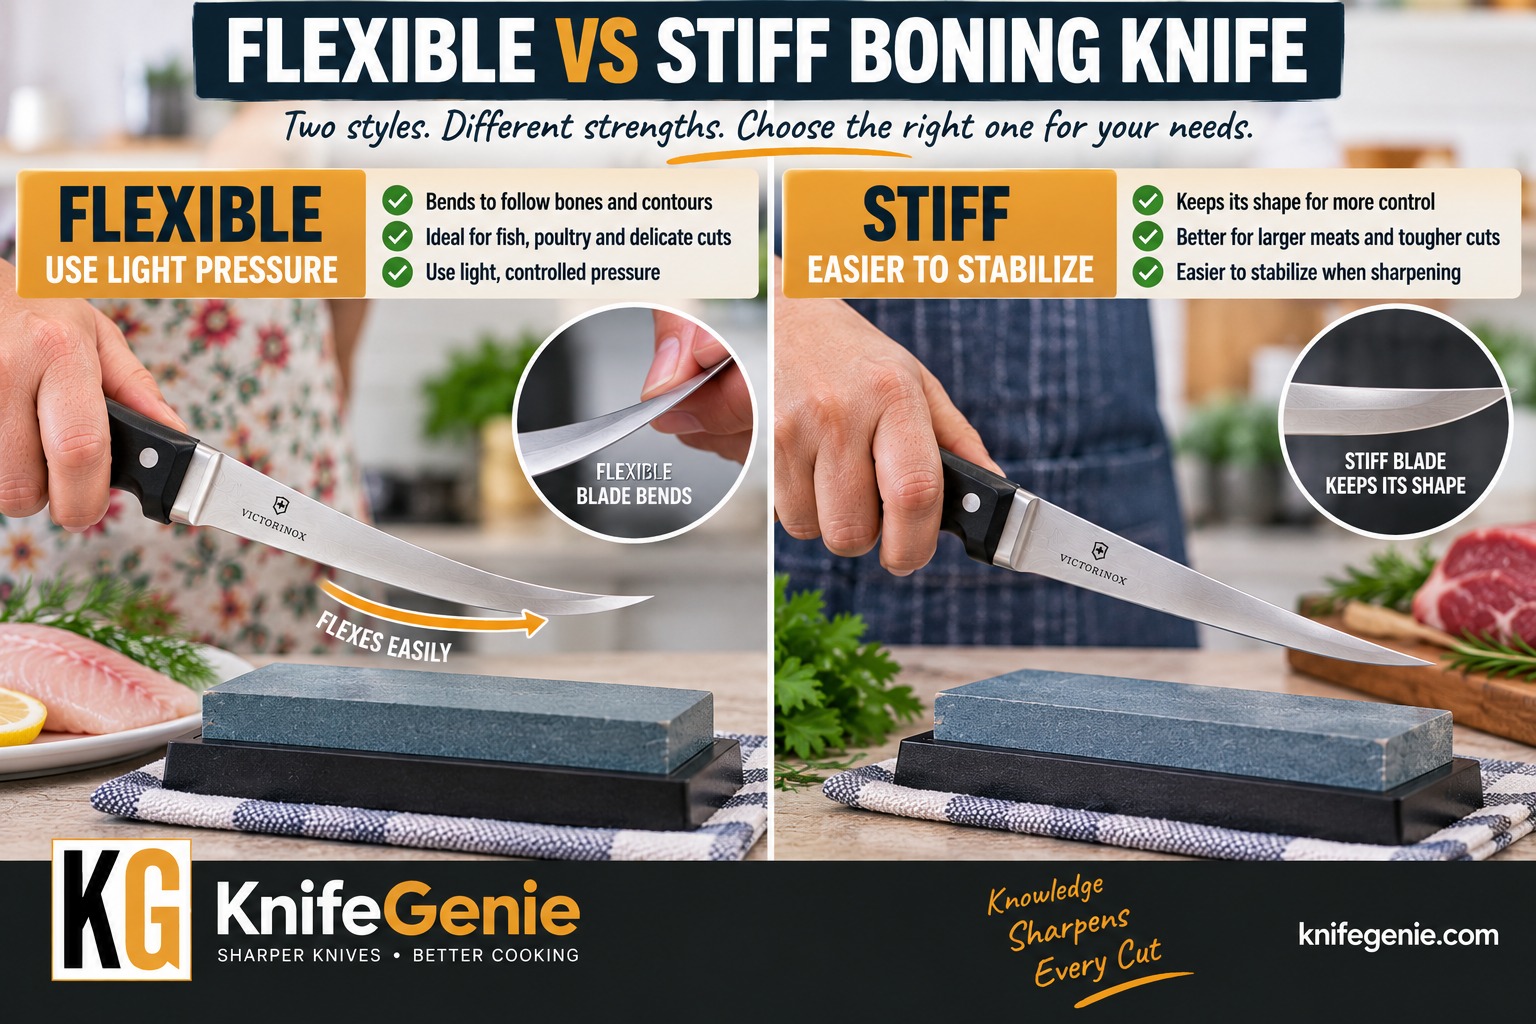
🪶 Flexible Boning Knife
A flexible blade can bend under pressure.
Flexibility is also important when comparing a boning knife vs fillet knife, since fillet knives generally emphasize flexibility for following the contours of fish.
That means you should be especially careful not to press excessively against the stone.
Let the abrasive do the work.
Too much pressure can make it harder to maintain consistent contact and geometry.
Best approach:
✔ Light pressure
✔ Controlled strokes
✔ Stable hand position
✔ Extra care near the tip
💪 Stiff Boning Knife
A stiff boning knife is generally easier to stabilize on the stone.
The basic sharpening process remains the same:
Maintain the bevel, work evenly along the edge and avoid unnecessary metal removal.
🧙 KnifeGenie Tip
Flexible doesn’t mean fragile — but it does mean you need to control pressure carefully while sharpening.
FLEXIBLE VS STIFF BONING KNIFE
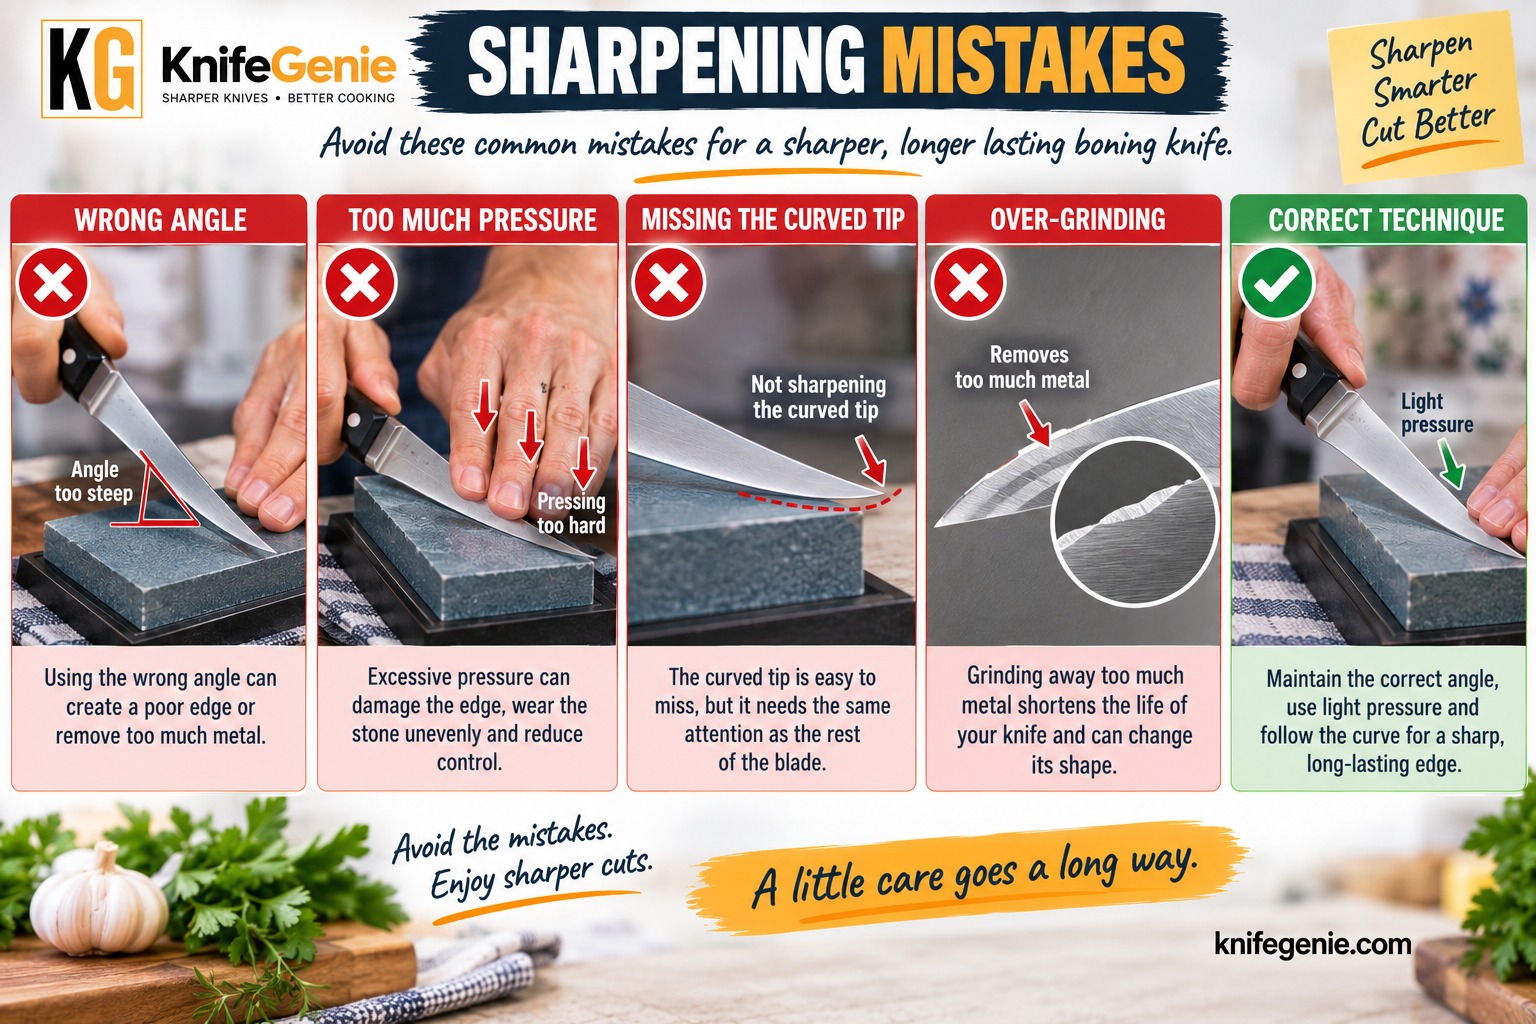
❌ 9 Boning Knife Sharpening Mistakes to Avoid
1. Guessing the Angle
Don’t assume every boning knife has identical edge geometry.
Check the manufacturer or preserve the existing bevel.
2. Using Too Much Pressure
More pressure doesn’t automatically mean a sharper knife.
It can make angle control worse and remove unnecessary steel.
3. Forgetting the Curved Tip
If you sharpen only the flatter portion of the blade, you’ll eventually create an uneven edge.
Follow the entire cutting edge.
4. Over-Sharpening the Tip
The opposite problem is concentrating too much pressure at the point.
The tip contains very little metal compared with the broader sections of the blade.
Treat it carefully.
5. Using Only a Very Coarse Stone
Coarse abrasives have a purpose.
Routine sharpening usually doesn’t require aggressive metal removal.
6. Never Removing the Burr
Creating the burr is only part of the process.
Finish by refining and deburring the edge.
7. Using an Incompatible Pull-Through Sharpener
A fixed-angle sharpener is useful only if its geometry is suitable for your knife.
Don’t force a valuable boning knife into a system that isn’t designed for it.
8. Sharpening When the Knife Only Needs Honing
Sharpening removes steel.
Don’t do it unnecessarily.
9. Trying to Repair Serious Damage Yourself
A badly chipped, bent or severely worn knife may need professional attention.
Knowing when not to keep grinding is part of good knife maintenance.
SHARPENING MISTAKES
Wüsthof knife-sharpening guide
⏱️ How Often Should You Sharpen a Boning Knife?
Don’t sharpen it simply because a certain number of weeks have passed.
Sharpen according to performance.
Your boning knife may need sharpening when:
❌ It struggles to begin a clean cut
❌ It slides rather than bites
❌ Trimming requires noticeably more force
❌ The edge catches or tears
❌ Paper testing reveals obvious snagging
❌ Appropriate honing no longer restores performance
Someone breaking down and trimming meat every day will wear an edge faster than somebody using a boning knife twice a month.
Steel, cutting technique, cutting surfaces and storage also affect edge life.
👉 How Often Should You Sharpen Kitchen Knives?
🧙 KnifeGenie Rule
Hone when the edge needs maintenance.
Sharpen when the edge actually needs restoration.
🛡️ How to Keep a Boning Knife Sharp Longer
Sharpening technique matters.
But what you do between sharpenings matters just as much.
Sharpening also can’t compensate for a knife that doesn’t suit the job. If you’re choosing one for meat preparation, see our guide to finding the right boning knife for home butchers.
🪵 Use a Knife-Friendly Cutting Board
Use an appropriate wood or plastic cutting board.
Avoid routinely cutting on:
❌ Glass
❌ Stone
❌ Granite
❌ Ceramic plates
❌ Metal surfaces
Hard surfaces can accelerate edge wear.
🦴 Don’t Treat a Boning Knife Like a Cleaver
The name can be misleading.
A boning knife is designed primarily for controlled cutting around bones, joints and connective tissue.
That doesn’t automatically mean it is designed to chop directly through heavy bones.
Use the appropriate cleaver, saw or other suitable tool when the job requires one.
🧼 Hand Wash and Dry
Clean the knife promptly after use and dry it thoroughly.
Don’t leave it sitting wet in a sink.
🗄️ Protect the Edge During Storage
Good options include:
✔ Knife block
✔ Blade guard
✔ Appropriate magnetic strip
✔ Dedicated knife storage
Avoid allowing the edge to bang against other metal utensils in a drawer.
🔧 Maintain the Edge
Appropriate honing or touch-ups can help maintain cutting performance between full sharpenings.
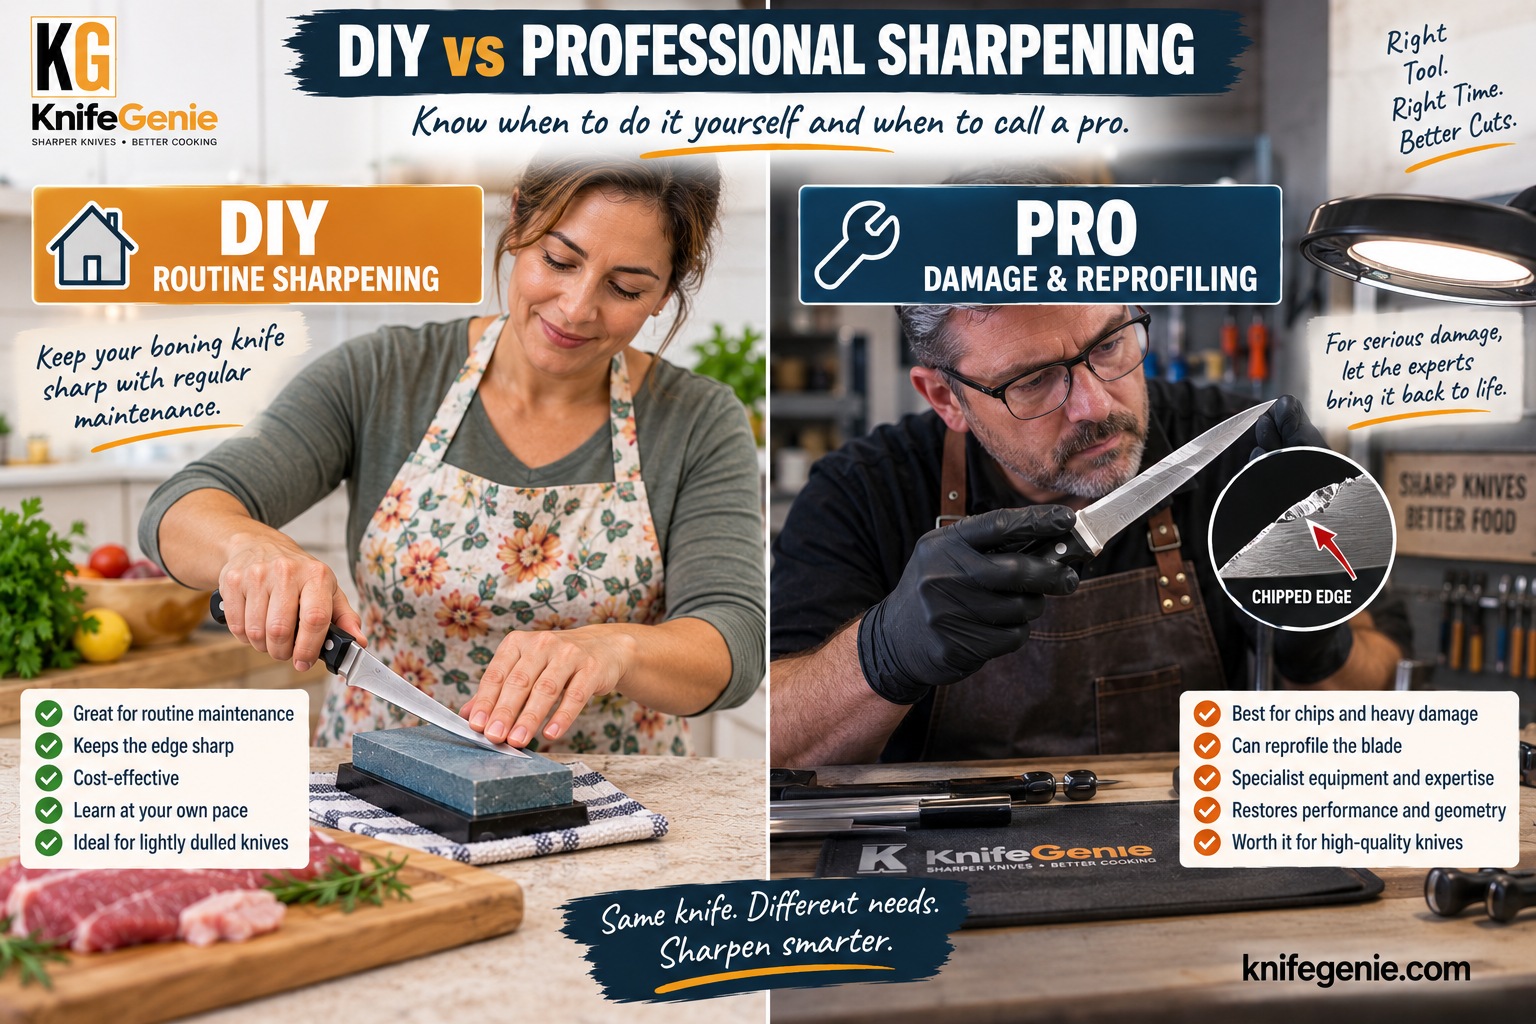
👨🔧 When Should You Have a Boning Knife Professionally Sharpened?
Home sharpening makes sense for routine edge maintenance.
Professional help makes more sense when:
⚠️ The edge has large chips
⚠️ The tip is damaged
⚠️ The bevel has become badly uneven
⚠️ The blade needs substantial thinning or reprofiling
⚠️ You’re unsure about an unusual edge geometry
⚠️ The knife is valuable and you aren’t comfortable sharpening it
⚠️ Previous sharpening has significantly altered the edge
There’s no shame in handing a good knife to an experienced sharpener.
Sometimes that is the smarter decision.
DIY VS PROFESSIONAL SHARPENING
❓ How to Sharpen a Boning Knife — Frequently Asked Questions
What Is the Best Way to Sharpen a Boning Knife?
A whetstone is an excellent option because it provides direct control over the sharpening angle and lets you follow the curved edge of the blade.
A compatible guided sharpening system is another good option if maintaining a freehand angle is difficult.
What Angle Should I Sharpen My Boning Knife?
There is no single correct angle for every boning knife.
Check the knife manufacturer’s recommendation first. If no specification is available, preserving the existing bevel is generally preferable to arbitrarily changing the edge geometry.
Can I Use a Pull-Through Sharpener on a Boning Knife?
Possibly, provided the sharpener is designed for your knife’s edge geometry and blade style.
The disadvantage is that many pull-through systems give you less control over angle and metal removal than a whetstone.
Can I Sharpen a Flexible Boning Knife?
Yes.
Use particularly light pressure because the blade can flex against the sharpening surface.
Is a Boning Knife Supposed to Be Razor Sharp?
A boning knife should certainly be sharp enough to make clean, controlled cuts.
But the thinnest possible razor-like edge isn’t automatically the best edge for every boning knife.
Durability and the manufacturer’s intended geometry also matter.
Should I Hone a Boning Knife?
Many conventional double-bevel Western boning knives can benefit from appropriate honing between sharpenings.
However, the honing tool must be suitable for the knife’s steel and edge.
How Often Should I Sharpen a Boning Knife?
Sharpen according to cutting performance rather than a fixed calendar.
If appropriate honing no longer restores a clean working edge, it is probably time to sharpen.
How Do I Sharpen the Curved Tip?
Follow the upward curvature of the cutting edge as the knife moves across the stone. Slightly adjust the handle so the bevel remains in contact without dramatically increasing the angle.
Can I Use a Chef’s Knife Sharpener for a Boning Knife?
Sometimes.
The important question is whether the sharpener is compatible with the boning knife’s edge geometry, blade thickness and sharpening angle.
Don’t assume compatibility simply because both are kitchen knives.
Should I Use a Coarse or Fine Whetstone?
A moderately dull knife usually doesn’t require the most aggressive stone available.
Use a coarser abrasive when substantial edge restoration is necessary and a finer stone for refinement and finishing.
🏁 Overall Recommendation: How to Sharpen a Boning Knife
Sharpening a boning knife isn’t about grinding away as much steel as possible.
It’s about restoring the edge without unnecessarily changing the knife.
For most home cooks, KnifeGenie’s preferred approach is straightforward:
🏆 KnifeGenie Verdict
🪨 Use a whetstone if you’re comfortable learning freehand sharpening.
📐 Preserve the existing bevel or follow the manufacturer’s specified angle.
🪶 Use light pressure, especially with flexible boning knives.
↪ Follow the curved edge carefully all the way to the tip.
🔬 Create and then remove the burr rather than stopping halfway through the sharpening process.
🔧 Hone appropriately between sharpenings rather than constantly removing steel.
👨🔧 Use a professional when you’re dealing with serious chips, damage or an edge geometry you don’t understand.
Most importantly, don’t obsess over hitting some supposedly universal boning-knife angle.
Different knives are designed differently.
Learn the knife you actually own.
Preserve its geometry.
Use controlled strokes.
Remove as little steel as necessary.
Then get back to what a good boning knife does best:
clean, controlled work around meat, joints and connective tissue.
Sharp knives. Smart choices.
— KnifeGenie