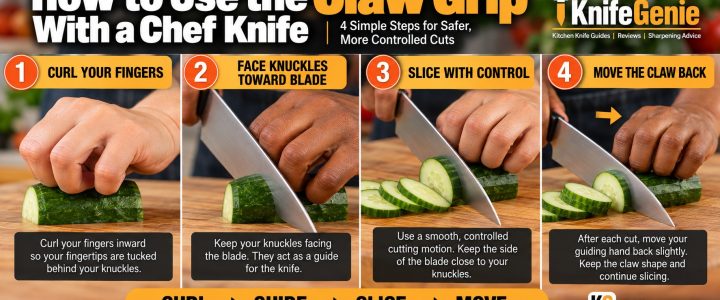
How to Use the Claw Grip With a Chef Knife

How to use the claw grip with a chef knife
Learn how to position your guiding hand for safer, more controlled chef-knife cuts.

Using a chef knife safely isn’t only about how you hold the knife. What you do with your other hand matters just as much.

The claw grip is a simple guiding-hand position that keeps your fingertips tucked away from the cutting edge while helping you hold and guide food as you slice. It can feel unfamiliar at first, but once the movement becomes comfortable, it can make everyday cutting more controlled and consistent.

This guide explains how to use the claw grip with a chef knife, where to position your fingers and thumb, how to use your knuckles as a guide, how to move the claw while cutting, and the common mistakes beginners should avoid.

💡 Quick answer: To use the claw grip, curl the fingertips of your guiding hand inward so they sit behind your knuckles. Hold the food securely and keep the flat side of the knife blade close to the front of your knuckles as you cut. Gradually move your guiding hand backward while maintaining the claw shape.

Research note: This article is based on research into established kitchen knife skills and food-preparation practices. It is intended as an instructional guide rather than a claim of personal testing or professional culinary training.


▶️ Jump to

What Is the Claw Grip?
Why Use the Claw Grip?
How to Use the Claw Grip
How Your Knuckles Guide the Knife
How to Move the Claw While Cutting
Foods to Practice With
Claw Grip in Action
Claw Grip vs Exposed Fingers
Common Claw-Grip Mistakes
Claw Grip and Pinch Grip
Claw Grip Checklist
Frequently Asked Questions


🔪 What Is the Claw Grip?

The claw grip is a way of positioning the hand that holds and guides food while you cut it.

Instead of leaving your fingertips extended toward the knife, you curl your fingers inward, creating a shape that resembles a loose claw.

Your fingertips remain behind your knuckles, while the front of your knuckles becomes a reference point for the side of the knife blade.

✋ The basic position

Fingertips tucked back → knuckles forward → blade beside the knuckles.

💡 Why it works: The claw moves your fingertips farther from the cutting edge while giving the knife a consistent guide.

The grip does not need to be rigid. In fact, squeezing too tightly can make it harder to move your hand smoothly as you work through the ingredient.

Think curled and controlled, rather than clenched.
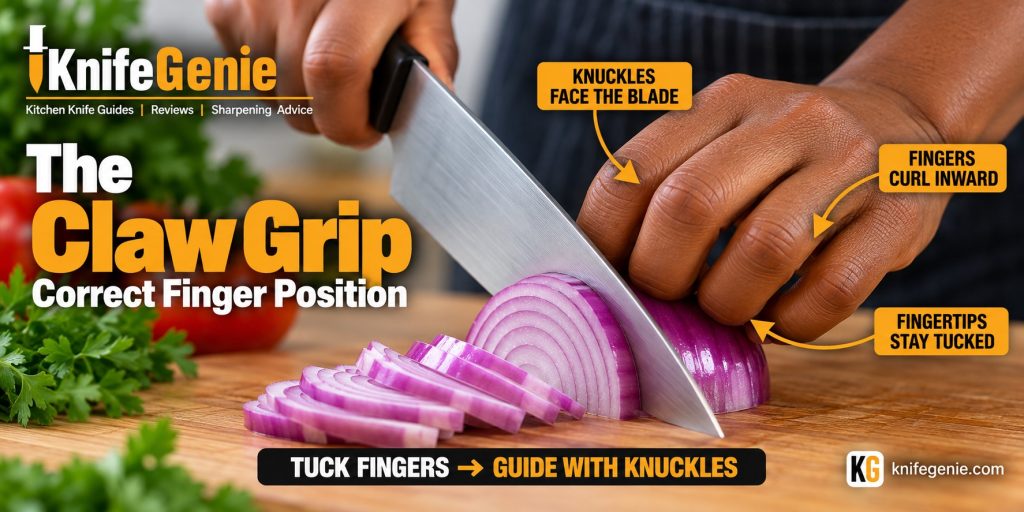

Claw grip finger position beside a chef knife while cutting an onion
Curl your fingertips inward and use the front of your knuckles as a guide for the blade.


🛡️ Why Use the Claw Grip?

Beginners often concentrate so much on their knife hand that they overlook the hand holding the food.

Yet that guiding hand can be closer to the cutting edge than the hand holding the knife.

The claw grip helps you:

✔️ Keep fingertips farther from the cutting edge
✔️ Hold ingredients more securely
✔️ Guide the knife more consistently
✔️ Produce more even slices
✔️ Develop a smoother cutting rhythm
✔️ Coordinate your knife hand and guiding hand

It can also make repetitive cuts easier because your guiding hand provides a reference for the position of the blade.

The claw grip helps keep your fingertips farther from the cutting edge while giving the knife a consistent guide. This technique is also included in Utah State University Extension’s guidance on basic vegetable-cutting and knife-safety techniques.

⚠️ Remember: The claw grip does not make cutting risk-free. You still need a stable cutting board, a suitable sharp knife, controlled movements and your full attention.

If you’re still developing your overall technique, start with How to Use a Chef Knife. For your knife hand, see How to Hold a Chef Knife and How to Use a Pinch Grip With a Chef Knife.


👨‍🍳 How to Use the Claw Grip

Don’t worry about speed when you’re learning. The easiest way to develop the technique is to practice the hand positions slowly.

1️⃣ Stabilize the Food

Before forming the claw, make sure the ingredient isn’t rolling around.

🧅 Working with a round ingredient? Where appropriate, create a flat surface before making additional cuts.

Your cutting board should also remain firmly in place.

Trying to learn the claw grip while chasing an unstable onion, carrot or other ingredient across the board makes the technique unnecessarily difficult.


2️⃣ Curl Your Fingers Inward

Place your guiding hand on the food.

Now bend your fingers so your fingertips curl inward rather than pointing down beside the ingredient.

✋ Think relaxed claw, not tightly clenched fist.

Your hand needs enough tension to control the ingredient without becoming stiff.


3️⃣ Tuck Your Fingertips Behind Your Knuckles

This is the key part of the technique.

👉 Your fingertips should remain behind the front line of your knuckles.

Viewed from the side, your knuckles should be closer to the knife than your fingertips.

👍 Keep your thumb tucked behind your fingers too.

⚠️ Don’t allow your thumb to stick out toward the blade.


4️⃣ Face Your Knuckles Toward the Blade

Position the chef knife so the flat side of the blade is close to the front of your guiding knuckles.

Your knuckles now provide a reference point for the knife.

💡 KEY POINT: It is the side of the blade that stays near your knuckles. Your fingertips should remain curled safely behind them.


5️⃣ Slice With Control

Begin cutting using the motion appropriate for your knife and ingredient.

Don’t force the knife straight downward simply because you’re concentrating on your guiding hand.

➡️ Allow the knife to slice through the ingredient with a smooth, controlled movement.

Your knife hand controls the blade while your claw hand controls and guides the food.


6️⃣ Move the Claw Back

After each cut, move your guiding hand backward slightly while maintaining the claw.

🔁 Think:

CUT → MOVE CLAW → CUT → MOVE CLAW

Your hand gradually retreats as the knife works through the ingredient.

🐢 Start slowly. Speed should develop from repetition and coordination rather than deliberately trying to cut quickly.


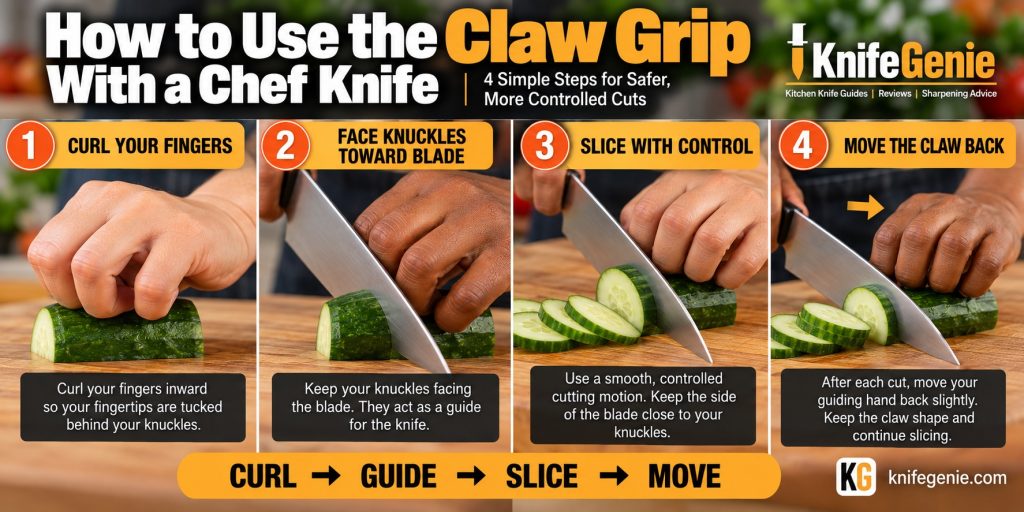
How to Use the Claw Grip: 4 Steps
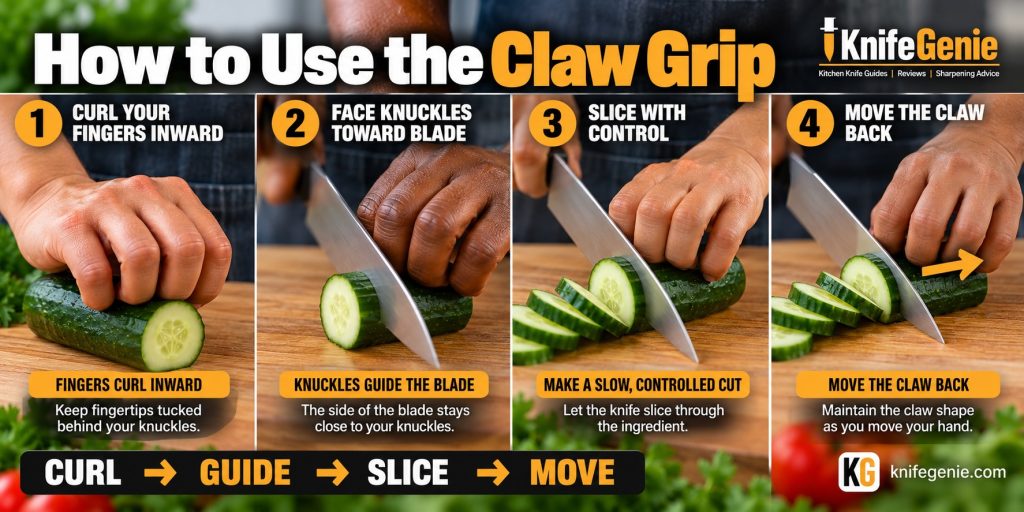
Four steps showing how to use the claw grip with a chef knife
Curl, guide, slice and move—the claw should retreat gradually as the knife advances.


🤚 How Your Knuckles Guide the Knife

Your knuckles are what make the claw grip particularly useful.

With your fingers curled inward, the middle sections of your fingers create a relatively vertical surface beside the knife.

The flat side of the blade can remain close to this surface while you cut.

This gives you a physical reference for the knife’s position without requiring you to stare continuously at the blade.

However, don’t deliberately press the knife hard against your hand.

The goal is gentle guidance, not pressure.

Keep your guiding hand relaxed enough to move but firm enough to control the food.

🧠 Remember

BLADE SIDE → near the knuckles

KNUCKLES → guide the blade

FINGERTIPS → tucked behind

CUTTING EDGE → away from fingertips
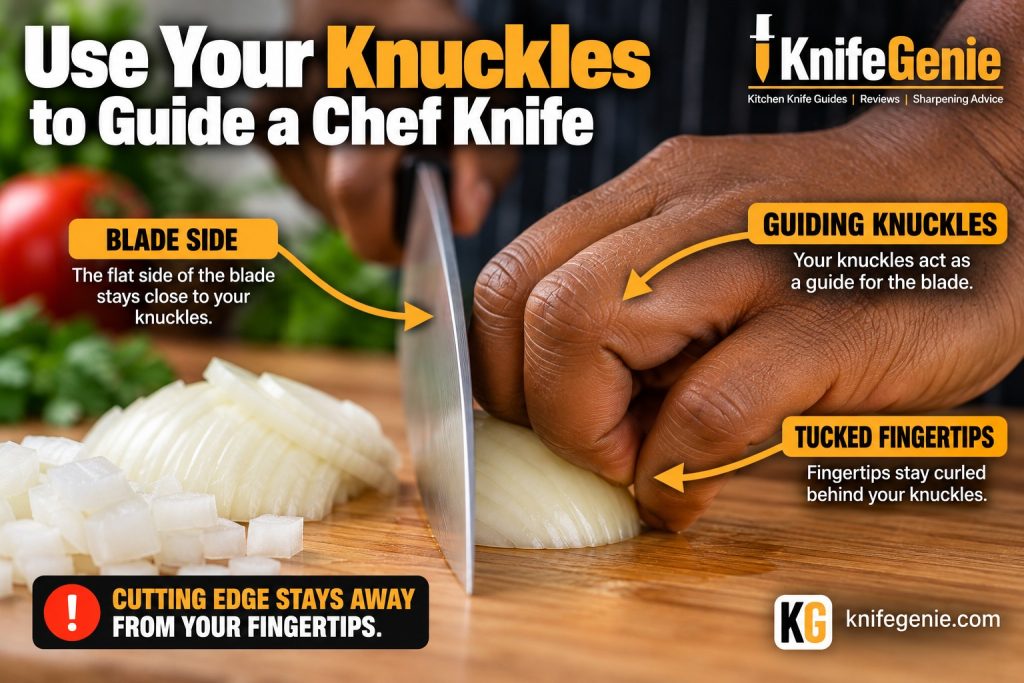


Chef knife blade beside guiding knuckles in the claw grip
The side of the blade stays near the knuckles while the fingertips remain curled safely behind them.


🔁 How to Move the Claw While Cutting

Forming the claw is only half the technique.

You also need to move it correctly.

A common beginner mistake is forming a perfect claw for the first cut and then straightening the fingers while repositioning the food.

Instead, try to preserve the claw shape as you gradually move your hand backward.

Imagine your guiding hand retreating from the blade a little at a time:

KNIFE ADVANCES → CLAW RETREATS

Then repeat.

Your guiding hand and knife hand should move together in a controlled rhythm.

Don’t try to imitate the speed of an experienced cook.

🎯 Control comes first. Speed comes later.


🥕 Foods to Practice With

Some ingredients are much easier for learning the claw grip than others.

🥒 Cucumber — excellent for practicing repeated slices.

🥕 Carrot — useful for learning consistent spacing once the ingredient is stabilized, and it is easy to practice the claw grip while cutting carrots.

🥬 Celery — easy to hold while making repeated crosswise cuts.

🧅 Onion halves — excellent once you’re comfortable with the basic position.

🥒 Zucchini — large enough to hold comfortably while practicing.

⚠️ Avoid starting with very small ingredients. They give your guiding hand less room and can make the technique unnecessarily difficult.

Our How to Cut an Onion With a Chef Knife guide shows how the claw grip fits into a complete everyday cutting task.


🥒 Claw Grip in Action

Once you’ve learned the basic hand position, the same claw principle can be used across many everyday cutting tasks.

The ingredient and knife movement may change, but the guiding-hand principle remains essentially the same:

Curl the fingers → tuck the fingertips → guide with the knuckles.

🔪 Slice — Cucumber

Hold the cucumber steadily while the claw retreats after each slice.

🧅 Dice — Onion

Keep your guiding fingertips curled as the onion becomes progressively smaller.

🥕 Julienne — Carrot

Use the claw to help guide consistent strips while maintaining control of the stabilized carrot.

🥬 Chop — Celery

Move the guiding hand gradually backward as the knife works along the stalk.

💡 The important lesson

Different ingredient. Different cut. Same basic claw.
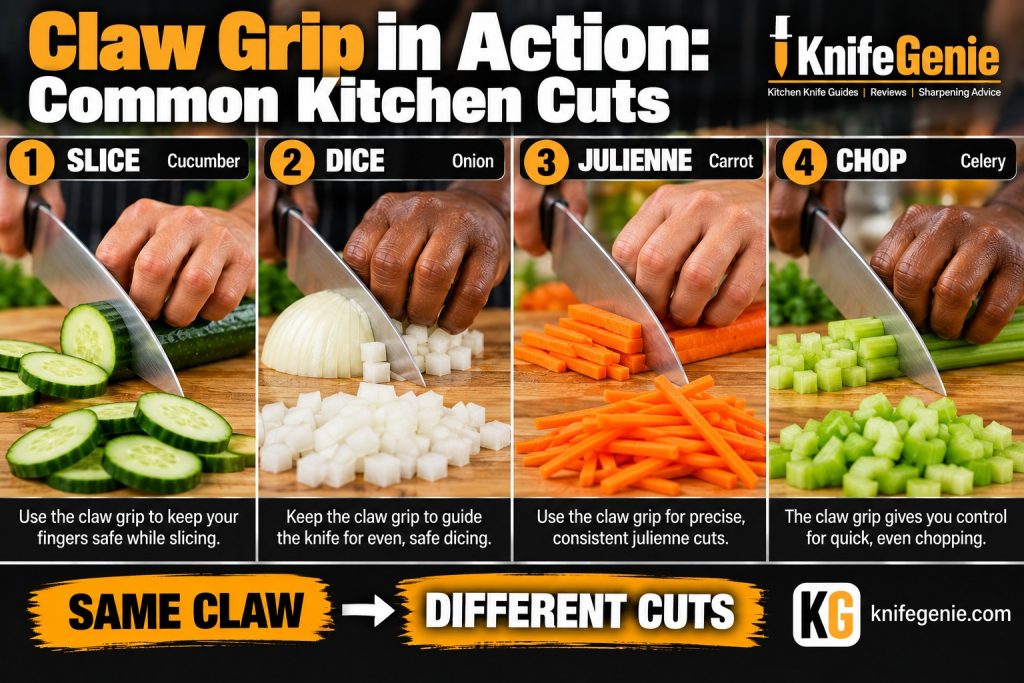

Claw grip used to slice cucumber, dice onion, julienne carrot and chop celery
The ingredient and cutting motion may change, but the basic claw position remains the same.


🆚 Claw Grip vs Exposed Fingers

One of the easiest ways to understand the claw grip is to compare it with the position you’re trying to avoid.

❌ Exposed Fingers

When your fingers remain straight, the fingertips can extend toward the cutting board and sit unnecessarily close to the knife’s path.

FINGERTIPS TOO CLOSE

That gives you less margin between your fingers and the cutting edge.

✔️ Proper Claw Grip

Curling your fingers inward moves your fingertips behind your knuckles.

FINGERTIPS TUCKED BACK

The knuckles now face the blade while the fingertips remain farther from the cutting line.

🧠 Easy rule to remember

FINGERTIPS FORWARD → STOP

KNUCKLES FORWARD → CLAW
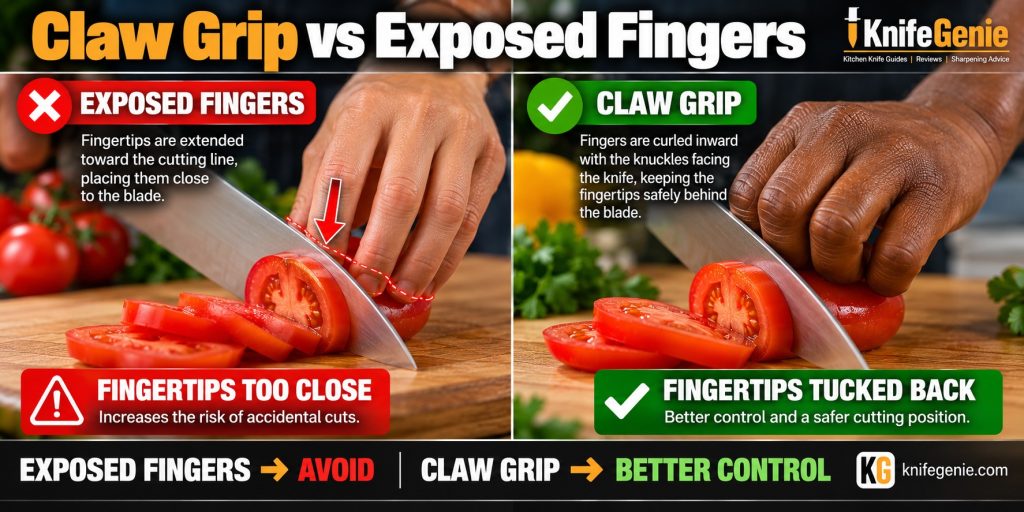

Claw grip compared with exposed fingertips while using a chef knife
Curling the fingers moves the fingertips farther from the knife’s cutting path.


⚠️ Common Claw-Grip Mistakes

Learning the shape is fairly simple. Maintaining it while cutting takes more practice.

Here are four mistakes worth watching for.

❌ 1. Leaving Your Fingertips Exposed

Curling only the upper part of your fingers isn’t enough if your fingertips still point toward the cutting board beside the blade.

✔️ Correction: Curl the fingertips completely behind the knuckles.


❌ 2. Letting Your Thumb Stick Out

The thumb can be forgotten because most of your attention is focused on your fingers.

A thumb protruding toward the blade defeats part of the purpose of forming the claw.

✔️ Correction: Keep your thumb tucked behind your guiding fingers.


❌ 3. Gripping the Food Too Tightly

The claw should stabilize the ingredient, but it doesn’t need to crush it.

Too much tension can make your hand stiff and make repositioning more difficult.

✔️ Correction: Keep your hand stable but relaxed.


❌ 4. Losing the Claw Between Cuts

Beginners sometimes curl their fingers for the actual cut and then straighten them while moving the food.

That can bring the fingertips back toward the cutting line.

✔️ Correction: Maintain the claw as your hand gradually moves backward.
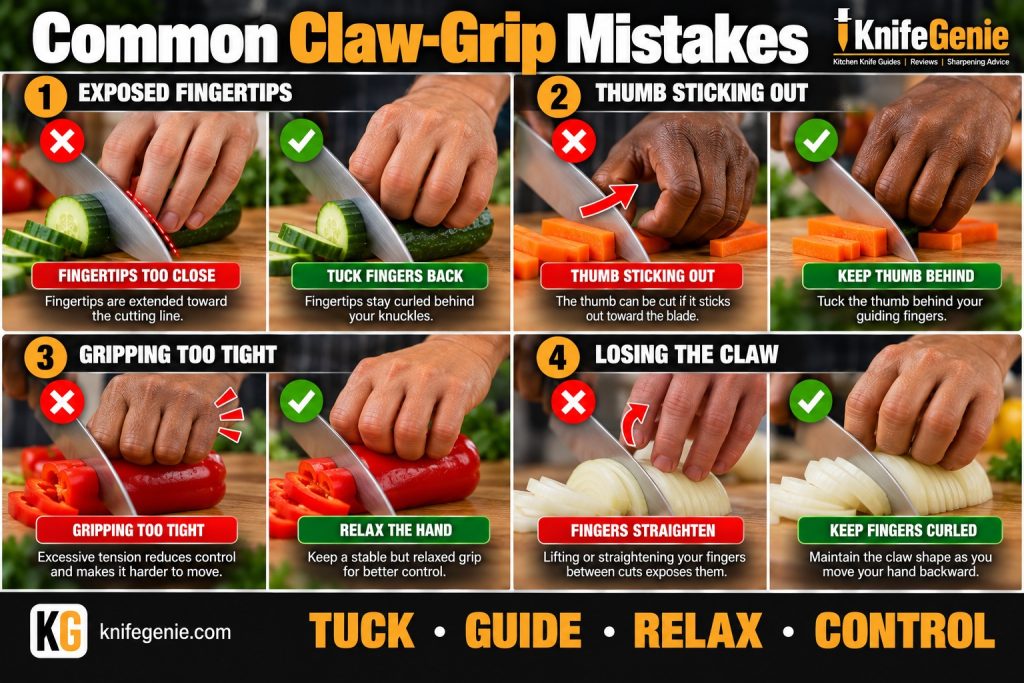

Four common claw grip mistakes and their corrections
Keep your fingertips and thumb tucked while maintaining a relaxed claw throughout the cutting motion.


🤝 Claw Grip and Pinch Grip

The claw grip describes what your guiding hand does.

The pinch grip describes one way your knife hand can control the chef knife.

Used together, they create a simple two-hand system:

🔪 KNIFE HAND → PINCH GRIP

✋ GUIDING HAND → CLAW GRIP

⬇️

🥕 FOOD → STABILIZED AND GUIDED

⬇️

🎯 RESULT → BETTER CONTROL

This is why the claw-grip article fits naturally into the KnifeGenie knife-skills cluster:

How to Use a Chef Knife

↓

How to Hold a Chef Knife

↓

Pinch Grip + Claw Grip

↓

Rock Chop vs Push Cut

↓

Individual cutting techniques

If you’re unfamiliar with the knife-hand side of this combination, see How to Use a Pinch Grip With a Chef Knife.


🔪 Claw Grip and Cutting Motion

The claw grip doesn’t dictate how the knife itself must move.

Depending on the knife, food and task, you may use techniques such as a rock chop or push cut.

With a rock chop, the knife typically uses a rocking movement while the guiding hand controls the ingredient.

With a push cut, the knife travels forward and down through the food while the claw continues to keep the fingertips tucked.

Our Rock Chop vs Push Cut guide explains these two cutting motions in more detail.

The important point here is:

The knife movement may change. Your guiding fingertips still stay tucked.


🪵 Don’t Forget the Cutting Board

Even good hand technique becomes less safe if the cutting board slides underneath you.

✔️ Use a stable cutting surface.

✔️ Stabilize the board if necessary.

✔️ Create a flat surface on rolling foods where appropriate.

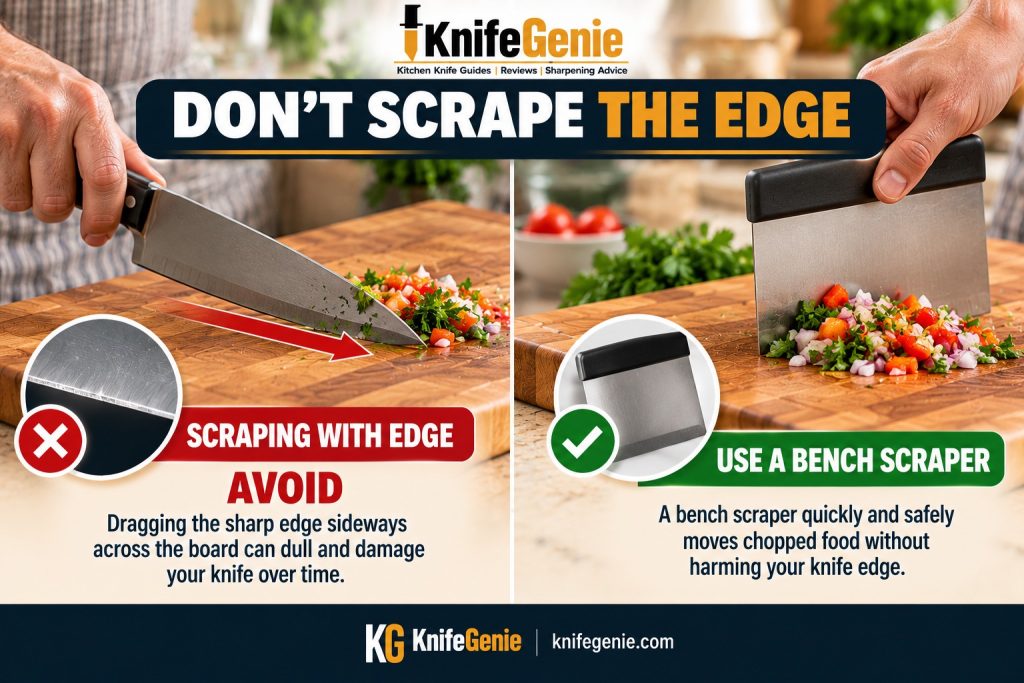
❌ Don’t scrape chopped food across the board with the sharpened cutting edge.

Good cutting-board habits aren’t only about knife control. Follow appropriate food-safety practices to prevent cross-contamination, particularly when switching between produce and raw meat, poultry or seafood.

If you’re choosing a surface for everyday knife work, see Best Cutting Board for Kitchen Knives: Wood vs Plastic.


✅ Claw Grip Checklist

Before increasing your cutting speed, check the fundamentals.

✔️ Curl your fingers inward

✔️ Tuck your fingertips back

✔️ Keep your thumb behind

✔️ Face your knuckles toward the blade

✔️ Hold the food steadily

✔️ Keep your hand relaxed

✔️ Move the claw backward as you cut

✔️ Slice with control

🎯 Remember

TUCK • GUIDE • SLICE • MOVE

Control and consistency matter much more than speed.
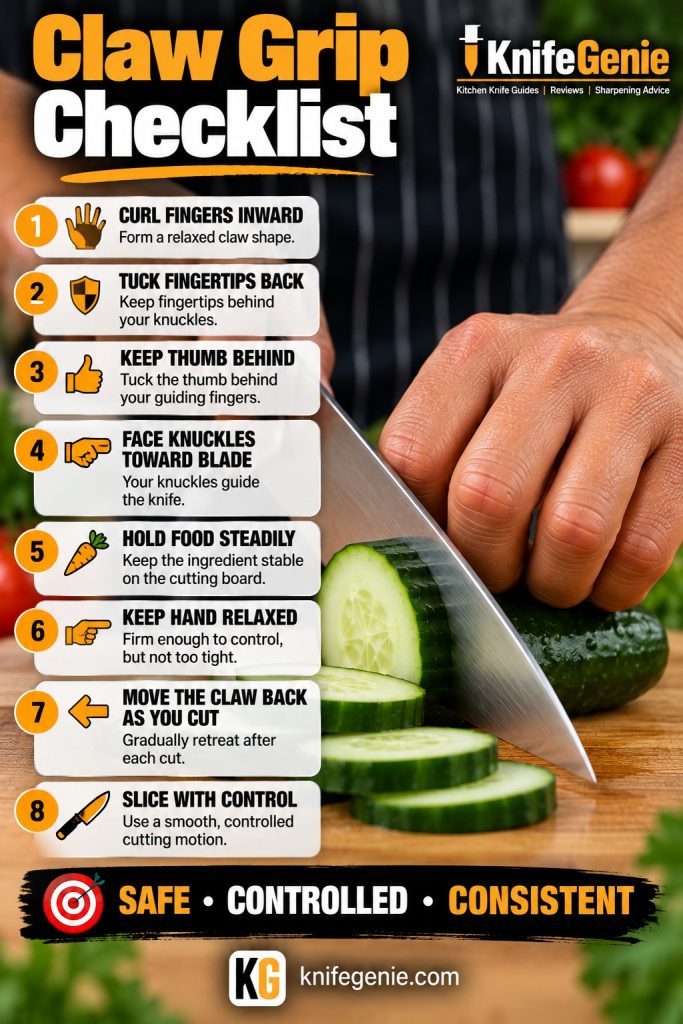

Claw grip checklist for using a chef knife
Check your finger position and control before trying to increase your cutting speed.


❓ Frequently Asked Questions

What is the claw grip when using a knife?

The claw grip is a guiding-hand position in which the fingers curl inward so the fingertips remain behind the knuckles. The knuckles provide a reference for the side of the knife blade while cutting.

Is the claw grip safer?

The claw grip is intended to keep the fingertips farther from the knife’s cutting path and can improve control. However, it does not eliminate the possibility of injury. Proper knife handling, a stable cutting surface and controlled movements remain important.

Should the knife touch your knuckles?

The flat side of the blade can remain close to or lightly reference your guiding knuckles, but you shouldn’t force the knife against your hand. The cutting edge should remain away from your fingertips.

Where should my thumb go in the claw grip?

Keep your thumb tucked behind your guiding fingers rather than allowing it to stick out toward the blade.

How tightly should I hold the food?

Firmly enough to stabilize it, but not so tightly that your hand becomes rigid. A relaxed claw is easier to reposition as you cut.

Does the claw grip work for cutting onions?

Yes. The claw grip is particularly useful when slicing and dicing onions because the guiding hand can stabilize the onion while the fingertips remain tucked. See How to Cut an Onion With a Chef Knife for the complete cutting technique.

Can I use the claw grip when chopping vegetables?

Yes. The basic claw position can be adapted to many slicing, chopping and dicing tasks as long as the ingredient gives you enough room to position your guiding hand properly.

Should beginners use the claw grip?

It’s a useful foundational knife skill for beginners. Practice slowly and concentrate on keeping the fingers tucked and coordinating both hands before trying to increase speed.

Do professional chefs use the claw grip?

Variations of the claw technique are commonly taught as part of standard kitchen knife skills. Exact hand position can vary depending on the cook, ingredient and cutting technique.

Should I use a claw grip with very small foods?

Use extra caution with very small ingredients because there may not be enough space to form a comfortable claw. Beginners are better off learning the technique with larger, stable foods first.


🎯 Final Thoughts

Learning how to use the claw grip with a chef knife is really about teaching your guiding hand to work together with your knife hand.

Remember the basic sequence:

✋ CURL YOUR FINGERS

↓

🛡️ TUCK YOUR FINGERTIPS

↓

🤚 GUIDE WITH YOUR KNUCKLES

↓

🔪 SLICE WITH CONTROL

↓

🔁 MOVE THE CLAW BACK

At first, that sequence may require conscious thought. That’s normal.

Practice slowly with stable ingredients until maintaining the claw begins to feel natural.

Then continue building your technique with our guides on How to Use a Chef Knife, How to Hold a Chef Knife, How to Use a Pinch Grip With a Chef Knife, How to Cut an Onion With a Chef Knife, and Rock Chop vs Push Cut.
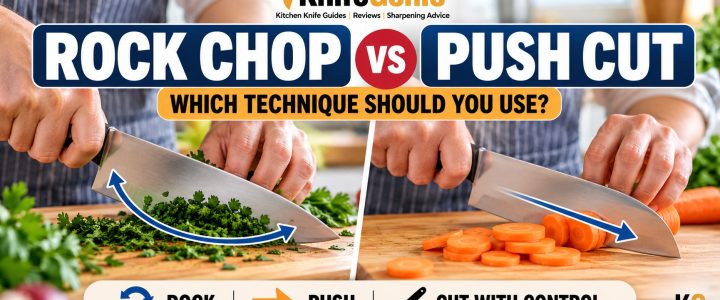
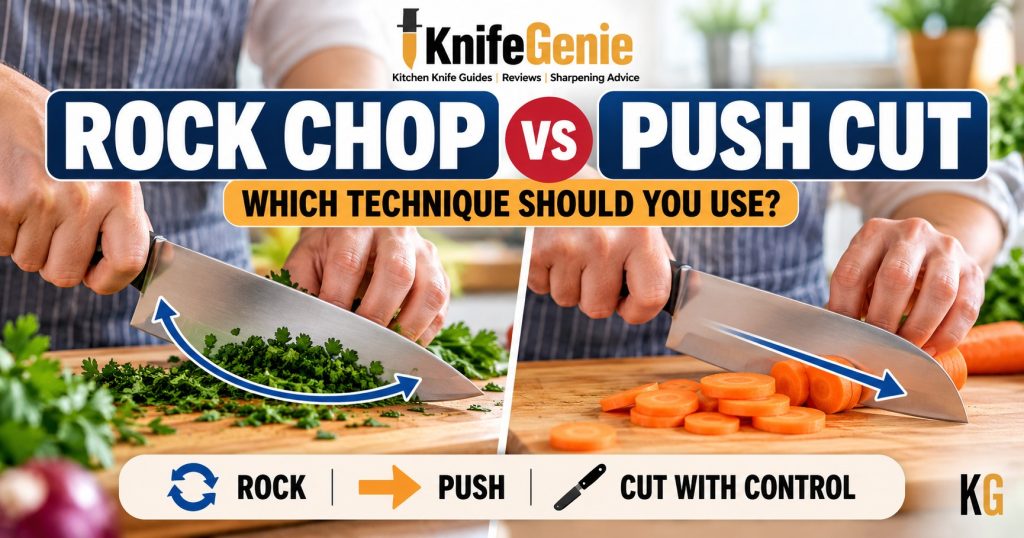
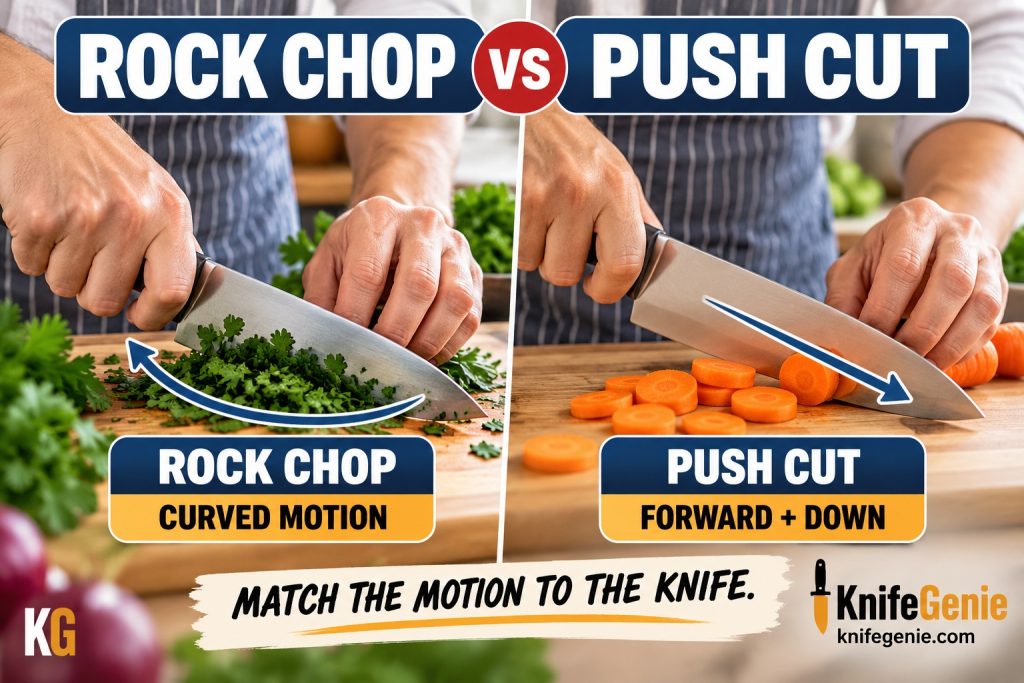
 

Rock Chop vs Push Cut: Which Knife Technique Should You Use?

Rock chop vs push cut chef knife techniques for home cooks

Rock chop vs push cut chef knife techniques for home cooks

Rock chopping and push cutting use different blade movements; the right technique depends partly on knife profile and cutting task.


Watch experienced cooks prepare vegetables, and you may notice that their knives don’t all move the same way.

They either try rock chop vs push chop to find which technique is most suitable.

Some keep the tip of the knife close to the cutting board while the blade rises and falls in a smooth rocking motion.

Others lift more of the blade and move it forward and downward through the food, producing a cleaner, more linear cut.

These are commonly described as rock chopping and push cutting.

Neither technique is automatically better.

The right motion depends on your knife’s shape, the ingredient you’re cutting, and how much control you have over the blade. Western-style chef’s knives commonly have more curvature to facilitate rocking, while flatter blade profiles can lend themselves naturally to push cutting. WÜSTHOF, for example, specifically describes the curved profile of Western chef’s knives as facilitating rocking motions.

This guide is based on research into knife design, manufacturer guidance, and established cutting techniques rather than personal testing of any particular knife or product.

By the end, you’ll know when to:

🔄 Rock chop

➡️ Push cut

⬇️ Use a simple straight chop

—and why learning more than one cutting motion can make you much more comfortable with a chef knife.

NB: If you’re still learning the fundamentals, start with our How to Use a Chef Knife guide, which covers grip, guiding-hand position, cutting motions, and basic knife control.


▶️ Jump to a Section

👉 Quick Answer
👉 Rock Chop vs Push Cut Comparison
👉 What Is Rock Chopping?
👉 What Is Push Cutting?
👉 How Blade Shape Affects Cutting
👉 Common Cutting Mistakes
👉 Which Technique Should Beginners Use?
👉 Frequently Asked 
👉 Final Takeaway


🏆 Rock Chop vs Push Cut: The Quick Answer

🔄 Use the Rock Chop When:

✔ Your chef knife has a noticeably curved belly
✔ You’re mincing herbs
✔ You’re making repeated cuts through relatively small ingredients
✔ You want to keep the knife tip near the board
✔ A rocking motion feels comfortable and controlled

➡️ Use the Push Cut When:

✔ Your knife has a flatter cutting edge
✔ You’re cutting vegetables into controlled, even pieces
✔ You’re using a chef knife vs Santoku, nakiri, or flatter-profile chef knife
✔ You want clean cuts with less repetitive rocking
✔ You’re comfortable moving the blade forward and down

🧙 KnifeGenie Quick Rule

CURVED BLADE → ROCKING FEELS NATURAL

FLATTER BLADE → PUSH CUTTING FEELS NATURAL

But don’t treat that as an absolute rule. Many chef knives can perform both techniques, and the food you’re preparing matters just as much as the knife.

🧙 KnifeGenie Tip: Don’t force your knife into a cutting motion that doesn’t suit its blade profile. Let the shape of the edge help determine how the knife moves across the board.


Rock Chop vs Push Cut Overview

Rock chop vs push cut chef knife techniques compared
Rock chopping uses a curved rocking motion, while push cutting moves the blade forward and downward through the food.


⚔️ Rock Chop vs Push Cut — Comparison

Feature 🔄 Rock Chop ➡️ Push Cut
Main motion Rocking/rolling Forward and downward
Tip position Often stays near board Usually moves with blade
Best blade profile Curved Flatter
Common knife Western chef knife Santoku, gyuto, nakiri
Excellent for Herbs, onions, repeated chopping Vegetables, precise cuts
Guiding hand Claw grip Claw grip
Cutting feel Flowing and rhythmic Controlled and deliberate
Blade travel Curved arc Forward/down
Beginner difficulty Relatively intuitive with curved chef knife Requires learning blade path
Main mistake Excessive rocking Straight-down chopping
Key principle Let curvature work Slice through rather than crush

The biggest difference isn’t simply whether the knife moves up and down.

It’s how the cutting edge travels through the ingredient.

ZWILLING’s knife guidance emphasizes that cutting involves movement through the food rather than simply pressing downward; greater slicing movement can reduce the amount of pressure required.


🔄 What Is Rock Chopping?

Rock chopping uses the curvature of a chef knife to create a smooth rocking motion across the cutting board.

Rather than repeatedly lifting the entire blade straight up and bringing it straight down, you allow the knife to travel through a controlled arc.

Think:

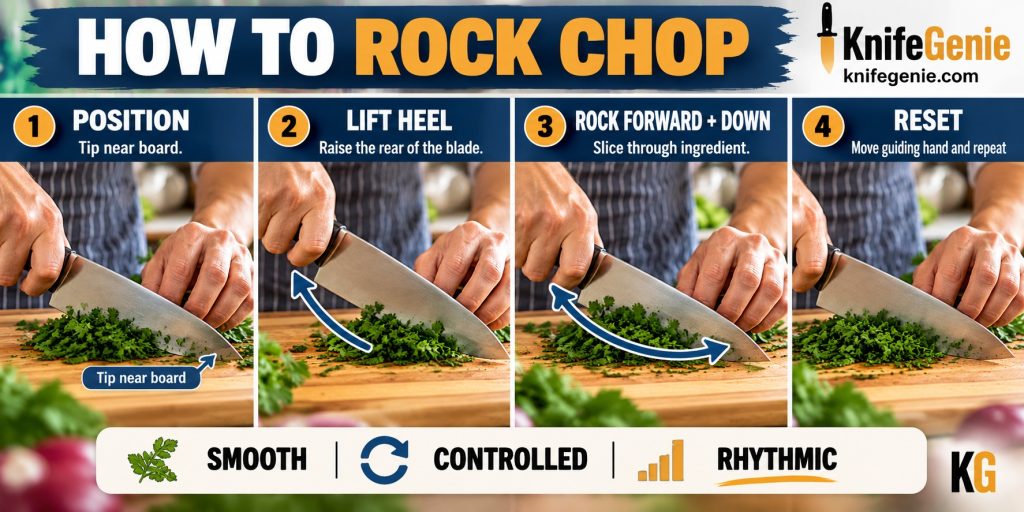
FORWARD → DOWN → ROCK → LIFT → REPEAT

The tip often remains on or close to the cutting board while the heel rises.

As the heel comes downward, the curved cutting edge progressively contacts the board.

This is why blade shape matters.

Traditional Western chef knives commonly have a noticeable curve—or belly—along the cutting edge. That curvature helps the blade move smoothly through a rocking cut, unlike WÜSTHOF German knives.


How to rock chop safely with a chef knife in four steps

A controlled rock chop uses the curved profile of the chef knife rather than repeatedly striking straight downward.


🌿 When Does Rock Chopping Work Well?

Rock chopping can be particularly useful when you’re working with:

🌿 Parsley
🌱 Cilantro
🧄 Garlic
🧅 Onions
🥬 Leafy herbs
🥕 Smaller vegetable pieces

It is particularly familiar for mincing herbs, because the knife can repeatedly travel across the ingredients while maintaining a flowing motion.

That doesn’t mean you should rock aggressively.

A controlled rock chop should feel smooth rather than violent.

If the knife is slamming against the cutting board, you’re probably using more force than necessary.


➡️ What Is Push Cutting?

Push cutting uses a noticeably different blade path.

Instead of pivoting primarily around the knife’s tip, the blade moves:

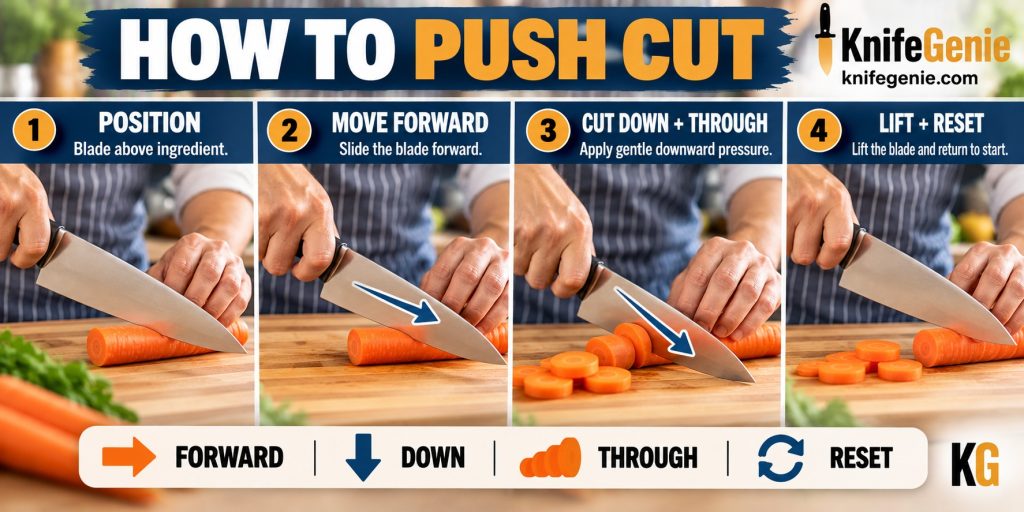
FORWARD + DOWN → THROUGH FOOD → LIFT → RESET

You’re allowing the sharp edge to slice through the ingredient as the knife moves forward.

That’s an important distinction.

A push cut isn’t simply:

UP → DOWN → UP → DOWN.

That’s closer to straight chopping.

The forward component helps the cutting edge travel through the ingredient instead of relying mainly on downward force.

Shun’s current use-and-care guidance similarly tells users to slice rather than simply chop, describing a forward-and-down cutting movement followed by a return stroke. See their PDF Shun Cutlery


Push cutting technique with chef knife shown step by step

Push cutting combines forward and downward movement so the cutting edge slices through the ingredient.


🥕 When Does Push Cutting Work Well?

Push cutting is particularly useful for controlled vegetable preparation.

Examples include:

🥕 Carrots
🥒 Cucumbers
🧅 Onions
🥔 Potatoes
🫑 Peppers
🥬 Cabbage
🍠 Root vegetables

It can work especially naturally with knives that have relatively flat sections along their cutting edges.

For example, ZWILLING describes its nakiri as suitable for chopping, slicing and push cutting, while Shun notes that flatter-profile designs such as the kiritsuke naturally support push-cutting techniques.


🔪 Blade Shape Changes Everything

This is probably the most important lesson in the entire comparison.

Your knife isn’t just a sharpened piece of steel.

Its blade profile determines how the edge contacts the cutting board.

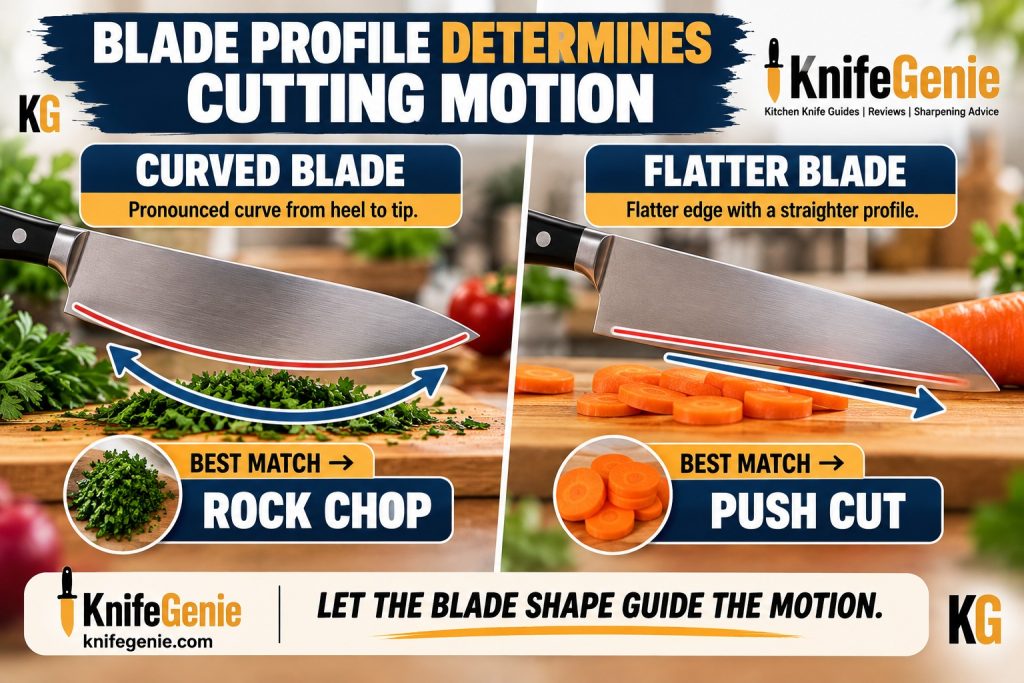
🔄 More Curved Blade

A pronounced belly allows the edge to roll progressively across the board.

That naturally supports:

ROCK → ROCK → ROCK

➡️ Flatter Blade

A flatter edge can contact more of the board simultaneously.

That naturally supports:

PUSH → LIFT → RESET

Trying to perform a large exaggerated rock with an extremely flat blade can feel awkward.

Likewise, trying to make perfectly flat vertical cuts with a highly curved chef knife can leave parts of the ingredient incompletely cut.

See our Cut an Onion With a Chef Knife guide.


Curved and flat knife blade profiles for rock chopping and push cutting

Curved chef knife profiles naturally support rocking, while flatter profiles are well suited to push cutting.


🇩🇪 German vs Japanese Knives and Cutting Technique

This also helps explain something we discussed in our German vs Japanese Kitchen Knives guide.

Traditional German-style chef knives often have a relatively curved cutting edge.

That makes them particularly comfortable for:

🔄 Rock chopping
🌿 Mincing
🧅 Repetitive chopping

Many Japanese-inspired multipurpose knives have flatter portions of edge.

These can feel particularly natural for:

➡️ Push cutting
⬇️ Controlled chopping
🎯 Precision slicing

WÜSTHOF similarly distinguishes the curved profile common to Western chef knives from straighter Asian-style profiles.

But avoid turning this into:

GERMAN = ROCK

and

JAPANESE = PUSH

Modern knife designs overlap considerably.

Look at the actual blade profile, not simply the country printed on the packaging.


✋ Your Guiding Hand Doesn’t Change

Whichever cutting motion you choose, your non-knife hand remains extremely important.

Use a proper claw grip technique.

Curl your fingertips backward and allow your knuckles to form a guide beside the blade.

Your fingertips should not be stretched toward the cutting line.

ZWILLING’s description of rocking technique similarly notes that the holding hand guides the blade along the curved fingers’ knuckles.

Combine that with a controlled pinch grip on the knife itself.

This gives you a simple system:

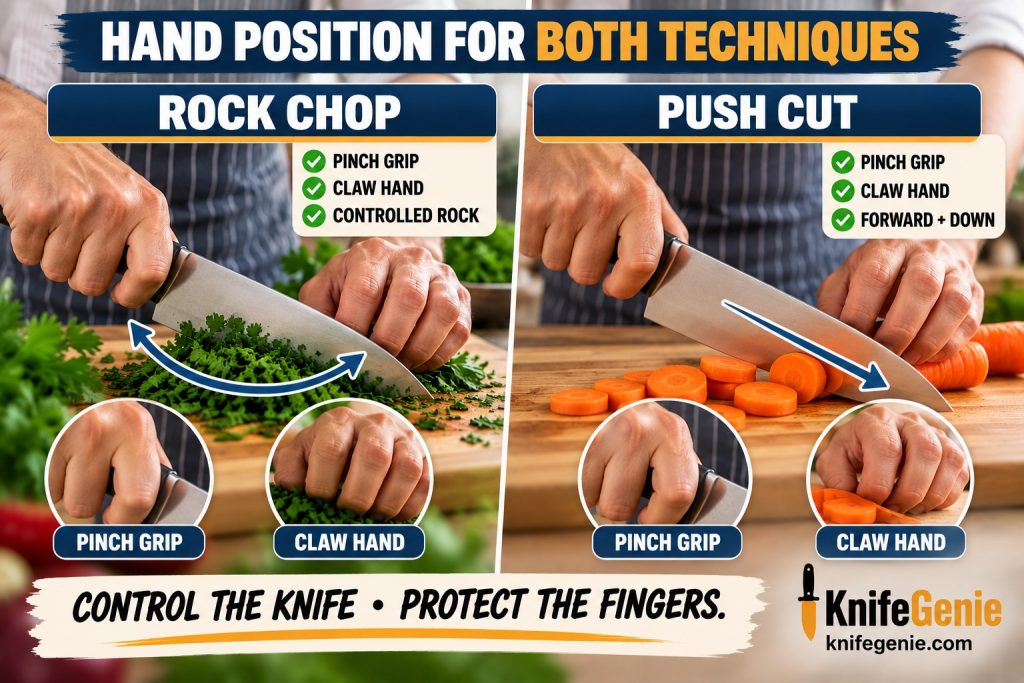
PINCH GRIP → CLAW HAND → CONTROLLED BLADE MOTION


Pinch grip and claw hand used for rock chopping and push cutting

Both techniques benefit from a secure knife grip and properly formed claw hand.


🥬 Rock Chopping Herbs

Herbs are one of the classic uses for a rocking motion.

Place the herbs together, establish your claw grip and make controlled cuts through them.

For finer mincing, you can gather the herbs again and make additional controlled passes.

The mistake is turning this into a frantic display of speed.

Speed isn’t the objective.

Consistency is.

Your knife should remain controlled throughout the movement.


🥕 Push Cutting Vegetables

Practicing push cuts with carrots provides an excellent opportunity to learn because their shape makes it easy to see whether your cuts are consistent.

Start slowly.

Position your claw hand.

Move the blade:

FORWARD ↘ DOWN

Then lift it enough to clear the ingredient.

Move your guiding hand slightly backward.

Repeat.

Your first goal isn’t speed.

Try to produce several pieces of approximately equal thickness.

That develops distance control, which is far more useful than trying to chop rapidly.


⚠️ Push Cutting Is NOT Straight-Down Chopping

This distinction deserves its own section because beginners frequently confuse the two.

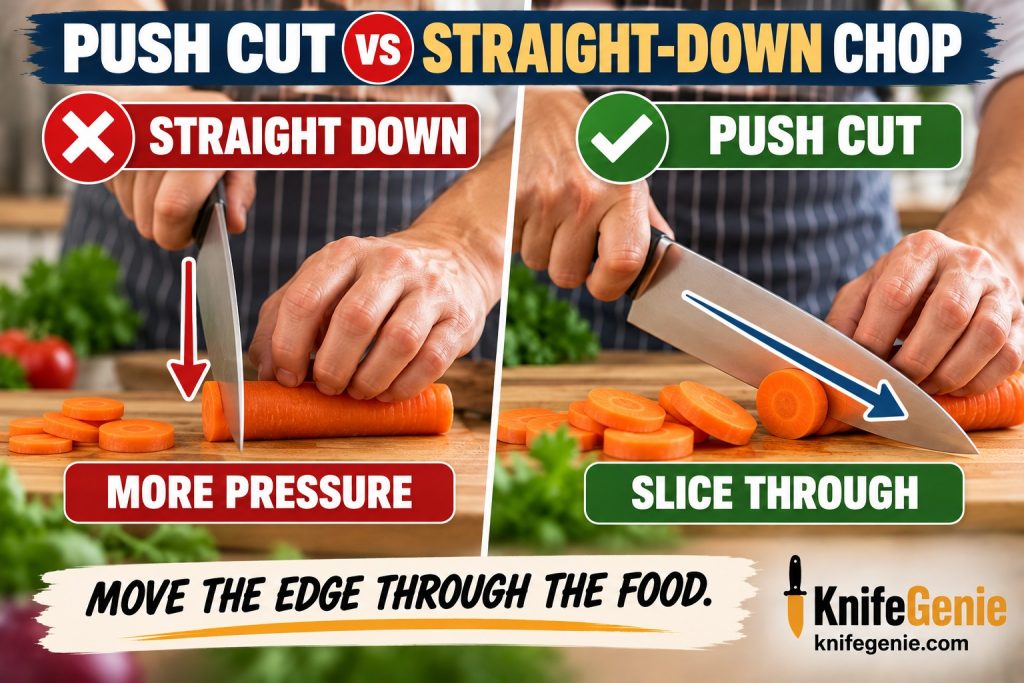
❌ Straight Down

UP ↓ DOWN

The knife primarily presses through the food.

✔ Push Cut

FORWARD ↘ DOWN

The cutting edge travels through the ingredient.

A sharp knife combined with slicing movement generally requires less brute force than simply pressing downward. ZWILLING explicitly notes this relationship between cutting movement and the pressure needed.

Think:

SLICE THROUGH THE FOOD—DON’T PUNCH THROUGH IT.


Push cutting compared with straight-down chopping using a chef knife

A push cut includes forward slicing movement instead of relying entirely on downward pressure.


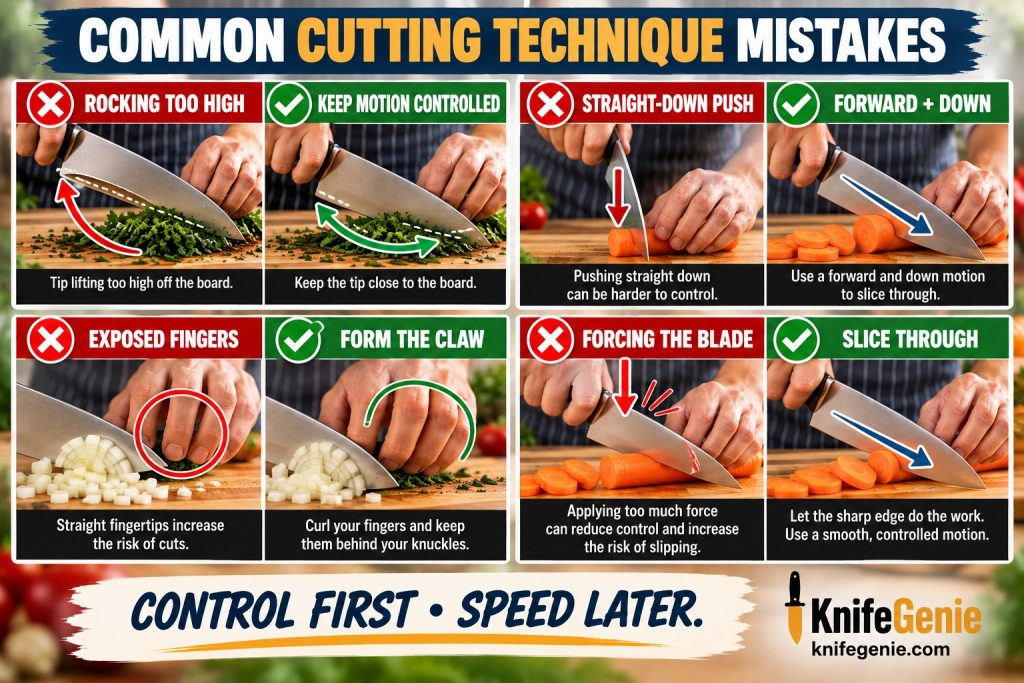
⚠️ Common Rock-Chopping Mistakes

1. Rocking Too Aggressively

You don’t need huge movements.

Keep the motion controlled.

2. Raising the Knife Too High

Exaggerated movements increase unnecessary blade travel.

3. Chasing Speed

Fast knife work comes from repetition and control—not deliberately moving the blade as quickly as possible.

4. Forgetting the Claw

Never sacrifice guiding-hand position just because you’re concentrating on the knife.

5. Forcing a Flat Knife to Rock

Some knives simply aren’t designed for a pronounced rocking motion.

Use the blade profile you actually have.

Watch out and don’t force too much, or you may have issues. See Why Kitchen Knives Get Dull.


⚠️ Common Push-Cutting Mistakes

1. Chopping Straight Down

Remember:

FORWARD + DOWN

not simply:

DOWN

2. Pushing Too Far Forward

The motion doesn’t need to be enormous.

3. Twisting the Blade

Avoid lateral twisting while the edge is embedded in food, particularly with thin, hard edges.

4. Using Excessive Force

If ordinary vegetables require substantial force, investigate your knife’s sharpness and technique.

5. Cutting Too Quickly

Learn the path first.

Speed can develop naturally later.


Common mistakes when rock chopping and push cutting with chef knives

Controlled blade movement, a proper claw grip and slicing action are more important than speed.


🆚 Which Technique Should Beginners Learn First?

If you own a conventional curved Western chef knife, learning a gentle rock chop is useful.

But don’t stop there.

Push cutting teaches an important principle:

A knife cuts most effectively when the edge moves through the food.

For a beginner learning general chef-knife skills, a sensible progression is:

1️⃣ PINCH GRIP

↓

2️⃣ CLAW HAND

↓

3️⃣ CONTROLLED SLICING

↓

4️⃣ PUSH CUT

↓

5️⃣ ROCK CHOP

↓

6️⃣ PRACTICE CONSISTENCY

You don’t need to choose one technique permanently.

A capable home cook should eventually be comfortable using several cutting motions.


🧅 Can You Use Both Techniques on the Same Ingredient?

Absolutely.

Consider an onion.

You might use controlled slicing movements while making the initial cuts.

Then use push cuts when dicing.

Later, if you want a finer mince, you might use a gentle rocking motion.

The ingredient hasn’t changed.

The cutting objective has.

That’s why thinking in terms of techniques rather than one universal knife movement makes you a more adaptable cook.


🪵 Your Cutting Board Matters Too

Whichever technique you’re practicing, use a stable, knife-friendly cutting board.

Wood and appropriate plastic boards are common choices.

Avoid cutting directly on extremely hard surfaces such as:

❌ Glass
❌ Stone countertops
❌ Ceramic plates
❌ Metal surfaces

Hard surfaces can be unnecessarily harsh on the cutting edge. WÜSTHOF specifically advises avoiding surfaces including metal and glass, while Shun likewise warns against glass, marble, granite, ceramic and similar hard surfaces.

Your board also shouldn’t slide.

If necessary, stabilize it before beginning.

👉 Related KnifeGenie guide: Best Cutting Board for Kitchen Knives: Wood vs Plastic


🧙 KnifeGenie Technique Tips

🔪 Match the motion to your blade. A curved chef knife invites rocking; flatter edges often favor push cutting.

✋ Master your hands before chasing speed. Build a reliable pinch grip and claw hand first.

🥕 Practice on predictable vegetables. Carrots, cucumbers and similar produce make it easy to judge cut consistency.

🪵 Stabilize the board. A moving cutting board undermines otherwise good technique.

⚔️ Let the edge cut. Excessive pressure is usually a warning that something needs attention.

🐢 Practice slowly. Deliberate repetitions build control better than trying to imitate a professional cook’s speed.

🔄 Learn both techniques. The goal isn’t to become a “rock chopper” or “push cutter.” It’s to select an appropriate motion for the knife and task.


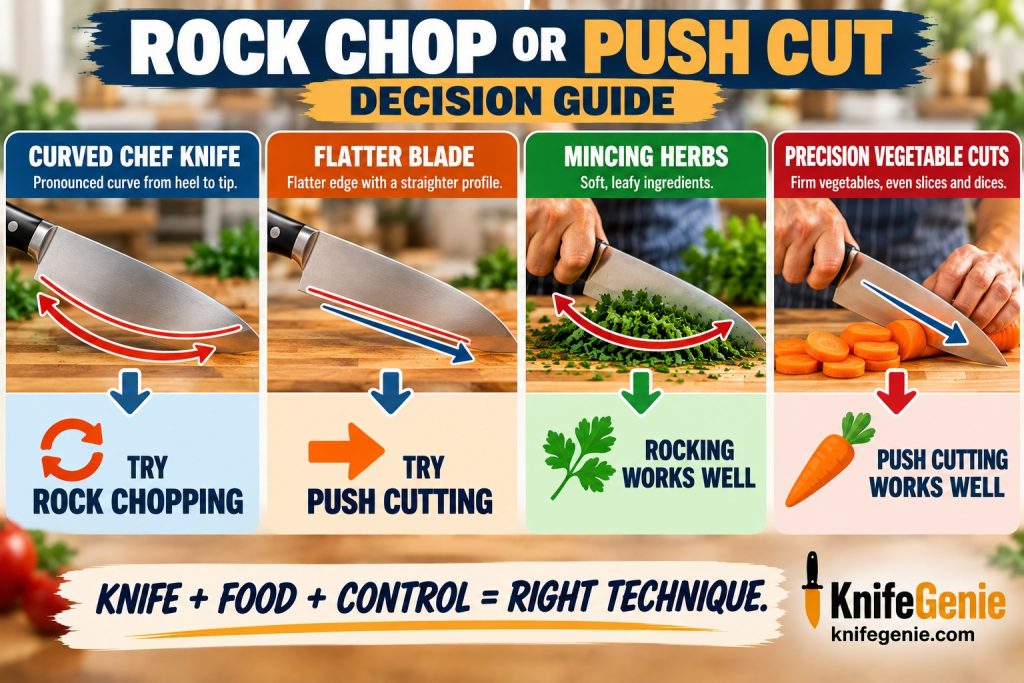
Decision guide for choosing rock chopping or push cutting
Choose your cutting technique according to the knife’s blade profile, the ingredient and the type of cut you need.


❓ Frequently Asked Questions

Is rock chopping better than push cutting?

Neither is universally better.

Rock chopping works naturally with curved chef knives and is particularly useful for repetitive chopping and mincing. Push cutting works especially well with flatter blade profiles and controlled vegetable preparation.

Learning both gives you more flexibility.


What is the difference between rock chopping and push cutting?

Rock chopping moves a curved knife through an arc, often keeping the tip close to the cutting board.

Push cutting moves the blade forward and downward through the ingredient before lifting and resetting it.


Is push cutting the same as chopping straight down?

No.

A proper push cut includes forward movement so the edge slices through the ingredient.

Straight-down chopping relies much more heavily on vertical movement.


What knife is best for rock chopping?

A chef knife with a curved belly is particularly well suited to rocking.

Traditional Western chef knives commonly use this type of profile.


What knife is best for push cutting?

Knives with relatively flat cutting edges—including many Santoku, nakiri and Japanese-inspired chef-knife designs—can work particularly well for push cutting.

Blade design varies, however, so examine the actual knife rather than relying entirely on its name or country of origin.


Can you rock chop with a Japanese knife?

Sometimes.

“Japanese knife” describes a huge range of blade shapes and constructions.

Some have enough curvature to accommodate gentle rocking; others are much flatter.

Follow the manufacturer’s guidance for the particular knife and avoid aggressive rocking or lateral twisting with thin, hard edges.


Should the knife leave the cutting board when rock chopping?

The tip commonly remains on or close to the board while the heel rises and falls.

The exact movement depends on the knife’s profile and the food you’re preparing.


Is rock chopping safe for beginners?

It can be when performed slowly with a stable cutting board, controlled knife grip and proper claw hand.

Beginners should prioritize control and consistent hand position rather than speed.


🏆 Rock Chop vs Push Cut: Final Takeaway

Rock chopping and push cutting aren’t competing techniques.

They’re different tools in your knife-skills toolbox.

🔄 ROCK CHOP

Works naturally with:

✔ Curved chef knives
✔ Herbs
✔ Repetitive chopping
✔ Mincing
✔ Flowing cutting motions

➡️ PUSH CUT

Works naturally with:

✔ Flatter blade profiles
✔ Vegetable preparation
✔ Precision cuts
✔ Santoku and nakiri-style knives
✔ Controlled forward slicing

The most useful lesson is simple:

🧙 KnifeGenie Rule: Let the knife, ingredient and cut determine the technique—not habit alone.

Once you can comfortably use a pinch grip, protect your guiding hand with the claw, and switch between rocking, push cutting and controlled slicing, you’re developing the foundation of genuinely useful chef-knife technique.

Now see our guides to take you a step further: How to Use a Chef Knife: Beginner’s Guide to Cutting Safely and How to Use a Pinch Grip.


Best Cutting Board for Kitchen Knives: Wood vs Plastic

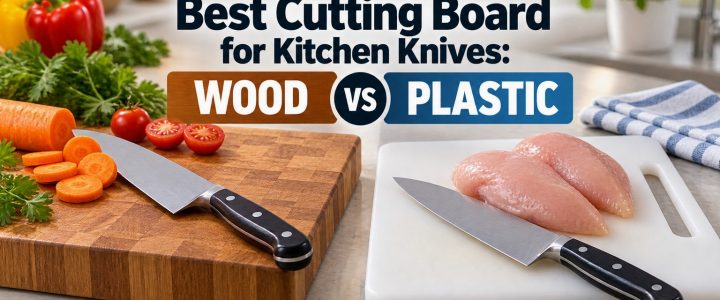
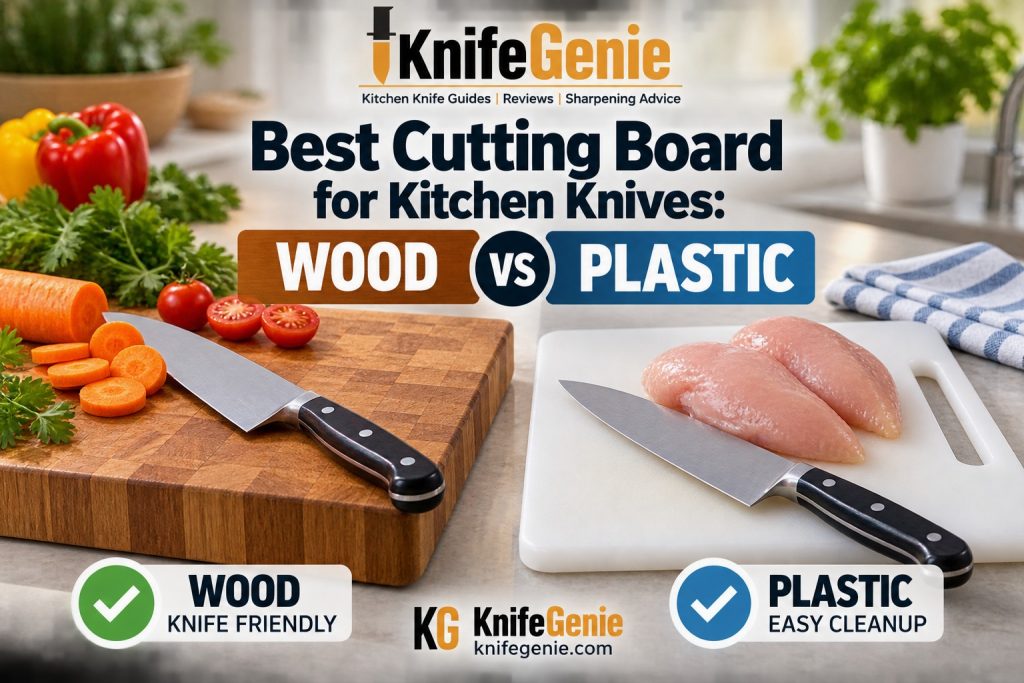
Wood vs plastic cutting boards with chef knives for kitchen food preparation

Wood vs plastic cutting boards with chef knives for kitchen food preparation

Wood vs plastic cutting boards: compare knife friendliness, cleanup, and everyday kitchen use.The cutting board underneath your knife may seem like a simple piece of kitchen equipment, but the best cutting board for kitchen knives is very important.

Every time you chop an onion, slice a tomato or dice vegetables, the knife edge eventually meets the board. A surface that is reasonably forgiving allows the edge to make contact without excessive stress. A very hard surface can accelerate dulling and may increase the risk of edge damage.

For most home cooks, a good wooden cutting board is the better everyday choice when protecting kitchen knife edges is the priority. Plastic boards, however, have an important advantage: they are inexpensive, easy to maintain and many can be cleaned in a dishwasher.

In practice, you don’t necessarily have to choose only one.

A sensible home-kitchen setup is often a wooden board for everyday vegetable, fruit, bread and general knife work, plus a separate dishwasher-safe plastic board for raw meat, poultry or seafood.

💡 Quick Answer: For everyday knife work, choose a quality wood cutting board such as maple or walnut. Wood provides a durable but relatively forgiving cutting surface. Keep a separate plastic board if you want something inexpensive and easy to sanitize after preparing raw meat, poultry or seafood.

🔬 Research Note: This guide is based on published food-safety guidance, cutting-board research and manufacturer information. It is not presented as personal testing or firsthand experience with the individual products or materials discussed.

Also read about proper chef knife grip when using a cutting board.


🔽 Jump to

👉 Wood vs Plastic: Quick Comparison
👉 Why Your Cutting Board Matters
👉 Is Wood Better for Kitchen Knives?
👉 Are Plastic Cutting Boards Good for Knives?
👉 Wood vs Plastic for Food Safety
👉 End-Grain vs Edge-Grain Wood
👉 Best Woods for Cutting Boards
👉 What About Bamboo Cutting Boards?
👉 Cutting Board Materials to Avoid
👉 What Size Cutting Board Should You Buy?
👉 How Thick Should a Wooden Cutting Board Be?
👉 How to Keep a Cutting Board From Sliding
👉 How to Clean a Wooden Cutting Board
👉 How to Clean a Plastic Cutting Board
👉 Don’t Scrape Food With Your Knife Edge
👉 When Should You Replace a Cutting Board?
👉 Which Cutting Board Should You Choose?
👉 Final Recommendation
👉 Frequently Asked Questions


⚖️ Wood vs Plastic Cutting Boards: Quick Comparison

Both materials can work well in a home kitchen, but they have different strengths.

Feature 🪵 Wood ◻️ Plastic
Knife-edge friendliness Excellent with suitable woods Good to moderate
Maintenance Requires more care Easy
Dishwasher compatible Usually no Often yes
Longevity Potentially many years Usually shorter
Deep groove resistance Good on quality boards Grooves develop with use
Cost Usually higher Usually lower
Raw-meat convenience Good if cleaned correctly Excellent
Appearance Excellent Functional
Best use Everyday prep Raw meat / easy cleanup

✅ Bottom line: If preserving your knife edges is the main concern, quality wood is generally the stronger choice. If easy cleanup is the priority, plastic has a clear advantage.

WOOD VS PLASTIC QUICK COMPARISON

Wood vs plastic cutting board comparison for kitchen knives
Wood is an excellent everyday cutting surface, while plastic offers convenient cleanup.


🔪 Why Your Cutting Board Matters to Your Knives

A sharp kitchen knife has a very thin cutting edge. During normal cutting, that edge repeatedly contacts the board beneath the food.

The harder and less forgiving that surface is, the greater the stress placed on the fine edge.

A knife-friendly cutting board protects the edge during prep, while correct honing technique helps maintain a compatible knife between sharpenings.

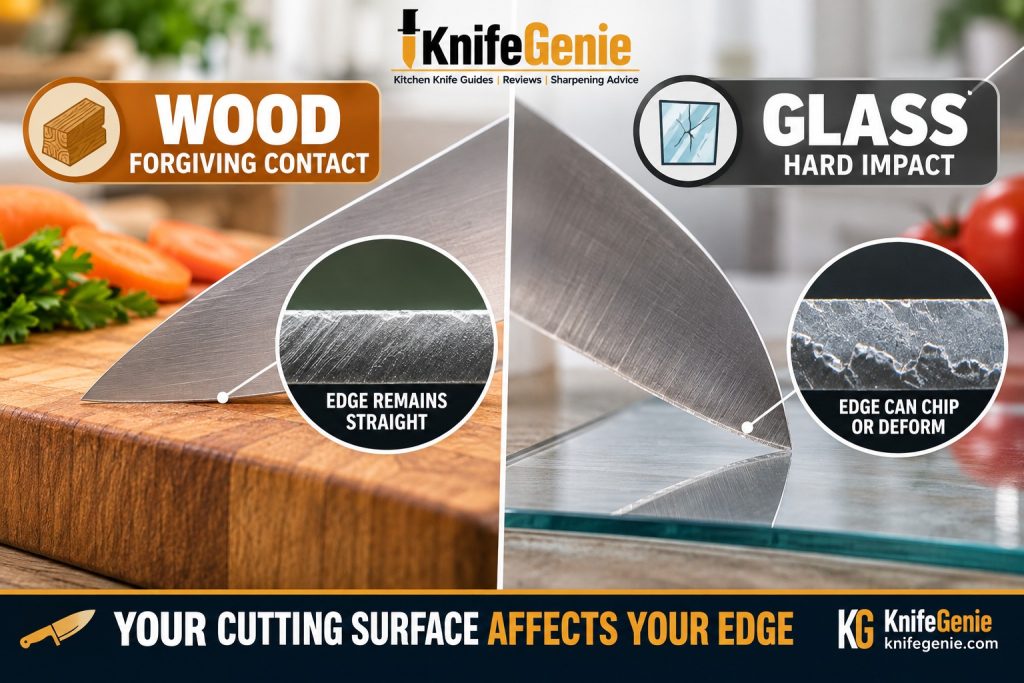
That is why chopping directly on glass, ceramic, stone, granite or a plate is a poor habit. These surfaces provide very little cushioning when the knife contacts them.

A suitable cutting board does something different: it provides a stable working surface while allowing the knife to finish the cut without repeatedly striking an extremely hard material.

This becomes particularly important with thin, finely sharpened knives.

See our How often to sharpen kitchen knives guide.

💡 KnifeGenie Tip: If your kitchen knives seem to lose their sharpness unusually quickly, the cutting surface is one of the first things worth checking. It is still important to keep kitchen knives sharp to prolong the life of your cutting board.

🔗 Related guide: Read Why Kitchen Knives Get Dull So Quickly for other common causes of premature dulling.

WHAT HAPPENS TO THE KNIFE EDGE

How cutting board material affects a kitchen knife edge
Hard cutting surfaces place greater stress on a fine knife edge.


🪵 Is Wood Better for Kitchen Knives?

For most everyday kitchen cutting, wood is an excellent choice.

Suitable cutting-board woods provide a balance between durability and resilience. The surface is firm enough to support controlled cutting without feeling excessively hard underneath the blade.

Common choices include:

  • Maple
  • Walnut
  • Cherry
  • Beech

Hard maple is particularly well established as a cutting-board material. FDA food-service guidance specifically recognizes hard maple and equivalently hard, close-grained woods for cutting boards.

But simply being made from wood doesn’t automatically make a board ideal. Because it’s wood doesn’t make it the best cutting board for kitchen knives.

Very hard or abrasive materials can be less forgiving, and poorly constructed wooden boards can warp, split or develop rough surfaces.

✅ Advantages of Wood

A good wooden cutting board can:

  • provide a forgiving cutting surface;
  • offer excellent stability;
  • last for years with proper maintenance;
  • be resurfaced in some cases;
  • develop fewer obvious knife scars than many plastic boards; and
  • double as an attractive preparation or serving surface.

⚠️ The trade-off: Most traditional wooden boards should be washed by hand rather than repeatedly exposed to the heat and prolonged moisture of a dishwasher. Follow the board manufacturer’s instructions because construction methods vary.


◻️ Are Plastic Cutting Boards Good for Knives?

Yes. A quality plastic cutting board is still a perfectly practical cutting surface.

Plastic is considerably more knife-friendly than glass, ceramic or stone.

Its greatest advantage, however, is convenience.

Many plastic boards are:

  • inexpensive;
  • lightweight;
  • nonporous;
  • easy to wash;
  • dishwasher safe; and
  • easy to dedicate to a particular food category.

That makes them particularly useful when preparing raw chicken, meat or seafood.

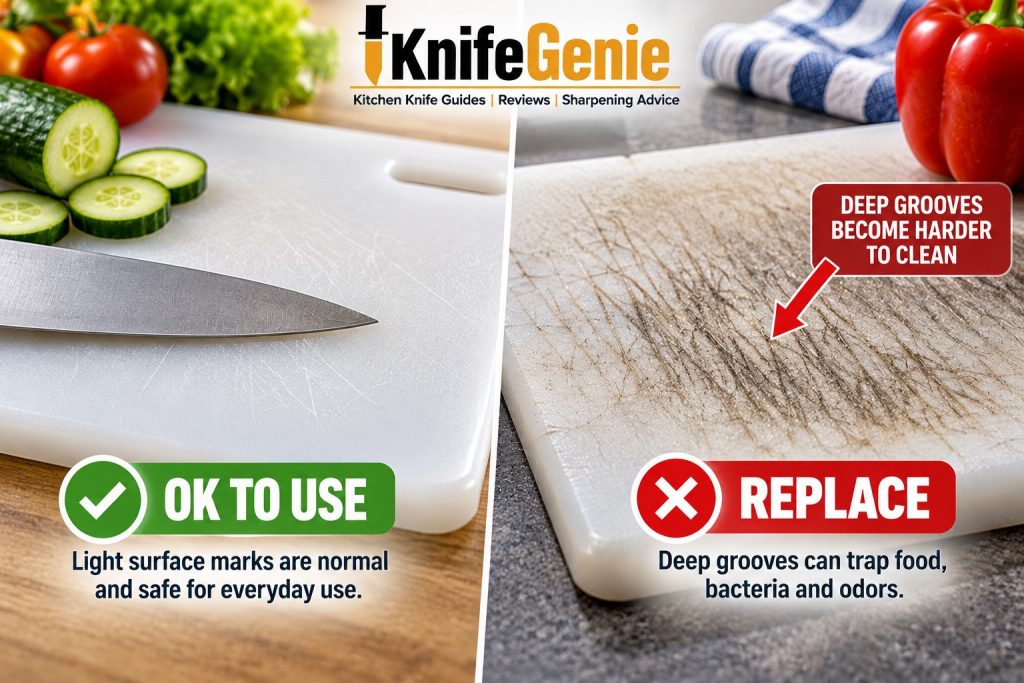
⚠️ Watch for wear: Repeated cutting creates scratches and eventually deeper grooves. Once those grooves become difficult to clean properly, the board should be replaced.

USDA on cutting boards specifically recommends replacing cutting boards that become excessively worn or develop hard-to-clean grooves.

WORN PLASTIC BOARD

Worn plastic cutting board with deep knife grooves
Replace plastic cutting boards when deep grooves become difficult to clean.


🧼 Wood vs Plastic for Food Safety

This is where the comparison often becomes unnecessarily confusing.

You’ll sometimes hear that plastic is always more sanitary because it is nonporous. You’ll also encounter claims that wood is naturally safer.

For a home cook, the more useful conclusion is simpler:

✅ Either material can be used safely when it is properly cleaned, maintained and kept in good condition.

The USDA recommends using separate boards where possible: one for fresh produce and bread and another for raw meat, poultry and seafood.

That separation helps reduce cross-contamination.

After preparing raw animal products, cutting boards and utensils should be thoroughly cleaned before they are used for other foods.

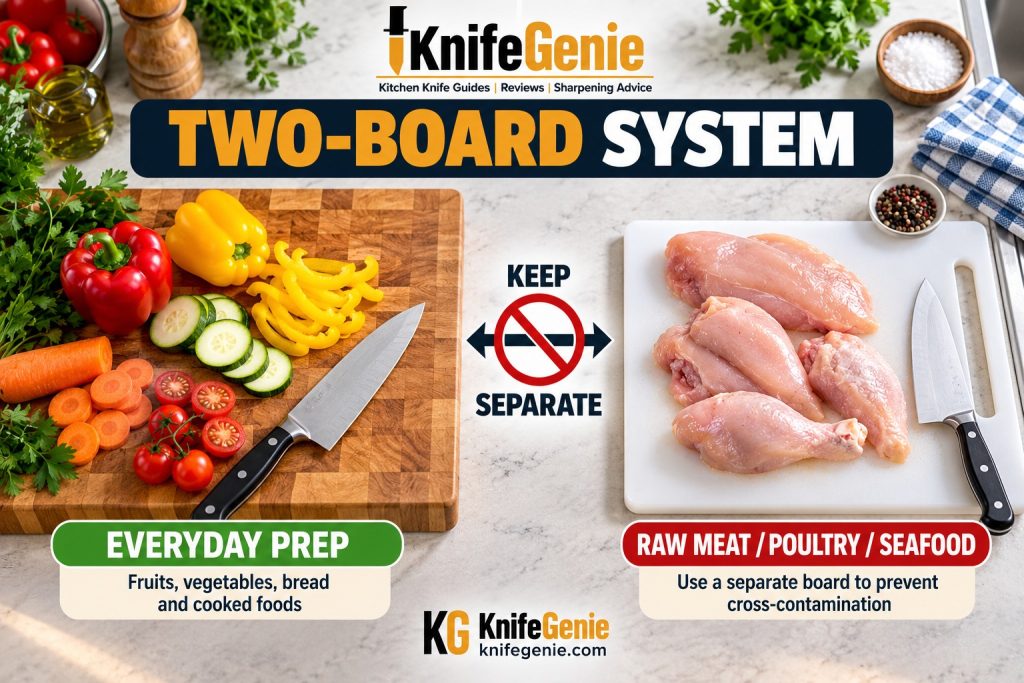
🍎 A Practical Two-Board System

🪵 BOARD 1 — WOOD

Use for:

🥕 Vegetables → 🍎 Fruit → 🌿 Herbs → 🍞 Bread → 🔪 General preparation

◻️ BOARD 2 — PLASTIC

Use for:

🍗 Raw poultry → 🥩 Raw meat → 🐟 Raw seafood

💡 Why this works: This isn’t because wood cannot be cleaned safely. It simply makes the workflow easier and provides an additional barrier against accidental cross-contamination.


Separate wood and plastic cutting boards for food preparation
Using separate boards can help reduce cross-contamination during food preparation.


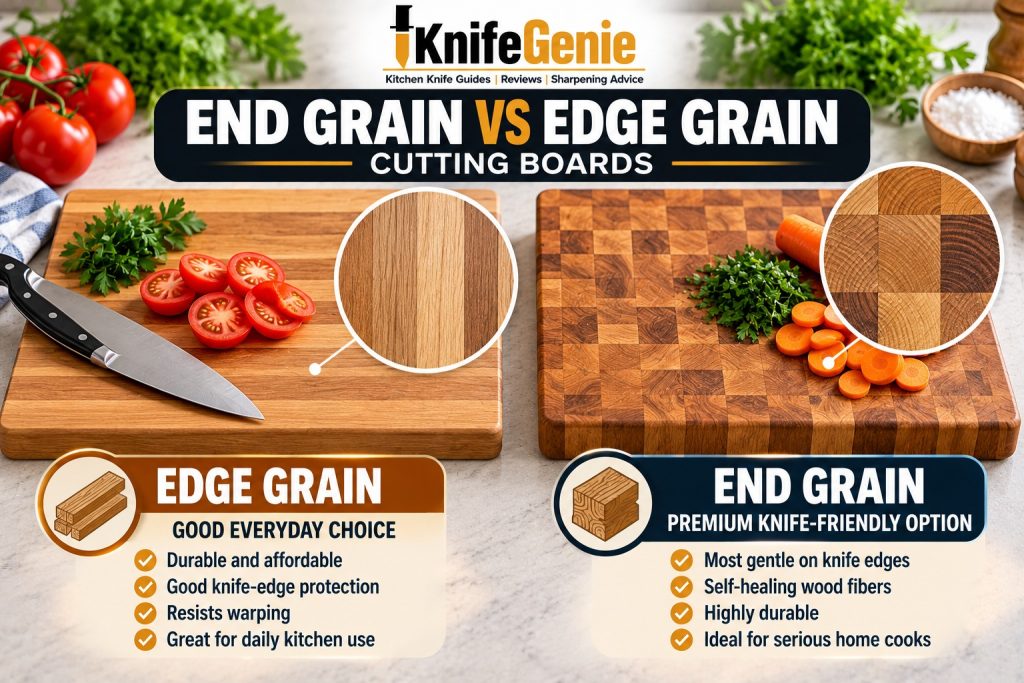
🌳 End-Grain vs Edge-Grain Cutting Boards

Once you’ve decided on wood, there is another choice to make.

Edge-Grain Boards

On an edge-grain board, long strips of wood are arranged with their edges forming the cutting surface.

These boards are commonly available and usually less expensive than comparable end-grain boards.

💰 Best value: For most home cooks, a good edge-grain maple or walnut board offers an excellent balance of performance, durability and price.

End-Grain Boards

An end-grain board is constructed so that the ends of the wood fibers face upward.

Think of the surface as thousands of tightly packed fibers.

When a knife contacts the board, the edge meets those fibers rather than repeatedly cutting across long grain.

End-grain boards are often prized for their forgiving cutting feel and ability to hide light knife marks.

⭐ Main advantage: Excellent cutting feel and premium construction.

⚠️ Main drawbacks: Higher price, greater weight and additional maintenance.


End-grain vs edge-grain wood cutting board comparison
Both constructions work well, although end-grain boards are often considered the premium option.


🌲 What Is the Best Wood for a Cutting Board?

For a general-purpose kitchen board, look for a relatively close-grained hardwood that is durable without being excessively hard.

🍁 Maple

Hard maple is one of the classic choices.

It is durable, relatively light in color and widely used for butcher blocks and professional work surfaces.

Best for: Someone looking for a traditional all-purpose board.

🌰 Walnut

Walnut is somewhat darker and attractive enough to remain on the countertop.

It provides an excellent work surface but generally costs more than basic maple.

Best for: Knife care plus appearance.

🍒 Cherry

Cherry offers another relatively forgiving hardwood surface and develops a deeper color as it ages.

Best for: Someone wanting an attractive board that can also serve as a permanent countertop piece.

🌳 Beech

Beech is another traditional cutting-board hardwood.

It can provide good value, although—as with other wooden boards—it needs proper drying and occasional maintenance.

Best for: Practical everyday use.


🎋 What About Bamboo Cutting Boards?

Bamboo boards are inexpensive, widely available and often marketed as environmentally friendly alternatives to hardwood.

But bamboo is not actually wood; it is a grass.

Many bamboo boards are relatively hard, and their construction commonly involves laminated strips.

💡 KnifeGenie Takeaway: That doesn’t mean a bamboo board will immediately damage a kitchen knife. It simply means that if knife-edge preservation is your primary objective, maple, walnut or another suitable hardwood would generally be the first choice instead.

See our honing vs sharpening guide to a better knife edge.


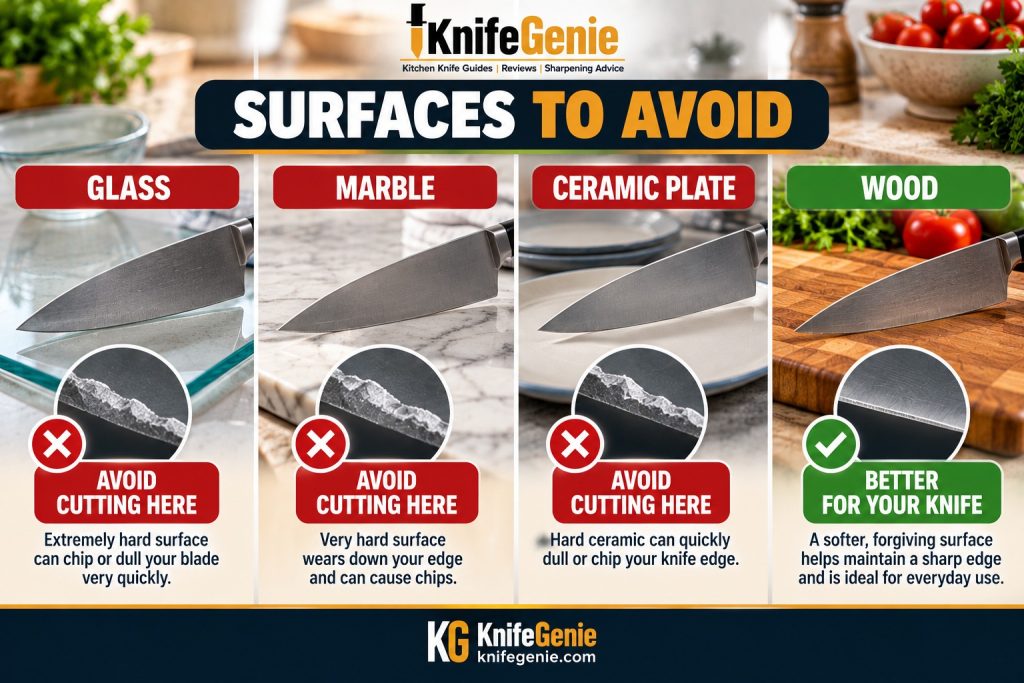
⛔ Cutting Board Materials to Avoid for Kitchen Knives

Some kitchen surfaces may look attractive but make poor cutting boards.

❌ Glass

Glass is easy to clean but extremely hard compared with a suitable cutting surface.

Use a glass board as a serving or decorative surface—not as the primary surface for chopping with a good knife.

❌ Marble and Granite

The same principle applies to stone.

Your countertop may seem convenient, but cutting directly on granite, marble or engineered stone repeatedly puts the edge against a very hard surface.

❌ Ceramic Plates

Avoid using a dinner plate as an improvised cutting board.

The glazed eating surface is not an appropriate chopping surface for a quality kitchen knife.

These are generally not the best cutting boards for kitchen knives to use.

Glass marble and ceramic cutting surfaces compared with wood
Avoid routinely cutting on glass, stone or ceramic surfaces.

The above advice applies to imported German and Japanese knives also.


📏 What Size Cutting Board Should You Buy?

A cutting board should give you enough room to work without food constantly falling off the edges.

For an 8-inch chef’s knife, a board around 12 × 18 inches is a useful general-purpose size for many kitchens.

Larger boards provide more working room, particularly when chopping several vegetables.

Choosing the right chef knife size for your cutting board is also very important to give you the right space to work with.

⚠️ Don’t forget the sink: A huge board that won’t fit comfortably in your sink may become frustrating very quickly.

Before buying, check:

  1. 📐 Available countertop space
  2. 🚰 Sink dimensions
  3. 🗄️ Storage space
  4. 🔪 Knife length
  5. 🥕 Amount of food you normally prepare

📐 How Thick Should a Wooden Cutting Board Be?

Thickness becomes particularly important with larger wooden boards.

Thin wood boards are lighter and easier to store, but substantial boards generally feel more stable.

For a board that will stay on the counter, a thicker butcher-block-style design can provide an excellent work surface.

For something you intend to lift, wash and store after every meal, however, moderate thickness may be more practical.

✅ Choose stability before appearance.

A beautiful cutting board isn’t much help if it moves every time you start chopping.


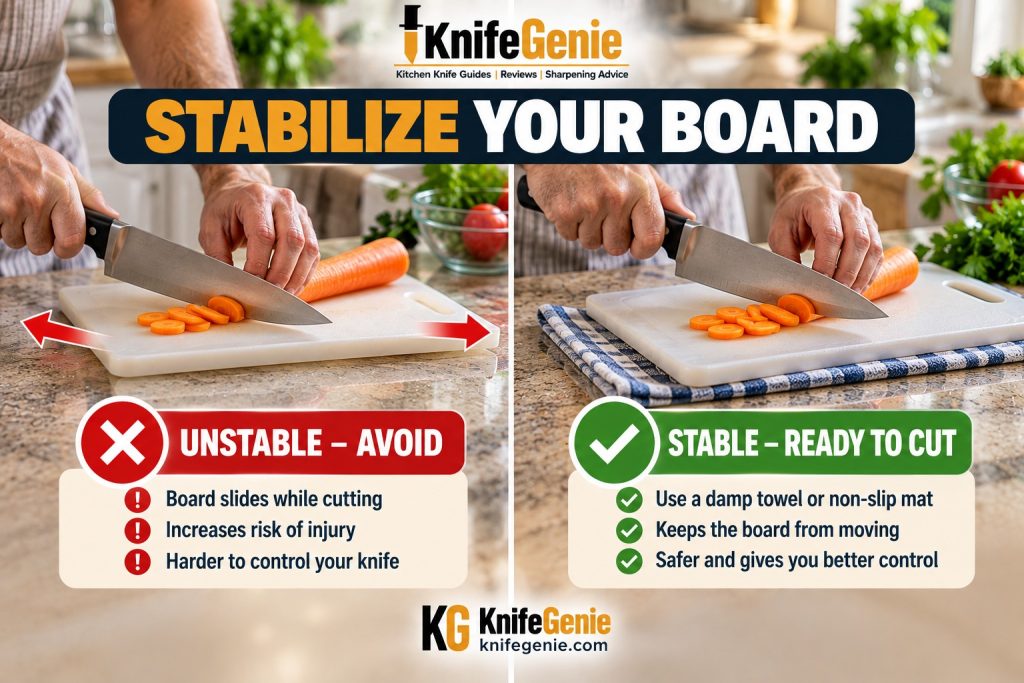
🛑 How to Keep a Cutting Board From Sliding

This is an important knife-safety habit.

Before cutting, place the board on a stable, dry counter and check whether it moves.

If it slides, place a slightly damp kitchen towel or nonslip mat underneath it.

Then press down on each corner.

The board should remain stable before the knife comes anywhere near the food.

💡 KnifeGenie Tip: This simple step is especially useful with lightweight plastic boards.


How to keep a cutting board from sliding while using a knife
Stabilize a moving cutting board before beginning any knife work.

🔗 Related guide: See How to Use a Chef Knife: Beginner’s Guide to Cutting Safely for grip, claw-hand position, stance and controlled cutting technique.


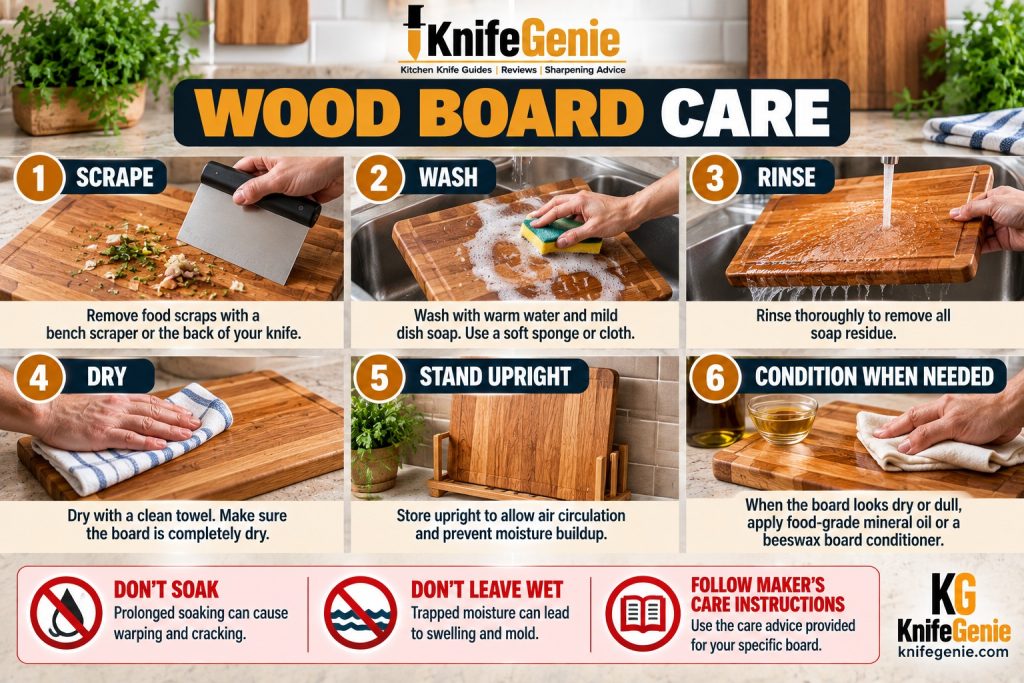
🧽 How to Clean a Wooden Cutting Board

For most traditional wooden boards:

1️⃣ Remove Food Debris

Scrape remaining food into the trash or compost.

Use a bench scraper rather than dragging the sharp edge of your knife sideways across the board.

2️⃣ Wash Promptly

Wash the surface with warm water and dish soap according to the manufacturer’s care instructions.

🚫 Avoid leaving a wooden board soaking in a sink.

3️⃣ Rinse

Remove soap and food residue thoroughly.

4️⃣ Dry Immediately

Wipe away excess water and allow air to circulate around the board.

Standing a board upright can help both sides dry more evenly.

5️⃣ Oil When Necessary

If the manufacturer recommends it, periodically apply food-grade mineral oil or an appropriate cutting-board conditioner.

⚠️ Avoid ordinary cooking oils that can become rancid.


How to clean and maintain a wooden cutting board
Prompt washing and thorough drying help maintain wooden cutting boards.


🚿 How to Clean a Plastic Cutting Board

Plastic is simpler.

After use:

  1. 🧹 Remove food debris.
  2. 🧼 Wash thoroughly with hot, soapy water.
  3. 🚿 Rinse thoroughly.
  4. ✨ Sanitize when appropriate.
  5. 💨 Air-dry completely.

If the manufacturer identifies the board as dishwasher safe, the dishwasher provides a convenient cleaning option.

⚠️ Food-safety reminder: Wash cutting boards, utensils and work surfaces thoroughly between preparing raw meat, poultry or seafood and preparing foods that will not subsequently be cooked.


🚫 Don’t Scrape Food With Your Knife Edge

The cutting board isn’t the only part of this relationship that matters.

After chopping vegetables, many cooks turn the knife sideways and drag the sharpened edge across the board to gather the food.

Try not to do this.

Repeated sideways scraping can be unnecessarily hard on a fine cutting edge.

✅ Better method: Turn the knife over and use the spine, or use a bench scraper.


Avoid scraping a kitchen knife edge across a cutting board
Use the knife spine or a bench scraper to move chopped food.


♻️ When Should You Replace a Cutting Board?

A wooden board can often remain useful for years if it is properly cared for.

Replace it—or have it professionally resurfaced where appropriate—if it develops:

  • ❌ Major splits
  • ❌ Deep cracks
  • ❌ Loose sections
  • ❌ Severe warping
  • ❌ Persistent contamination or odors
  • ❌ Damage that prevents thorough cleaning

Plastic boards usually have a shorter practical life.

Light scratches are normal. Deep, heavily scored grooves that are difficult to clean are a sign that replacement is due.

💡 Don’t judge a cutting board by age alone. Judge it by its condition.


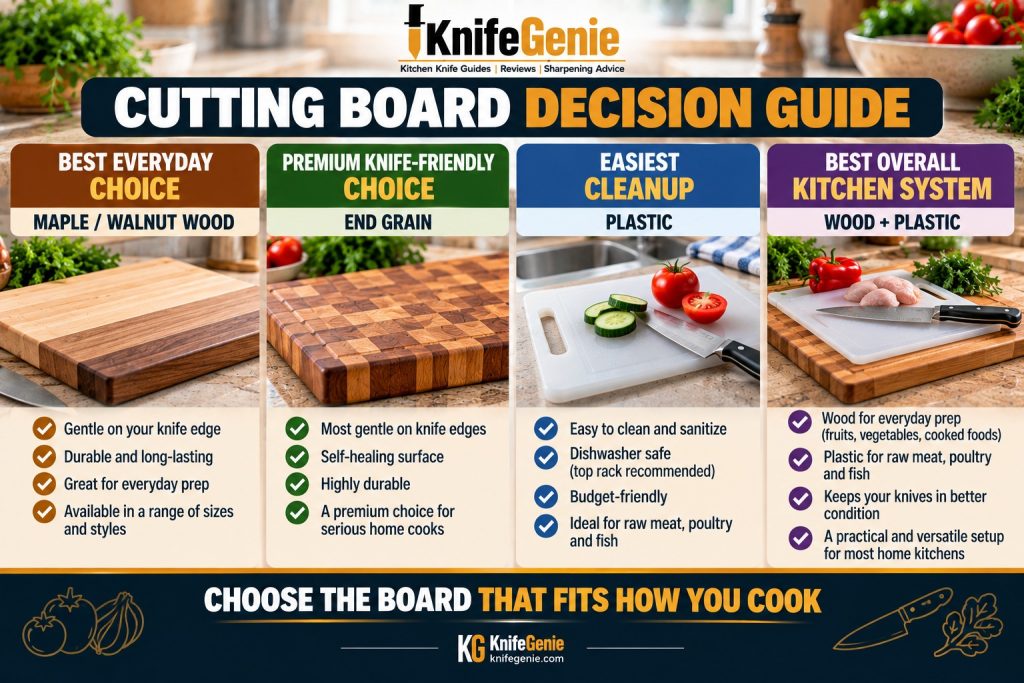
🎯 Which Cutting Board Should You Choose?

For most home cooks, the decision can be simplified.

🪵 Choose Maple or Walnut Wood If:

You want an excellent everyday surface for a chef’s knife and don’t mind hand washing and occasional maintenance.

⭐ Choose End-Grain Wood If:

You want a premium, substantial work surface and are comfortable paying more and maintaining it.

🧼 Choose Plastic If:

Easy cleaning, low cost, light weight and dishwasher compatibility are priorities.

🪵 + ◻️ Use Both If:

You want perhaps the most practical home-kitchen arrangement.

Use a quality wood board for most everyday cutting and keep a separate plastic board for raw meat, poultry and seafood.


Best cutting board decision guide for kitchen knives
Wood and plastic each have advantages, which is why many kitchens benefit from having both.


🏆 Final Recommendation

If your main concern is keeping your kitchen knives sharp, start with a quality maple, walnut, cherry or similar close-grained hardwood cutting board.

It provides a durable everyday workspace without subjecting your knife edge to the harsh contact associated with glass, stone or ceramic.

But plastic shouldn’t be dismissed.

An inexpensive dishwasher-safe plastic board makes an excellent companion to a wooden board, particularly for handling raw meat, poultry and seafood.

For many home cooks, therefore, the best answer to wood vs plastic isn’t really one or the other.

🪵 Wood for everyday knife work + ◻️ plastic for easy-clean raw-protein preparation.

Whichever board you choose, keep it clean, keep it stable and replace it when damage makes it difficult to maintain properly.

Your cutting board is part of your knife-care system. Pairing a sharp knife with an appropriate cutting surface can help that edge perform as intended for longer.


❓ Frequently Asked Questions

🔪 What cutting board is best for keeping knives sharp?

A quality wooden cutting board made from a suitable hardwood such as maple or walnut is an excellent choice for protecting kitchen knife edges during everyday use.

🪵 Is wood or plastic better for kitchen knives?

Wood generally offers an excellent balance of durability and knife friendliness. Plastic is also suitable for knives and offers easier cleaning, particularly when dishwasher safe.

◻️ Are plastic cutting boards bad for knives?

No. Plastic boards are far more appropriate cutting surfaces than glass, ceramic or stone. However, plastic becomes scratched and grooved over time and should be replaced once those grooves become difficult to clean.

🚫 What cutting boards should you avoid?

Avoid using glass, marble, granite, ceramic plates and other very hard surfaces as regular cutting surfaces for quality kitchen knives.

🎋 Is bamboo good for kitchen knives?

Bamboo boards are usable, but many are relatively hard. If protecting a fine knife edge is the priority, a suitable hardwood such as maple or walnut is generally a stronger choice.

🥩 Can wooden cutting boards be used for raw meat?

Wooden cutting boards can be used safely when properly cleaned and maintained. For convenience and reducing cross-contamination risk, however, many home cooks may prefer keeping a separate dishwasher-safe plastic board specifically for raw meat, poultry and seafood.

🚿 Should I put a wooden cutting board in the dishwasher?

Usually not unless the manufacturer specifically states that the board is dishwasher safe. Heat and prolonged exposure to water can warp, split or damage many traditional wooden boards.