Cutting an onion is one of the first real chef-knife skills worth learning.
It also combines several techniques you’ll use again and again in the kitchen:
✔ Creating a stable cutting surface
✔ Using the claw grip
✔ Controlling the knife with your guiding hand
✔ Making consistent slices
✔ Dicing ingredients evenly
✔ Knowing when not to make another cut
The good news?
You don’t need restaurant-chef speed.
For a beginner, control → consistency → speed is the right order.
This guide shows you how to cut an onion with a chef knife, including how to halve, slice and dice an onion safely using a beginner-friendly method.
The techniques described here are based on established culinary instruction and knife-safety guidance rather than claims of personal professional-kitchen experience.
🔽 Jump to What You Need
👉 Quick Answer
👉 What You Need
👉 Set Up Safely
👉 Step 1: Trim the Onion
👉 Step 2: Cut the Onion in Half
👉 Step 3: Peel the Onion
👉 How to Slice an Onion
👉 How to Dice an Onion
👉 Choose Your Dice Size
👉 Do You Need Horizontal Cuts?
👉 How to Hold the Onion Safely
👉 How to Redce Onion Tears
👉 Common Mistakes
👉 KnifeGenie Pro Tips
👉 Frequently Asked Questions
👉 Final Thoughts
🏆 Quick Answer
The basic method is simple:
1️⃣ Trim the stem end.
2️⃣ Halve the onion through the root.
3️⃣ Peel away the papery skin.
4️⃣ Stabilize each half flat-side down.
5️⃣ Curl your fingertips into a claw grip.
6️⃣ Slice or dice with slow, controlled cuts.
7️⃣ Stop when the remaining root section becomes too small to hold securely.
For dicing, leaving the root attached during the first cuts can help keep the onion’s layers together.
🧙 KnifeGenie Tip: Don’t measure your progress by how quickly you can chop an onion. A beginner who makes slow, controlled cuts with protected fingertips is developing better knife skills than someone simply trying to imitate a professional chef’s speed.
👉 See our article: How to Use a Chef Knife: Beginner’s Guide to Cutting Safely
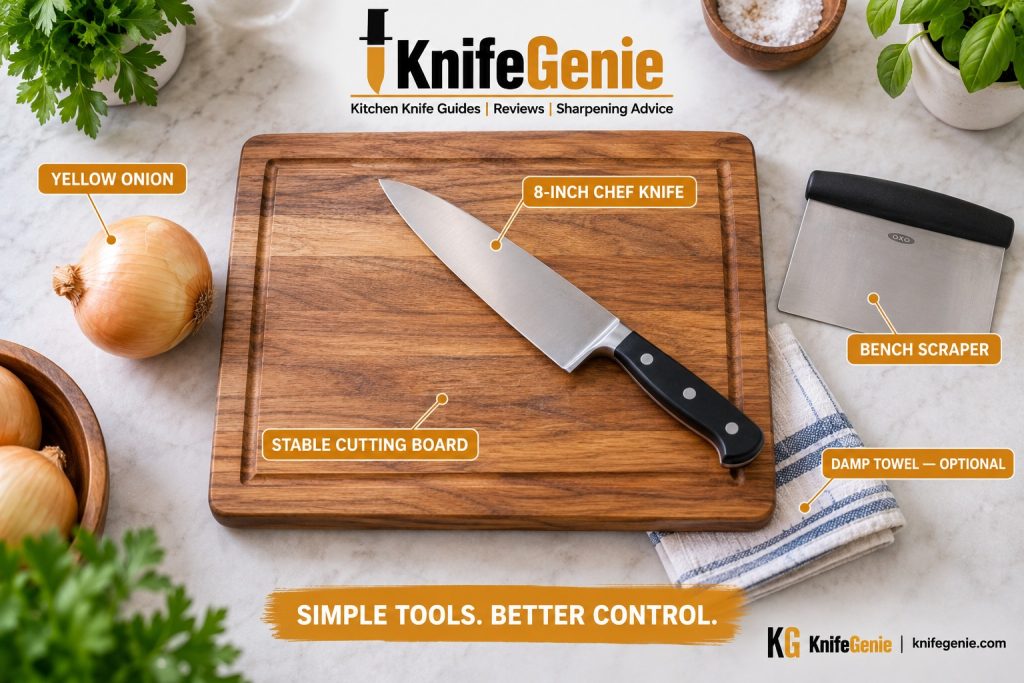
🔪 What You Need
Fortunately, this is one kitchen technique that doesn’t require much equipment.
✔ Chef knife — an 8-inch chef knife is a versatile choice for most home cooks
✔ Stable cutting board — preferably wood or suitable plastic
✔ Onion — yellow, white or red
✔ Damp kitchen towel or nonslip mat — if your board moves
✔ Bench scraper — optional, but useful for moving chopped onion
🔪 Why a Chef Knife Works So Well
A chef knife gives you enough blade length to cut cleanly through most onions while still allowing good control.
An 8-inch chef knife is particularly versatile for home kitchens.
The knife doesn’t have to be expensive.
More important is that it is:
✔ Sharp enough to cut cleanly
✔ Comfortable in your hand
✔ Appropriate for the ingredient
✔ Easy for you to control
A very dull knife requires additional pressure, which can make controlled cutting more difficult.
👉 Related KnifeGenie guide: How to Use a Chef Knife: Beginner’s Guide to Cutting Safely
YOUR ONION-CUTTING SETUP
🛡️ Set Up Safely
Before cutting anything, check the board.
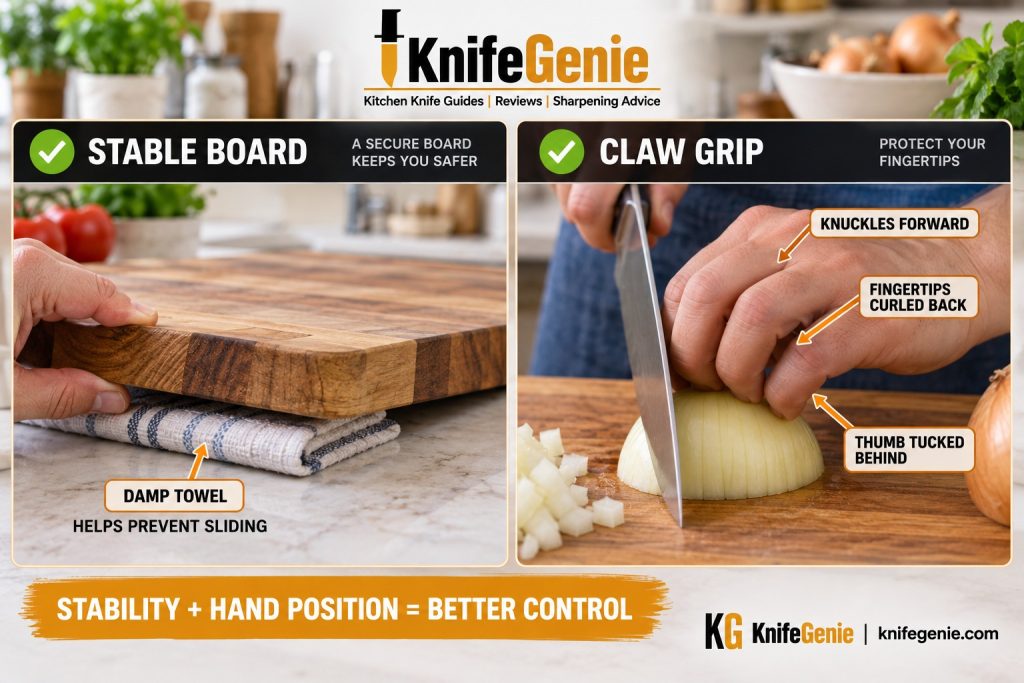
🪵 Stabilize Your Cutting Board
Give the board a gentle push.
Does it move?
If so, place a damp kitchen towel or nonslip mat underneath it.
Your cutting board should remain firmly in place while you’re working.
🤏 Grip the Chef Knife
A pinch grip gives you good control.
Pinch the blade gently between your thumb and index finger near the handle, then wrap your remaining fingers comfortably around the handle.
Don’t squeeze excessively.
You want control, not a death grip.
✋ Form the Claw
Your other hand controls the onion.
Curl your fingertips inward so your knuckles are positioned ahead of your fingertips.
Keep your thumb tucked safely behind.
Think:
KNUCKLES FORWARD → FINGERTIPS BACK
🧙 KnifeGenie Tip: Your guiding hand is just as important as your knife hand. Good knife skills depend on both hands working together.
SAFE ONION-CUTTING SETUP
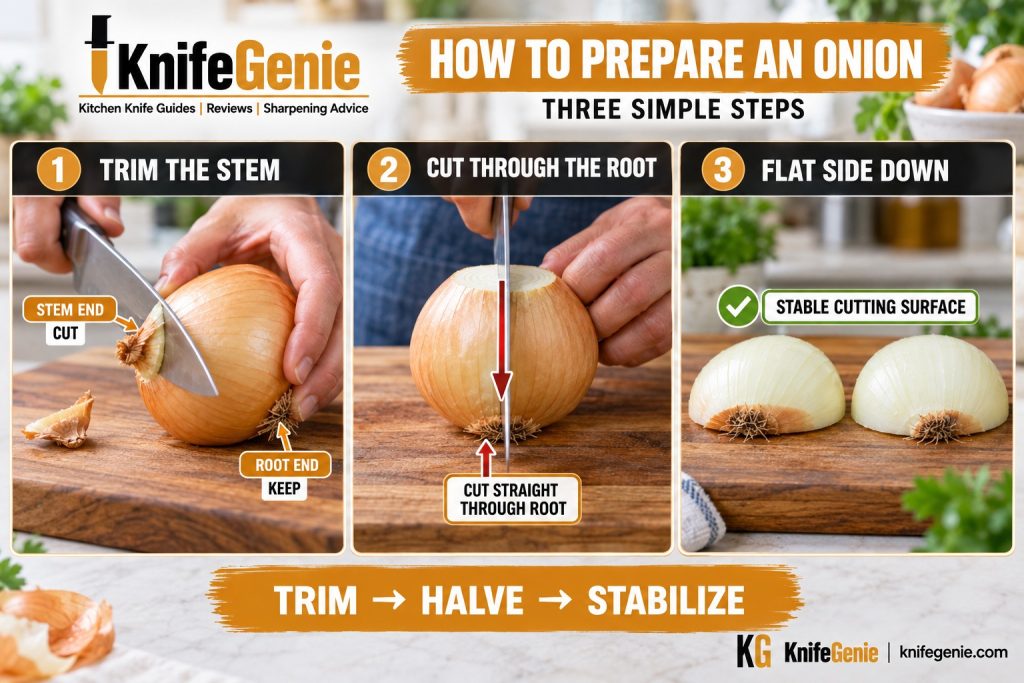
🧅 Step 1: Trim the Onion
Look at the onion before cutting.
You’ll see two different ends:
🌱 Stem end — the pointed or dried top
🌿 Root end — the end with the fibrous roots
Cut off the stem end.
You only need to remove enough to create a clean surface.
⚠️ Don’t Remove the Root Yet
If you’re planning to dice the onion, leave the root attached.
Why?
The root helps keep the onion’s layers together while you’re making the initial cuts.
STEM → CUT
ROOT → KEEP FOR NOW
🔪 Step 2: Cut the Onion in Half
Place the onion on the flat surface created by removing the stem end.
Position your chef knife through the center.
Cut:
STEM END → THROUGH CENTER → ROOT END
You should now have two halves.
Immediately place each half:
FLAT SIDE ↓ DOWN
This is more than an onion trick.
It’s an important general knife-safety principle:
🧙 KnifeGenie Rule: Whenever practical, create a flat surface on a round ingredient before continuing to cut it.
Round ingredients roll.
Flat ingredients are much easier to control.
PREPARE THE ONION
🧅 Step 3: Peel the Onion
With each onion half resting securely on its flat side, remove the papery outer skin.
If the layer immediately underneath is:
✘ Dry
✘ Tough
✘ Damaged
✘ Discolored
…remove that layer too.
If you’re dicing, try to keep the root intact.
You’re now ready to make your actual cuts.
🔪 How to Slice an Onion
Sliced onions are useful for:
🍔 Burgers
🥗 Salads
🥪 Sandwiches
🍳 Sautéing
🥘 Stews
🧅 Caramelized onions
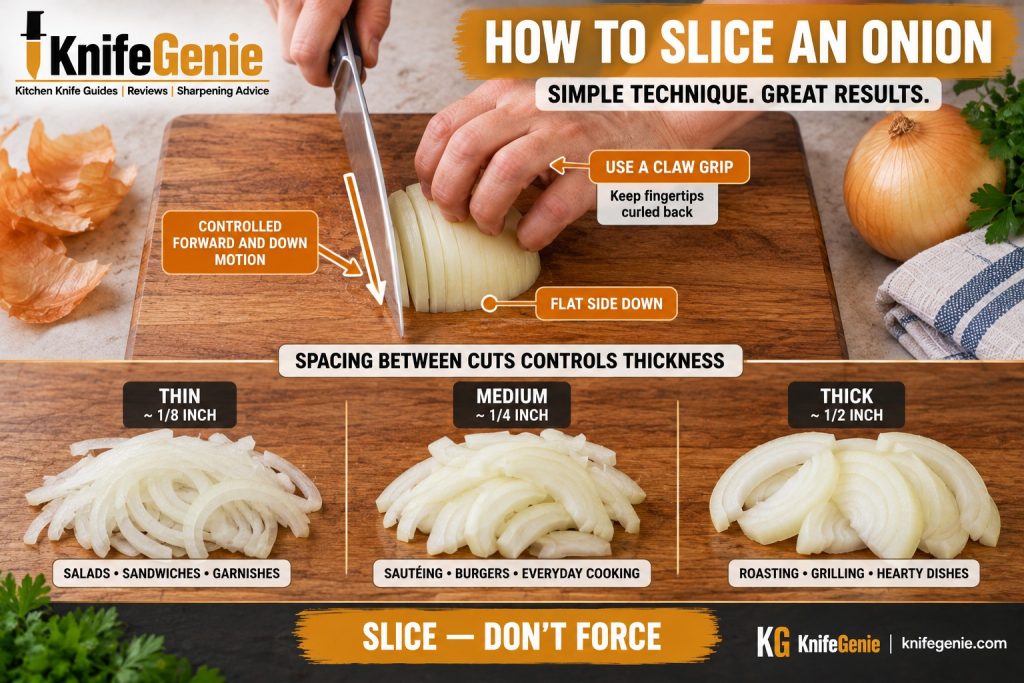
Place one peeled onion half:
FLAT SIDE DOWN
Hold it with your claw grip.
Then make controlled cuts at regular intervals.
📏 Control Thickness With Spacing
Want thin slices?
Narrow spacing between cuts.
Want thick slices?
Wider spacing between cuts.
That’s really the key.
| Cut | Approximate Result | Useful For |
|---|---|---|
| 🔹 Thin | Fine slices | Salads, sandwiches, garnishes |
| 🔸 Medium | Everyday slices | Sautéing, burgers, general cooking |
| 🟠 Thick | Substantial slices | Roasting, grilling, longer cooking |
↘ Let the Edge Slice
Avoid simply smashing the knife straight downward.
Use a controlled slicing movement that allows the cutting edge to move through the onion.
SLICE → DON’T FORCE
🧙 KnifeGenie Tip: Concentrate on producing similar-sized pieces. Consistency helps ingredients cook at approximately the same rate.
🎯 How to Dice an Onion
Now for the technique many beginners really want to learn.
Dicing turns an onion into relatively small, roughly cube-shaped pieces.
And there is an important point to understand before starting:
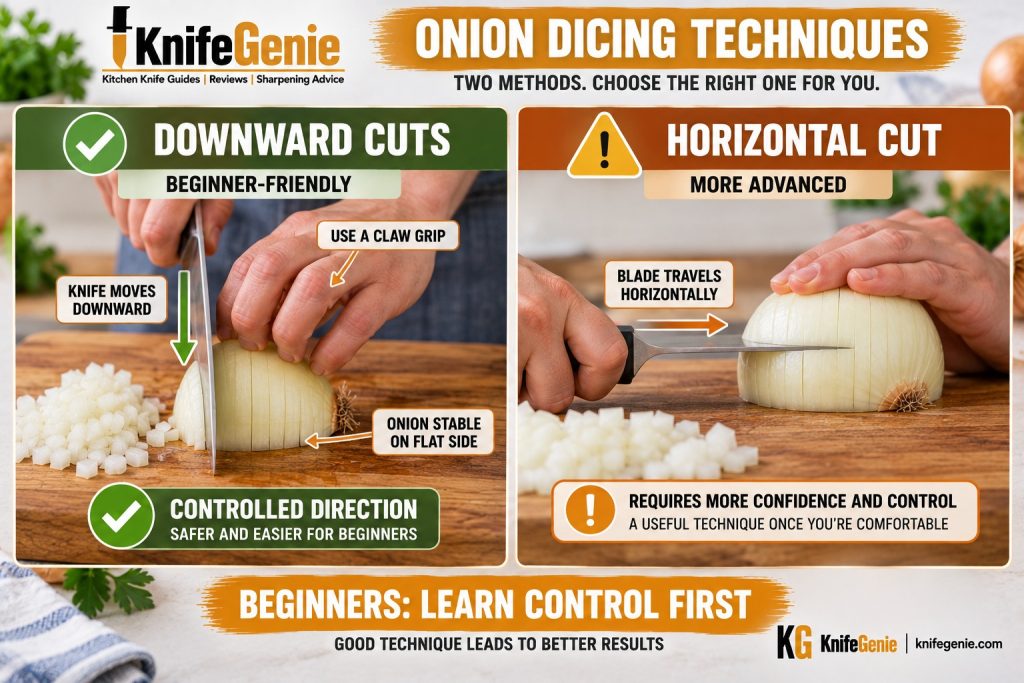
You don’t have to use the traditional horizontal-cut technique.
For beginners, we can keep the knife movements primarily directed down toward the cutting board.
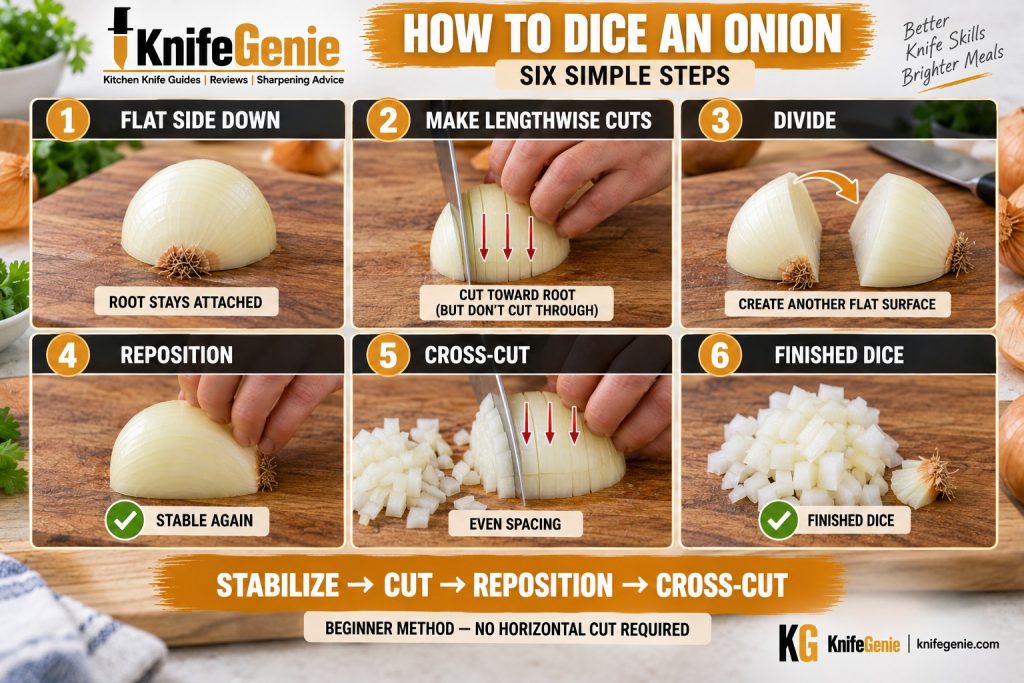
1️⃣ Start Flat-Side Down
Place the peeled onion half firmly on its flat side.
Keep the root attached.
You now have:
✔ Stable base
✔ Layers held together
✔ Better control
2️⃣ Make Lengthwise Cuts
Use your claw grip.
Make evenly spaced cuts toward the root.
↓ CUT
↓ CUT
↓ CUT
Stop before completely cutting through the root.
The spacing between these cuts helps determine the eventual size of your dice.
3️⃣ Divide and Reposition
Rather than pushing your knife horizontally through the onion toward your holding hand, you can divide and reposition the onion.
Place the newly created flat surface securely against the cutting board.
Now you can continue using controlled downward cuts.
4️⃣ Make the Second Cuts
Make another series of evenly spaced cuts.
Again:
DOWNWARD → CONTROLLED → DELIBERATE
The cuts intersect the first set and help establish the dice.
5️⃣ Cross-Cut the Onion
Make your final cuts perpendicular to the earlier cuts.
As you work toward the root:
🧅 → ▪ ▪ ▪ ▪
The diced pieces fall away.
Move your claw hand backward as the knife progresses.
6️⃣ Know When to Stop
Eventually you’ll reach the root.
The remaining piece gets smaller.
Your grip becomes less secure.
That’s your signal.
STOP.
Don’t chase the final tiny piece of onion simply to avoid wasting it.
🧙 KnifeGenie Tip: One teaspoon of onion isn’t worth putting your fingertips in an awkward position. When the ingredient becomes too small to hold securely, stop cutting.
📏 Choose Your Dice Size
How finely should you cut the onion?
That depends on what you’re cooking.
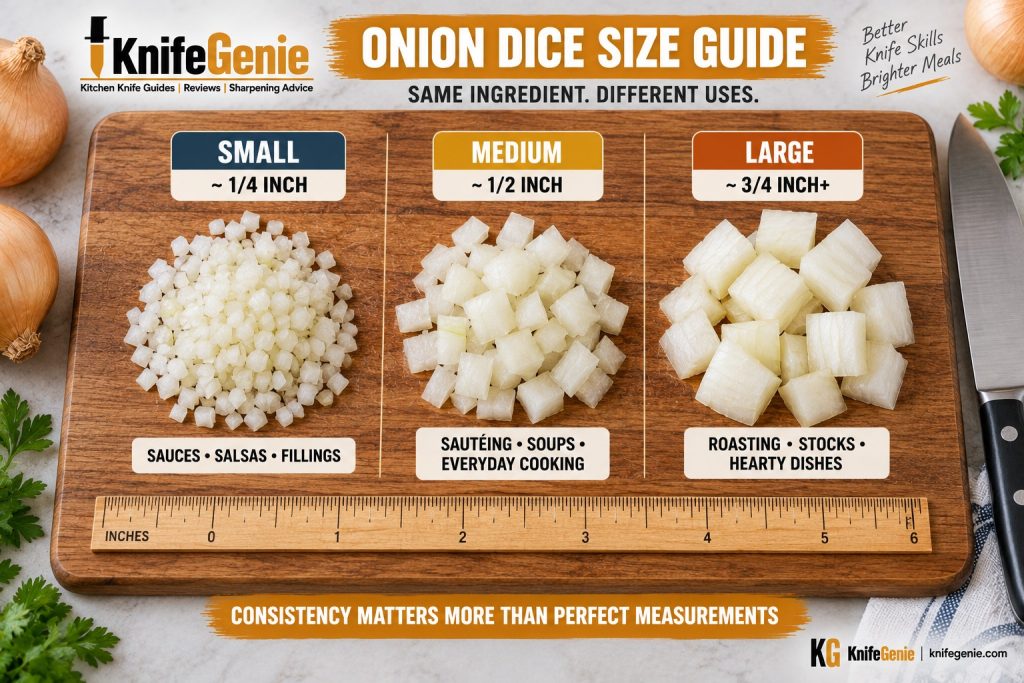
🟠 Large Dice — About 3/4 Inch or Larger
Useful for:
✔ Roasting
✔ Stocks
✔ Hearty soups
✔ Long-cooked dishes
🟨 Medium Dice — About 1/2 Inch
A versatile everyday size for:
✔ Soups
✔ Stews
✔ Sautéing
✔ Sauces
✔ General cooking
🔹 Small Dice — About 1/4 Inch
Useful when you want the onion to integrate more thoroughly into:
✔ Sauces
✔ Salsas
✔ Fillings
✔ Dressings
✔ Finer preparations
Don’t get obsessed with the ruler.
For normal home cooking:
CONSISTENCY > PERFECT DIMENSIONS
Pieces of approximately equal size generally cook more evenly.
⚠️ Do You Need Horizontal Cuts?
You’ve probably seen this technique.
The cook places a halved onion on the board and pushes the knife horizontally through it, parallel to the cutting board.
It’s part of the classic three-direction onion-dicing method.
👨🍳 Why Chefs Use It
In practiced hands, the technique can produce:
✔ Fine dice
✔ Consistent pieces
✔ Efficient repetitive preparation
But there’s a catch for beginners.
⚠️ Why We Don’t Make It Mandatory
During a horizontal cut, the blade travels toward or underneath the hand stabilizing the onion.
That’s a less forgiving movement than cutting toward the board.
The onion already has natural layers, and useful dice can be produced without treating horizontal cuts as compulsory.
🧙 KnifeGenie Recommendation
BEGINNER
⬇ Controlled downward cuts
⬇ Reposition ingredient
⬇ Maintain claw grip
⬇ Develop consistency
MORE EXPERIENCED
➡ Traditional horizontal technique can be learned later if desired.
The objective isn’t to reproduce restaurant technique perfectly.
It’s to cut the onion effectively while maintaining control of the knife.
BEGINNER METHOD VS HORIZONTAL CUT
✋ How to Hold the Onion Safely
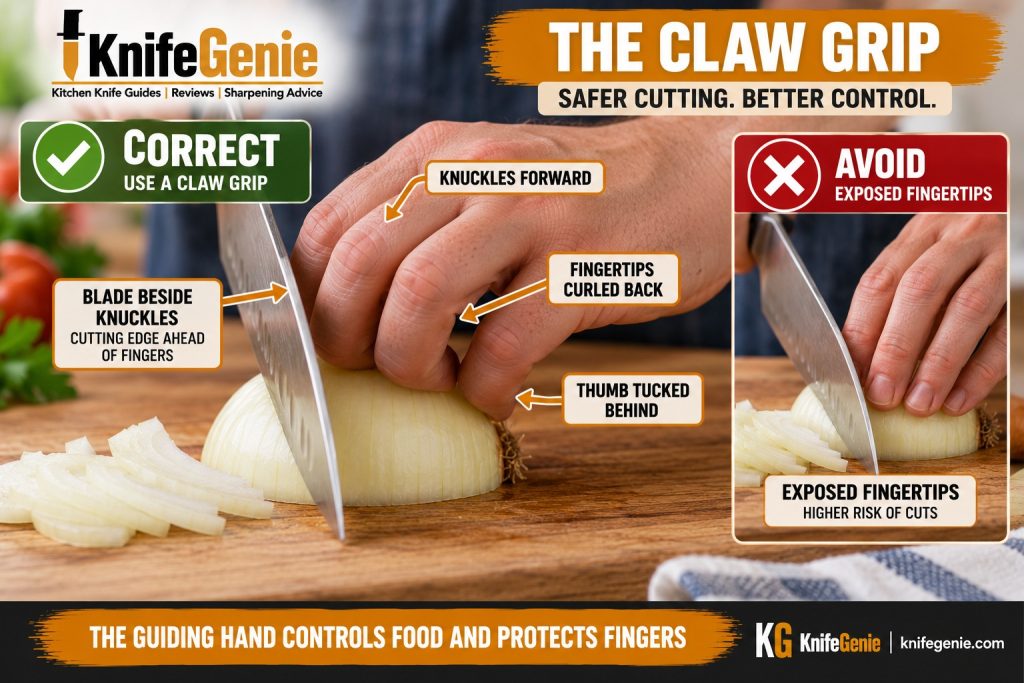
Your non-knife hand has two jobs:
1. Control the food.
2. Protect your fingers.
That’s why the claw grip matters.
🦀 Form the Claw
Curl your fingertips inward.
Keep your thumb tucked behind them.
Your knuckles should become the forward part of your hand.
Think:
KNUCKLES → FORWARD
FINGERTIPS → BACK
THUMB → TUCKED
🔪 Let the Knuckles Guide
The side of the knife can work near your knuckles while the cutting edge remains ahead of the fingertips.
As you progress through the onion, slowly move your guiding hand backward.
🐢 Start Slowly
Ignore professional-chef speed.
Good progression looks like:
CONTROL → ACCURACY → CONSISTENCY → SPEED
Not:
SPEED → HOPE FOR THE BEST
👉 See our complete How to Hold a Chef Knife guide for a closer look at knife and guiding-hand position.
😭 How to Reduce Onion Tears
Why do onions make your eyes water?
Cutting damages onion cells and triggers chemical reactions that eventually release an irritating volatile compound.
Your eyes respond by producing tears.
Fortunately, a few practical habits may help.
🔪 Use a Sharp Knife
A sharp edge cuts cleanly and requires less force.
❄️ Chill the Onion
Refrigerating an onion before cutting may help reduce the intensity of the reaction.
💨 Give Yourself Ventilation
Moving air can help carry irritating compounds away from your face.
⏱️ Work Efficiently — But Don’t Rush
Once you understand the sequence, you’ll naturally spend less time directly over the cut onion.
👀 Protect Your Vision First
If your eyes are watering badly enough that you can’t clearly see:
STOP CUTTING.
Wait until your vision clears.
🧙 KnifeGenie Tip: Don’t sacrifice knife control to try an internet onion-tear hack. Being able to clearly see your knife, fingers and cutting board is more important.
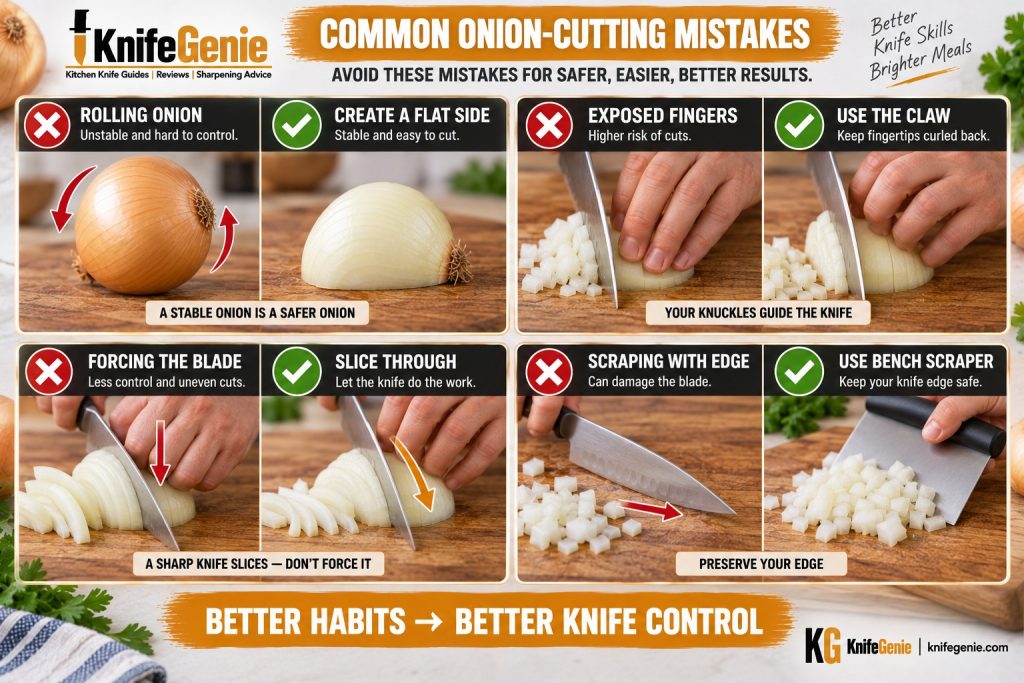
❌ Common Onion-Cutting Mistakes
❌ 1. Cutting a Rolling Onion
Problem: The ingredient moves underneath the knife.
Better: ✔ Create a flat surface first.
❌ 2. Leaving Your Fingertips Exposed
Problem: Fingertips sit unnecessarily close to the cutting edge.
Better: ✔ Use the claw grip.
❌ 3. Using a Very Dull Knife
Problem: You compensate by pushing harder.
Better: ✔ Keep your chef knife properly maintained.
👉 Related: Honing vs Sharpening: What’s the Difference?
❌ 4. Forcing the Blade
Problem: You’re crushing rather than cleanly cutting the onion.
Better: ✔ Use a controlled slicing or push-cutting action.
❌ 5. Trying to Look Fast
Problem: Speed exposes weaknesses in your technique.
Better: ✔ Make slow, repeatable cuts first.
❌ 6. Chasing the Last Piece
Problem: The remaining onion becomes too small to hold securely.
Better: ✔ Stop when your grip becomes awkward.
❌ 7. Scraping With the Cutting Edge
Problem: Dragging the sharp edge sideways against the cutting board contributes unnecessary wear.
Better: ✔ Use a bench scraper or, when appropriate, carefully use the knife’s spine.
🧙 KnifeGenie Pro Tips
🔪 Sharp beats force. If you’re struggling to push through an onion, don’t simply push harder.
🪵 Your board matters. Wood and suitable plastic are much friendlier to knife edges than glass, stone and similarly hard surfaces.
✋ Watch your guiding hand. Beginners often concentrate so much on the knife that they forget about the hand holding the food.
🧅 Use the root strategically. Keeping it attached temporarily can help hold the onion together.
🐢 Practice slowly. Repetition builds speed naturally.
📏 Aim for consistency rather than perfection. Similar-sized pieces are generally more useful than geometrically perfect ones.
🧹 Move food with a bench scraper. Avoid habitually scraping the cutting edge sideways across the board.
🛑 Know when to stop. Never compromise your grip just to recover one tiny remaining piece.
❓ Frequently Asked Questions
What knife is best for cutting an onion?
A chef knife is an excellent general-purpose choice. An 8-inch chef knife offers enough blade length for most onions while remaining manageable for many home cooks.
Should you cut the root off before dicing an onion?
Usually, no.
Leaving the root attached during the initial cuts helps hold the onion layers together. Remove or discard the root section at the end.
Do you need horizontal cuts to dice an onion?
No.
Horizontal cuts are part of the traditional three-direction technique, but they’re not mandatory for producing useful diced onion. Beginners can use controlled downward cuts and reposition the onion instead.
🧅 Why do you put an onion flat-side down?
Stability.
A round onion can roll beneath the blade. Halving it creates a broad, stable surface against the cutting board.
✋ Why use a claw grip?
The claw grip moves your fingertips away from the cutting edge while allowing your knuckles to help guide the blade.
📏 How small should I dice an onion?
As a general guide:
🔹 Small: ~1/4 inch
🟨 Medium: ~1/2 inch
🟠 Large: ~3/4 inch or larger
Exact measurements aren’t normally necessary for everyday home cooking.
🔪 Is a sharp knife safer for cutting onions?
A properly sharpened knife requires less force and gives you better control than a very dull blade.
Sharpness doesn’t replace safe technique, though.
Find out the difference between honed and sharpened knives.
You still need:
✔ Stable board
✔ Secure grip
✔ Protected fingertips
✔ Controlled movement
🥕 Should I rock or push cut an onion?
Either can work depending on your knife and what you’re cutting.
For straightforward onion slicing and dicing, a controlled forward-and-down slicing or push-cutting motion works well.
There’s no need to imitate rapid professional rock chopping.
🏁 Final Thoughts
Learning how to cut an onion with a chef knife teaches much more than how to prepare one vegetable.
You’re practicing some of the most important fundamentals of chef-knife use:
🪵 STABILIZE the ingredient.
🤏 GRIP the knife securely.
✋ PROTECT your fingertips.
🔪 SLICE rather than force.
📏 CONTROL your cut size.
🐢 BUILD speed gradually.
🛑 STOP when the ingredient becomes difficult to hold safely.
Master those habits on an onion and you’ll carry them into countless other kitchen tasks.
Carrots.
Celery.
Peppers.
Potatoes.
Herbs.
And much more.
🧙 KnifeGenie Final Tip: Don’t practice being fast. Practice making the same safe, controlled movement repeatedly. Speed is what happens after the movement becomes familiar.
👉 Next Knife Skills Guide: How to Use a Chef Knife: Beginner’s Guide to Cutting Safely
📚 Research & Editorial Note
This KnifeGenie guide was developed using established culinary instruction, food-science information and published knife-safety guidance.
The techniques and any product references are presented on a research basis. KnifeGenie does not represent them as conclusions from personal professional-kitchen experience or firsthand testing of products unless explicitly stated otherwise.