Learn the fundamental chef-knife techniques that make everyday cutting safer, more controlled and more efficient.Learning how to use a chef knife safely is one of the most useful skills you can develop in the kitchen.
A good chef knife can chop onions, slice vegetables, mince herbs, portion boneless meat and handle much of your everyday food preparation. But the knife itself is only part of the equation.
How you hold it, how you position your other hand and how you move the blade matter just as much.
Beginners often assume that safe knife use means cutting slowly and keeping their fingers away from the blade. Those things help, but good knife technique goes considerably further.
You want to learn a few repeatable habits:
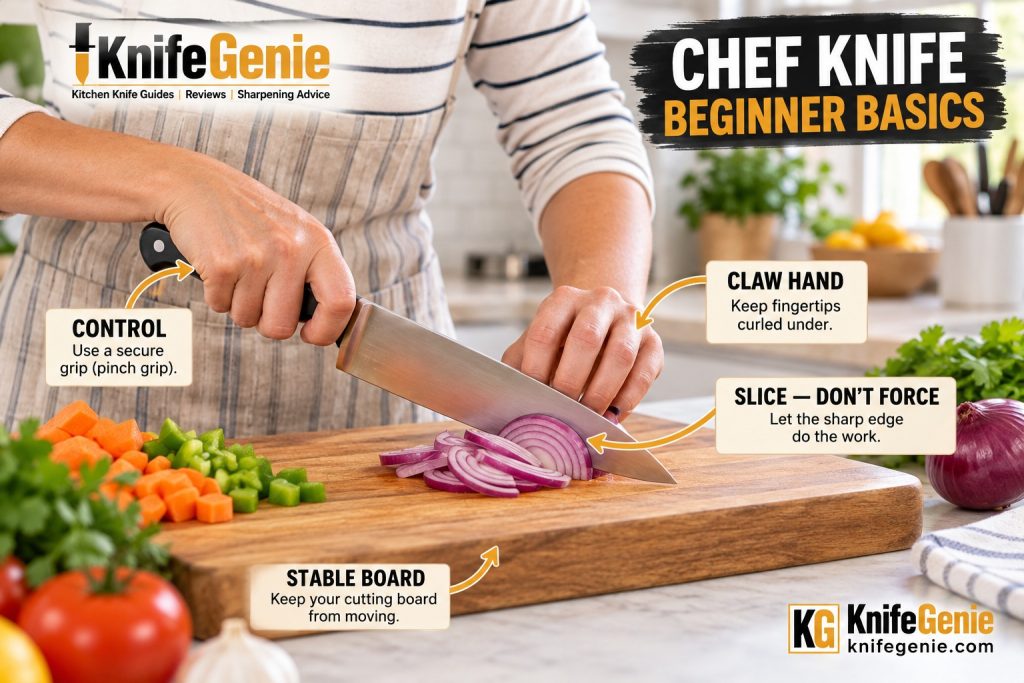
✔ Hold the knife securely without squeezing it excessively
✔ Protect the fingers of your guiding hand
✔ Keep your cutting board from moving
✔ Let the sharp edge slice instead of forcing the knife downward
✔ Keep control of the knife tip
✔ Choose a cutting motion appropriate for the knife and ingredient
✔ Never use the sharp edge to scrape food across the board
Once those habits become familiar, using a chef knife generally becomes more controlled, efficient and comfortable.
🧙 KnifeGenie Note: This guide is based on research into established kitchen-knife handling, cutting and safety practices. KnifeGenie is not claiming personal professional-chef experience or personal testing of any product mentioned.
🔽 Jump to What You Need
👉 Quick Answer
👉 Before You Start
👉 How to Hold a Chef Knife
👉 The Pinch Grip
👉 The Claw Hand
👉 Correct Cutting Stance
👉 Controlling the Knife Tip
👉 Rocking vs Push Cutting
👉 How to Slice Instead of Force
👉 How to Move Food Safely
👉 Common Beginner Mistakes
👉 How to Practice Knife Skills
👉 KnifeGenie Pro Tips
👉 Frequently Asked Questions
👉 Final Takeaway
🏆 How to Use a Chef Knife: The Quick Answer
If you’re completely new to chef knives, concentrate on control before speed.
Start with these seven fundamentals:
✋ 1. Hold the knife securely
Grip the knife firmly enough that it cannot move unpredictably in your hand, but don’t squeeze it unnecessarily.
🦀 2. Protect your guiding hand
Curl the fingertips of the hand holding the food inward into a claw position.
🪵 3. Stabilize your cutting board
The board should not slide while you’re cutting.
🔪 4. Slice through food
A chef knife works best when the blade moves through the ingredient rather than being forced vertically into it.
🎯 5. Control the tip
Know where the knife tip is throughout the cutting motion.
↕️ 6. Match the motion to the job
Rock cutting, push cutting and slicing are useful for different ingredients and different blade profiles.
↩️ 7. Move food with the spine
If you need to gather chopped food, turn the knife over and use its spine or side, rather than dragging the sharp cutting edge across the board.
🧙 KnifeGenie Tip: Don’t try to imitate the speed of professional cooks. Good knife skills begin with repeatable, controlled movements. Speed can develop naturally after technique becomes consistent.
See also How to Hold a Chef Knife.
CHEF KNIFE BASICS
🪵 Before You Cut: Set Up a Safe Work Area
Keep the board clean, too. Safe knife technique isn’t only about avoiding cuts. Wash cutting boards between food-preparation tasks, particularly when moving between raw meat, poultry or seafood and foods that won’t be cooked. The USDA also recommends replacing cutting boards once they become excessively worn or develop hard-to-clean grooves.
Good knife technique starts before the blade touches the food.
Your cutting board should sit on a stable, level surface with enough working space around it.
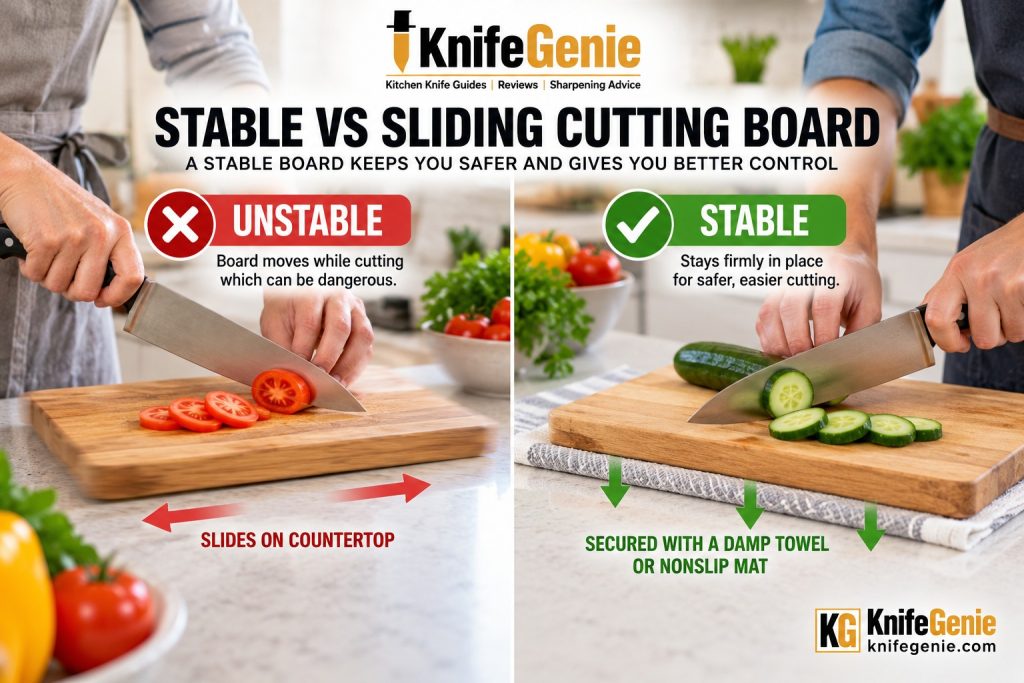
If the board moves while you cut, even good hand technique can become unpredictable.
Stop a Cutting Board From Sliding
If your cutting board moves on the countertop, place something grippy underneath it.
Common solutions include:
✔ A damp kitchen towel
✔ A damp paper towel
✔ A nonslip cutting-board mat
✔ A board with built-in nonslip feet
The goal is simple:
The board stays still while the knife moves.
Also choose a knife-friendly cutting surface. Wood and many suitable plastic boards are generally preferable to extremely hard surfaces such as glass, stone, granite or ceramic.
Hard surfaces can also accelerate edge wear.
🧙 KnifeGenie Tip: Before every cutting session, give the board a gentle push. If it slides easily, stabilize it before picking up the knife.
Food safety matters too. The USDA Food Safety and Inspection Service cutting-board guidance. USDA recommends keeping cutting boards clean, replacing excessively worn boards, and taking steps to prevent cross-contamination.
STABLE CUTTING BOARD
✋ How to Hold a Chef Knife
There isn’t one grip that every cook must use for every knife.
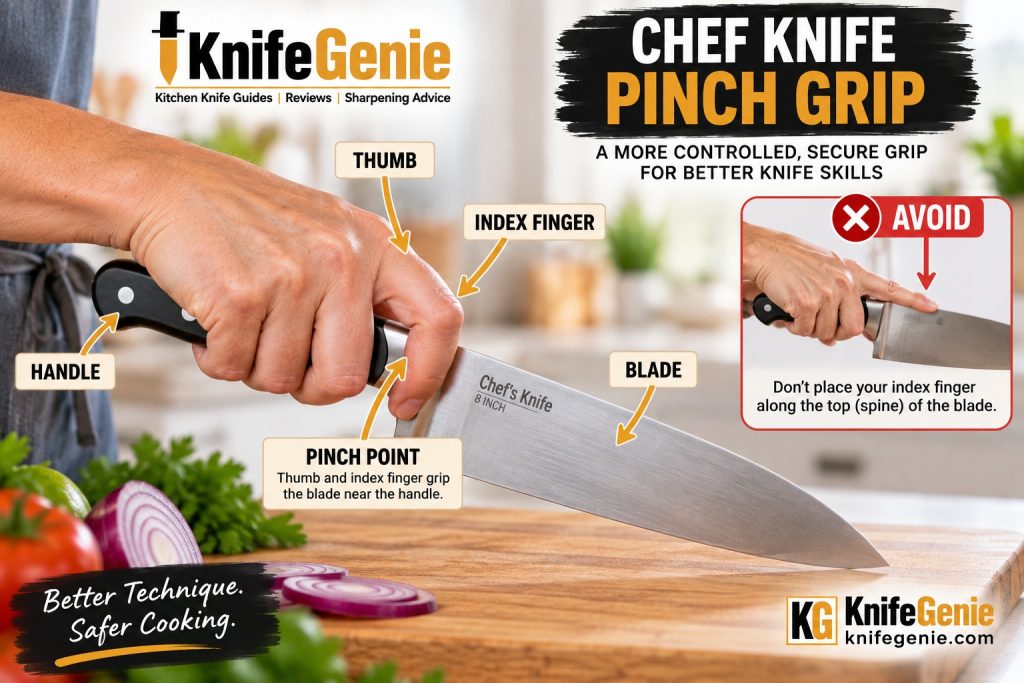
However, for a conventional Western chef knife, one of the most widely taught techniques is the pinch grip.
Instead of holding the knife only by the handle, you grip it near the point where the handle and blade meet.
Your thumb rests against one side of the blade while the side of your bent index finger rests against the other.
The remaining fingers wrap naturally around the handle.
The important word is control.
You’re not trying to crush the knife between your fingers.
You’re creating a stable connection between your hand and the blade.
🤏 The Pinch Grip
A basic pinch grip looks like this:
Thumb → one side of the blade
Index finger → opposite side of the blade
Remaining fingers → around the handle
This brings your hand closer to the knife’s working area and can provide better control than gripping only the far end of the handle.
Avoid placing your index finger straight along the top of the blade.
That position can feel intuitive to beginners, but it generally offers less secure lateral control and can become uncomfortable.
🧙 KnifeGenie Tip: Your grip should feel secure rather than tense. Excessive squeezing can make your hand tire unnecessarily and may make fluid cutting motions harder.
PINCH GRIP
🦀 The Claw Hand: Protect Your Fingers
Your knife hand controls the blade.
Your other hand controls the food.
That second hand is often called the guiding hand, and learning what to do with it is one of the most important parts of beginner knife technique.
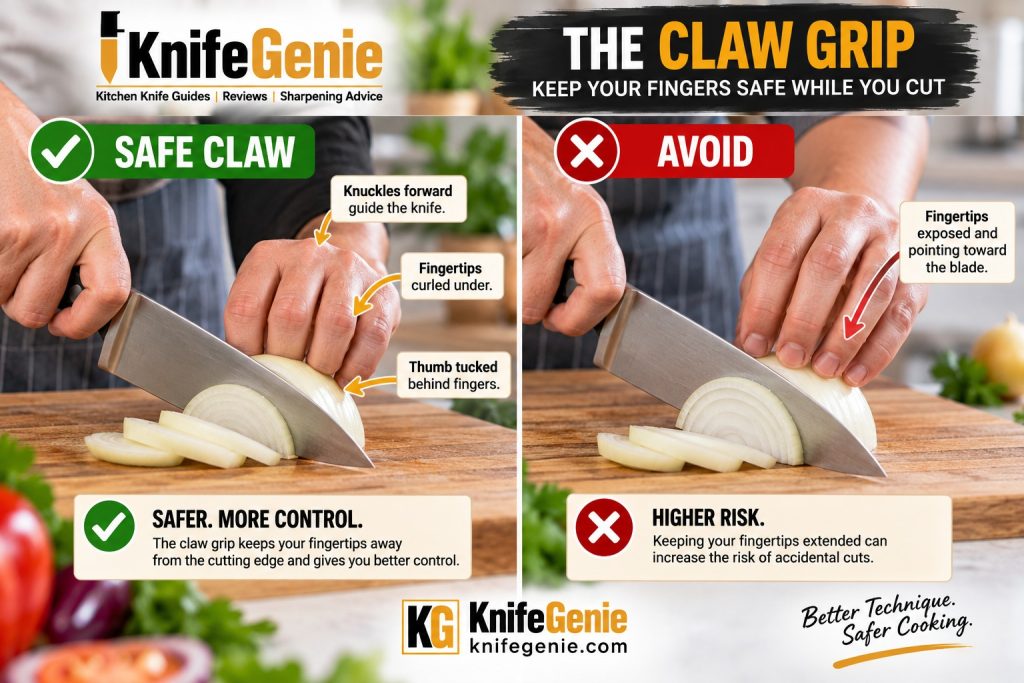
Rather than leaving your fingertips extended toward the blade, curl them inward.
This creates the familiar claw grip or claw hand.
Your fingertips remain tucked behind your knuckles while your thumb stays safely behind the fingers rather than sticking toward the blade.
The side of the blade can then work near the front knuckles as the guiding hand gradually moves backward through the ingredient.
Think:
Fingertips tucked → knuckles forward → thumb behind → blade controlled
Don’t deliberately press the cutting edge into your knuckles.
The objective is to create a consistent guide while keeping vulnerable fingertips away from the cutting path.
What Beginners Often Do Wrong
❌ Leave fingertips flat on top of the food
❌ Extend the thumb toward the blade
❌ Move the guiding hand unpredictably
❌ Watch the food but ignore finger position
❌ Try to cut quickly before mastering the claw
Slow down until the position feels natural.
CLAW GRIP CORRECT VS INCORRECT
🧍 Your Stance Matters More Than You Think
Knife technique isn’t just about your hands.
Your whole body affects control.
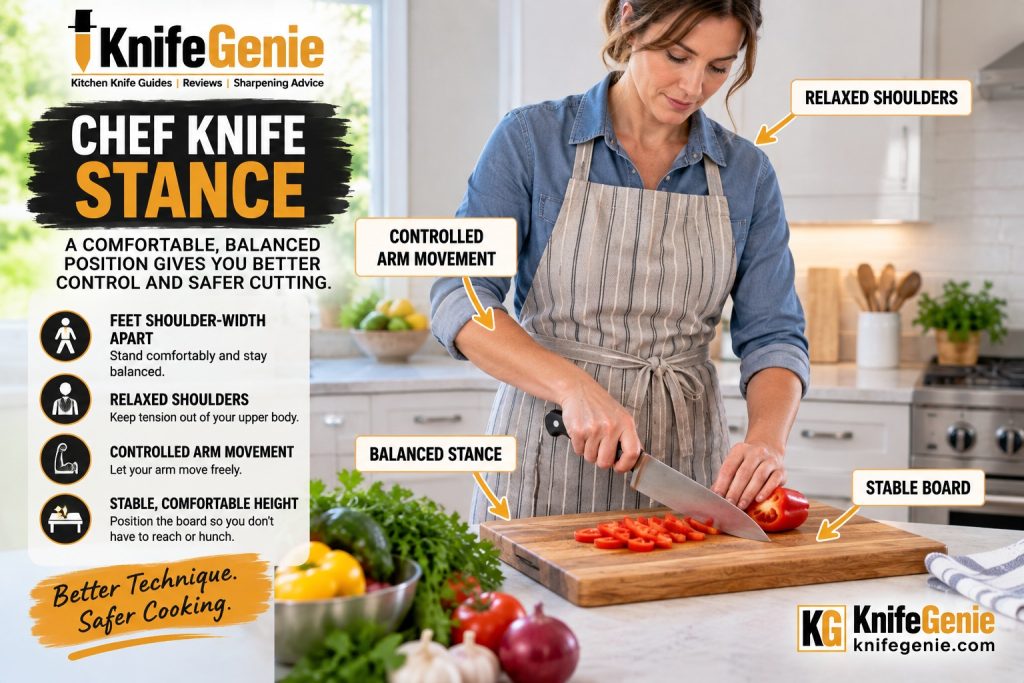
Stand comfortably at the counter rather than leaning awkwardly over the cutting board.
For many people, a good starting position means:
✔ Feet comfortably apart
✔ Body balanced
✔ Shoulders relaxed
✔ Cutting board positioned comfortably in front of you
✔ Knife-side arm able to move freely
✔ Food positioned where you don’t have to reach awkwardly
You shouldn’t need to raise your shoulder or bend your wrist dramatically to make ordinary cuts.
The exact stance varies according to your height, countertop height and cutting task.
The goal isn’t a rigid chef pose.
It’s balance and unrestricted control.
SAFE CUTTING POSITION
🎯 Learn to Control the Knife Tip
A chef knife is not just a sharp edge.
It has a heel, belly, edge and tip, and different parts of the blade become useful during different cutting motions.
Beginners sometimes focus so much on the food beneath the middle of the blade that they stop paying attention to the tip.
That’s a mistake.
You should always have a sense of where the entire knife is moving.
During a rocking cut, the tip may remain close to or in contact with the cutting board while the heel rises and falls.
During push cutting, more of the blade may travel forward and downward together.
During slicing, the knife travels smoothly through the ingredient.
Whichever technique you use:
Keep the movement deliberate and predictable.
Don’t wave the knife through the air between cuts or lift it unnecessarily high.
🥕 Rocking vs Push Cutting
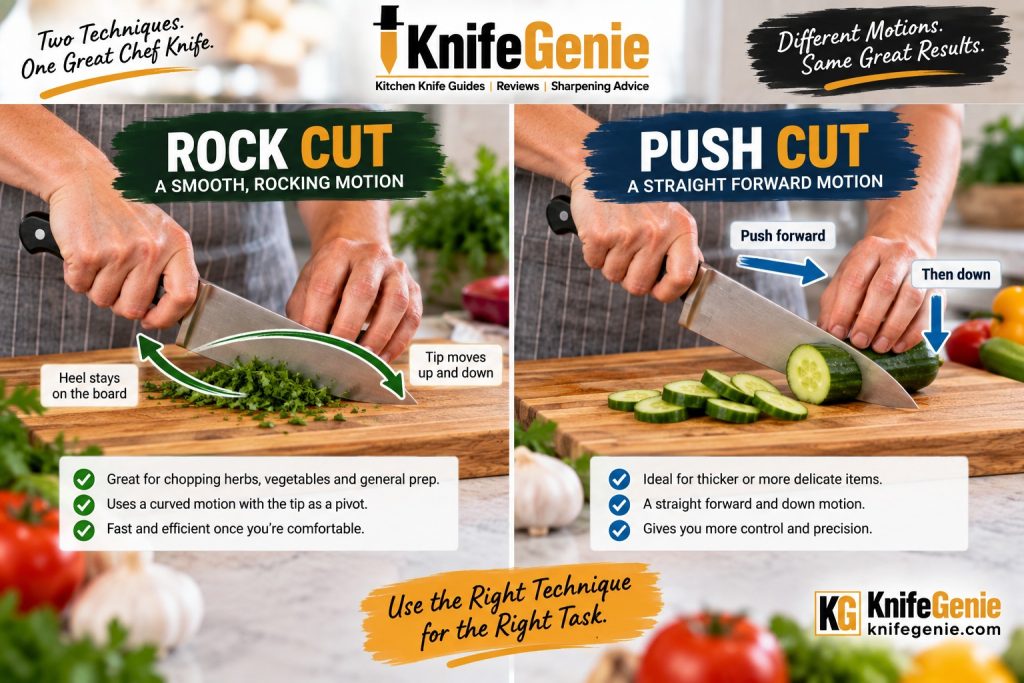
Two cutting motions you’ll encounter constantly are rock cutting and push cutting.
Neither technique is automatically correct for every knife or every ingredient.
Blade shape matters.
🔄 Rock Cutting
Traditional Western chef knives often have a curved belly.
That curvature makes them well suited to a rocking motion.
The tip remains near the board while the blade rocks down and forward through the food.
Rocking works particularly well for ingredients such as:
🌿 Herbs
🧅 Onions
🥕 Many vegetables
🧄 Garlic
The movement should be smooth.
Avoid violently hammering the blade against the board.
➡️ Push Cutting
With a push cut, the knife travels forward and downward through the ingredient before being repositioned for the next cut.
Flatter knife profiles often work particularly well with this technique.
Push cutting is useful for:
🥕 Vegetables
🥬 Leafy greens
🥔 Potatoes
🧅 Onions
🥒 Cucumbers
A push cut shouldn’t turn into aggressive straight-down chopping.
You’re still using the sharp edge to slice through the food.
ROCK CUTTING VS PUSH CUTTING
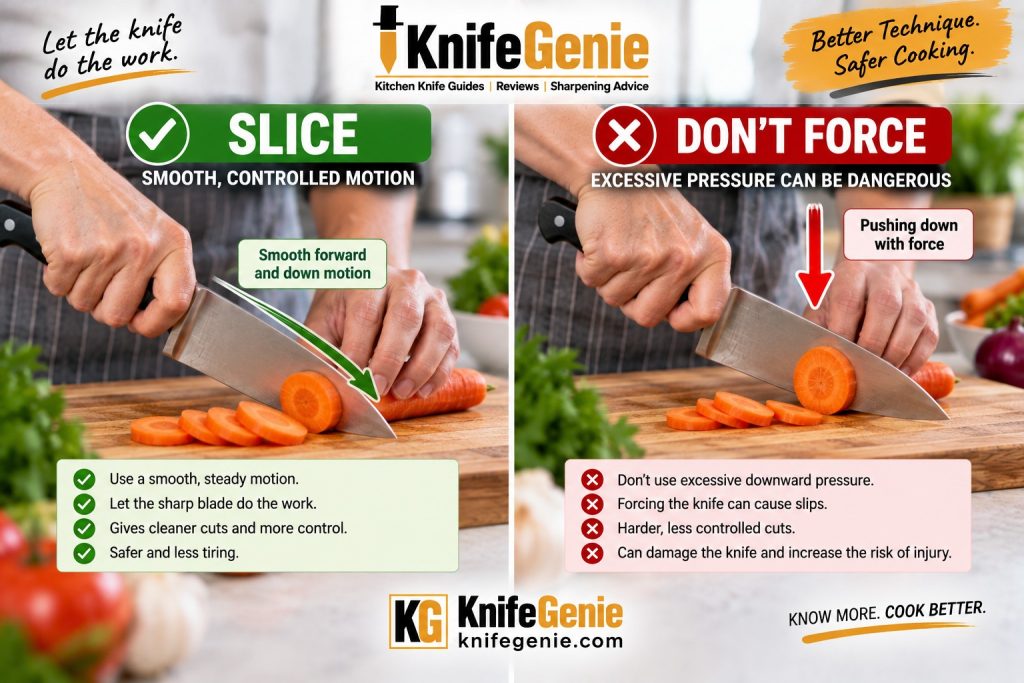
🔪 Slice Through Food — Don’t Force the Knife
One of the biggest improvements a beginner can make is learning that a knife should cut rather than crush.
A sharp knife doesn’t need to be hammered through an onion or carrot.
Instead, allow the edge to travel through the ingredient.
Think of cutting as a combination of:
Forward/backward movement + downward movement
rather than simply:
DOWN ↓
This is why slicing motions work.
The edge moves across the food as it moves through it.
If you find yourself applying excessive force during ordinary vegetable preparation, stop and consider why.
Possible causes include:
⚠️ The knife is dull
⚠️ The food isn’t stable
⚠️ You’re using the wrong cutting motion
⚠️ The knife is inappropriate for the job
⚠️ You’re trying to cut something a chef knife shouldn’t cut
Never compensate for poor cutting performance by simply pushing harder.
🧙 KnifeGenie Tip: A dull knife doesn’t become a sharp knife because you apply more pressure. If normal foods suddenly require noticeably more force, inspect the edge and consider whether the knife needs honing or sharpening.
SLICING VS FORCING
↩️ Move Food With the Spine — Not the Edge
You’ve chopped an onion.
Now you want to move all those little pieces into a neat pile.
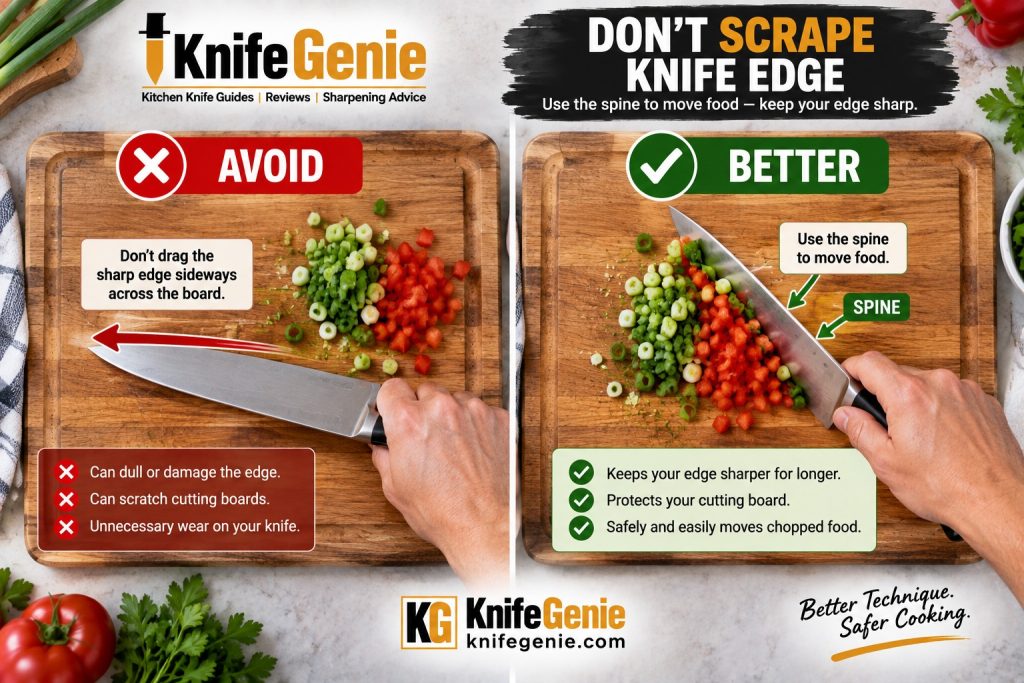
It’s tempting to turn the knife sideways and scrape the sharp edge across the cutting board.
Don’t make that a habit.
Repeatedly dragging the cutting edge sideways against the board can contribute to unnecessary edge wear.
Instead:
Turn the knife over and use the spine.
Or use the broad side of the blade carefully to gather or transfer food.
A bench scraper is another excellent option when moving large quantities of chopped ingredients.
Remember:
EDGE = cutting
SPINE/SIDE = gathering
EDGE VS SPINE
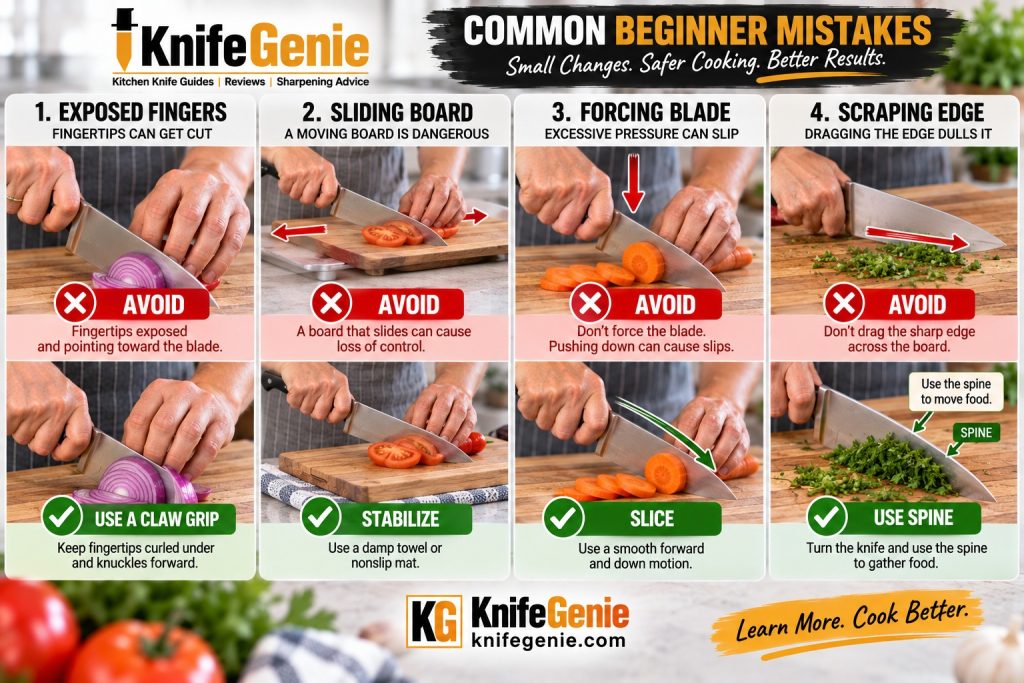
⚠️ 10 Common Beginner Chef-Knife Mistakes
Learning what not to do can improve your knife technique surprisingly quickly.
❌ 1. Trying to Cut Fast
Speed looks impressive.
Control is more important.
Learn the movement first.
❌ 2. Leaving Fingertips Exposed
Use the claw position instead of pointing fingertips toward the blade.
❌ 3. Cutting on a Sliding Board
Stabilize the board before you begin.
❌ 4. Using Excessive Force
Let the edge slice through the ingredient.
❌ 5. Using a Dull Knife
A poorly performing edge can encourage excessive pressure and awkward technique.
❌ 6. Scraping the Edge Across the Board
Use the spine, broad side of the blade or a bench scraper.
❌ 7. Cutting on Glass or Stone
Use a knife-friendly cutting surface.
❌ 8. Using a Chef Knife for Everything
Chef knives are versatile, but they’re not designed for every kitchen job.
Avoid bones, frozen foods and other tasks requiring a more appropriate tool.
❌ 9. Twisting the Blade While It’s Embedded
Lateral twisting can place unnecessary stress on a cutting edge, particularly thin, hard edges.
❌ 10. Becoming Distracted
Knife work deserves your attention.
Put down the knife before reaching for something, answering the phone, moving cookware or turning away from the cutting board.
4 BEGINNER KNIFE MISTAKES
Improving a few basic habits can make chef-knife use more controlled and efficient.
🥔 How to Practice Chef-Knife Skills
You don’t need to practice by seeing how quickly you can dice an onion.
Start with ingredients that sit reasonably securely on the board and allow you to concentrate on movement.
Potatoes, cucumbers, zucchini and similar vegetables can be useful practice ingredients once you’ve created a stable surface where necessary.
For round ingredients, first create a flat surface when appropriate.
That turns:
rolling food → stable food
Then practice deliberately.
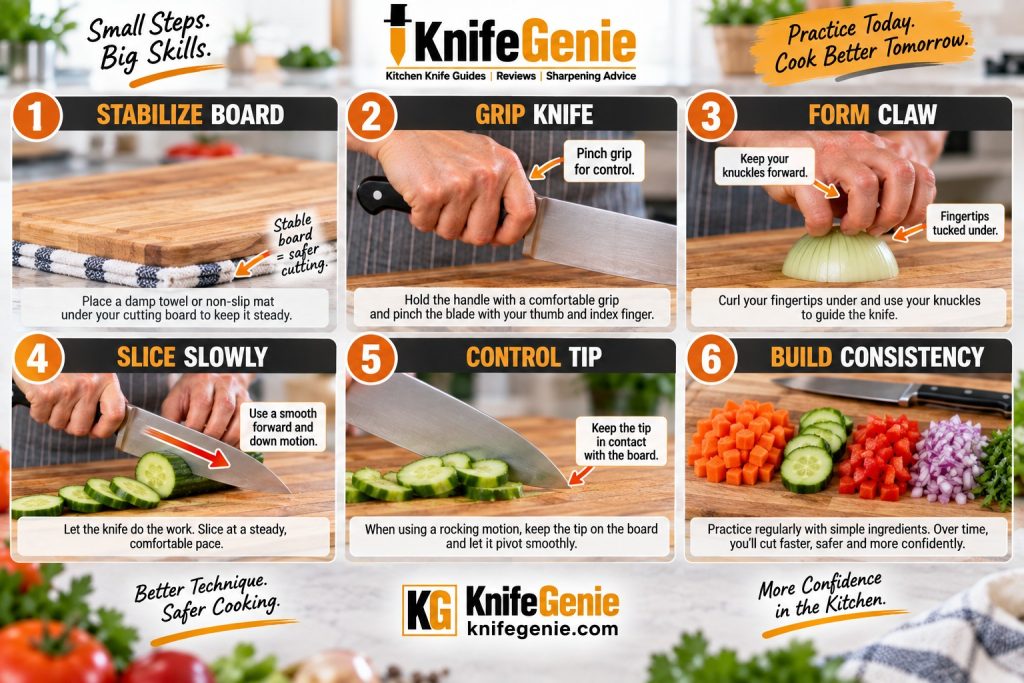
Beginner Practice Routine
Step 1 — Stabilize your board
Make sure it cannot slide.
Step 2 — Establish your grip
Hold the knife securely and comfortably.
Step 3 — Form the claw
Position the guiding hand before making the first cut.
Step 4 — Make slow, even slices
Concentrate on repeating the same controlled movement.
Step 5 — Watch the whole blade
Know where the heel, edge and tip are moving.
Step 6 — Reset when necessary
If your grip or food position becomes awkward, stop.
Reposition.
Then continue.
Step 7 — Increase speed only after consistency
Speed is the result of efficient movement.
It shouldn’t be the starting goal.
BEGINNER PRACTICE ROUTINE – KNIFE SKILLS PRACTICE STEPS
🧙 KnifeGenie Pro Tips
🔪 Control comes before speed. Fast cutting isn’t useful if the movement isn’t predictable.
🦀 Make the claw automatic. Get into the habit of positioning the guiding hand correctly before beginning each series of cuts.
🪵 Check the board first. A moving cutting board makes every other technique less reliable.
🎯 Know where the tip is. Don’t focus exclusively on the section of edge directly above the food.
↔️ Use slicing movement. A knife edge works by moving through the ingredient—not simply by being pressed downward.
🪨 Maintain your edge. When ordinary foods become noticeably more difficult to cut, investigate whether honing or sharpening is appropriate.
🥕 Make round food stable. When appropriate, create a flat side before continuing to cut.
↩️ Gather with the spine. Don’t repeatedly scrape your carefully maintained edge across the cutting board.
🦴 Use the right knife for the task. A chef knife isn’t a bone cleaver or frozen-food chopper.
📵 Avoid distractions. Put the knife down before turning away from the board or doing something unrelated to cutting.
❓ Frequently Asked Questions
What is the safest way to hold a chef knife?
A secure grip that gives you good blade control is important. Many cooks use a pinch grip, placing the thumb and index finger near opposite sides of the blade while the remaining fingers hold the handle.
The grip should feel controlled without excessive squeezing.
What is the claw technique?
The claw technique curls the fingertips of the guiding hand inward while keeping the knuckles forward.
This helps keep fingertips away from the knife’s cutting path while the hand guides the food.
Should a chef knife move straight up and down?
Not necessarily.
Chef knives are cutting tools, and slicing action helps the edge move efficiently through food. Depending on blade shape and ingredient, you may use rocking, push cutting or other controlled slicing motions.
Should the tip stay on the cutting board?
During some rocking cuts, the tip remains near or against the board while the heel rises and falls.
During other cutting techniques, including push cutting and slicing, the entire blade may move.
The important thing is maintaining control of the tip throughout the movement.
Is rocking or push cutting better?
Neither is universally better.
Curved Western chef knives naturally accommodate rocking, while flatter blade profiles often work well with push cutting.
Use the technique appropriate for your knife, ingredient and level of control.
How fast should a beginner cut?
As slowly as necessary to maintain consistent control.
There’s no reason for a beginner to imitate professional kitchen speed.
Develop accurate, repeatable movements first.
Why shouldn’t I scrape food with the knife edge?
Dragging the sharpened edge sideways across a cutting board can contribute to unnecessary edge wear.
Use the spine or broad side of the knife—or a bench scraper—to gather chopped ingredients instead.
Is a sharp knife safer than a dull knife?
A properly sharp knife generally requires less force to cut normal foods, which can improve predictability and control.
But every sharp knife can cause serious injury.
Sharpness does not replace careful technique.
What should I do if food rolls while I’m cutting it?
Stop and stabilize the ingredient.
For many round vegetables, creating a flat surface first can give the food a stable base before you continue cutting.
Can I use a chef knife on bones or frozen food?
Ordinary chef knives generally shouldn’t be used to chop through bones or hard frozen foods unless the manufacturer specifically designs the knife for that purpose.
Use the appropriate tool instead.
🏆 Final Takeaway: Control First, Speed Later
Using a chef knife well isn’t about chopping as quickly as possible.
It’s about developing control.
Start with a stable cutting board.
Hold the knife securely.
Protect your guiding hand with the claw technique.
Know where the knife tip is moving.
Use smooth rocking, push-cutting or slicing motions rather than forcing the blade through food.
And when you’ve finished chopping, flip the knife and use the spine rather than scraping your cutting edge across the board.
Those habits may feel deliberate at first.
That’s fine.
With repetition, deliberate movements become familiar movements—and familiar movements become efficient knife skills.
🧙 KnifeGenie Beginner Formula
STABLE BOARD → SECURE GRIP → CLAW HAND → CONTROLLED BLADE → SLICE → REPEAT
Learn those fundamentals before worrying about speed.
That’s the foundation on which the rest of your kitchen knife skills can be built.