Using a chef knife safely isn’t only about how you hold the knife. What you do with your other hand matters just as much.
The claw grip is a simple guiding-hand position that keeps your fingertips tucked away from the cutting edge while helping you hold and guide food as you slice. It can feel unfamiliar at first, but once the movement becomes comfortable, it can make everyday cutting more controlled and consistent.
This guide explains how to use the claw grip with a chef knife, where to position your fingers and thumb, how to use your knuckles as a guide, how to move the claw while cutting, and the common mistakes beginners should avoid.
💡 Quick answer: To use the claw grip, curl the fingertips of your guiding hand inward so they sit behind your knuckles. Hold the food securely and keep the flat side of the knife blade close to the front of your knuckles as you cut. Gradually move your guiding hand backward while maintaining the claw shape.
Research note: This article is based on research into established kitchen knife skills and food-preparation practices. It is intended as an instructional guide rather than a claim of personal testing or professional culinary training.
▶️ Jump to
What Is the Claw Grip?
Why Use the Claw Grip?
How to Use the Claw Grip
How Your Knuckles Guide the Knife
How to Move the Claw While Cutting
Foods to Practice With
Claw Grip in Action
Claw Grip vs Exposed Fingers
Common Claw-Grip Mistakes
Claw Grip and Pinch Grip
Claw Grip Checklist
Frequently Asked Questions
🔪 What Is the Claw Grip?
The claw grip is a way of positioning the hand that holds and guides food while you cut it.
Instead of leaving your fingertips extended toward the knife, you curl your fingers inward, creating a shape that resembles a loose claw.
Your fingertips remain behind your knuckles, while the front of your knuckles becomes a reference point for the side of the knife blade.
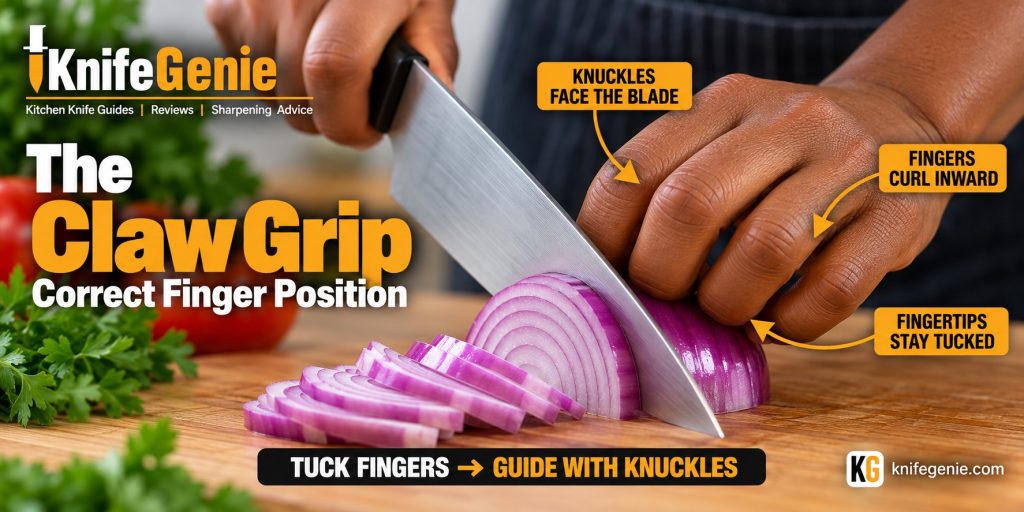
✋ The basic position
Fingertips tucked back → knuckles forward → blade beside the knuckles.
💡 Why it works: The claw moves your fingertips farther from the cutting edge while giving the knife a consistent guide.
The grip does not need to be rigid. In fact, squeezing too tightly can make it harder to move your hand smoothly as you work through the ingredient.
Think curled and controlled, rather than clenched.
🛡️ Why Use the Claw Grip?
Beginners often concentrate so much on their knife hand that they overlook the hand holding the food.
Yet that guiding hand can be closer to the cutting edge than the hand holding the knife.
The claw grip helps you:
✔️ Keep fingertips farther from the cutting edge
✔️ Hold ingredients more securely
✔️ Guide the knife more consistently
✔️ Produce more even slices
✔️ Develop a smoother cutting rhythm
✔️ Coordinate your knife hand and guiding hand
It can also make repetitive cuts easier because your guiding hand provides a reference for the position of the blade.
The claw grip helps keep your fingertips farther from the cutting edge while giving the knife a consistent guide. This technique is also included in Utah State University Extension’s guidance on basic vegetable-cutting and knife-safety techniques.
⚠️ Remember: The claw grip does not make cutting risk-free. You still need a stable cutting board, a suitable sharp knife, controlled movements and your full attention.
If you’re still developing your overall technique, start with How to Use a Chef Knife. For your knife hand, see How to Hold a Chef Knife and How to Use a Pinch Grip With a Chef Knife.
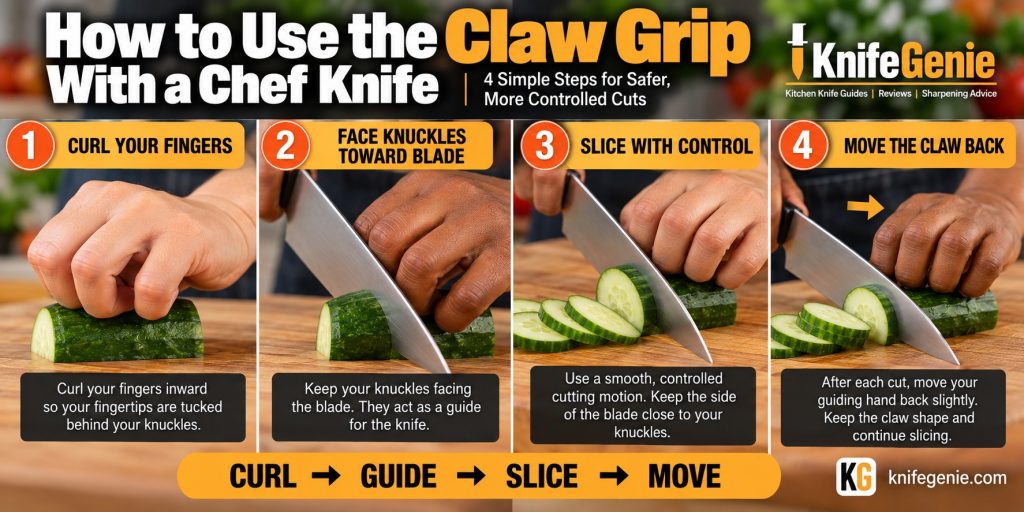
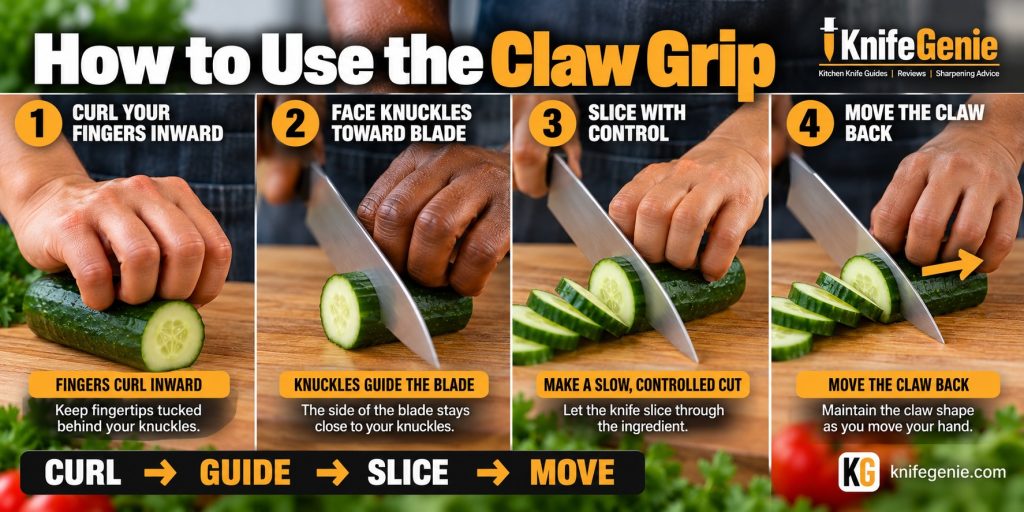
👨🍳 How to Use the Claw Grip
Don’t worry about speed when you’re learning. The easiest way to develop the technique is to practice the hand positions slowly.
1️⃣ Stabilize the Food
Before forming the claw, make sure the ingredient isn’t rolling around.
🧅 Working with a round ingredient? Where appropriate, create a flat surface before making additional cuts.
Your cutting board should also remain firmly in place.
Trying to learn the claw grip while chasing an unstable onion, carrot or other ingredient across the board makes the technique unnecessarily difficult.
2️⃣ Curl Your Fingers Inward
Place your guiding hand on the food.
Now bend your fingers so your fingertips curl inward rather than pointing down beside the ingredient.
✋ Think relaxed claw, not tightly clenched fist.
Your hand needs enough tension to control the ingredient without becoming stiff.
3️⃣ Tuck Your Fingertips Behind Your Knuckles
This is the key part of the technique.
👉 Your fingertips should remain behind the front line of your knuckles.
Viewed from the side, your knuckles should be closer to the knife than your fingertips.
👍 Keep your thumb tucked behind your fingers too.
⚠️ Don’t allow your thumb to stick out toward the blade.
4️⃣ Face Your Knuckles Toward the Blade
Position the chef knife so the flat side of the blade is close to the front of your guiding knuckles.
Your knuckles now provide a reference point for the knife.
💡 KEY POINT: It is the side of the blade that stays near your knuckles. Your fingertips should remain curled safely behind them.
5️⃣ Slice With Control
Begin cutting using the motion appropriate for your knife and ingredient.
Don’t force the knife straight downward simply because you’re concentrating on your guiding hand.
➡️ Allow the knife to slice through the ingredient with a smooth, controlled movement.
Your knife hand controls the blade while your claw hand controls and guides the food.
6️⃣ Move the Claw Back
After each cut, move your guiding hand backward slightly while maintaining the claw.
🔁 Think:
CUT → MOVE CLAW → CUT → MOVE CLAW
Your hand gradually retreats as the knife works through the ingredient.
🐢 Start slowly. Speed should develop from repetition and coordination rather than deliberately trying to cut quickly.
How to Use the Claw Grip: 4 Steps
🤚 How Your Knuckles Guide the Knife
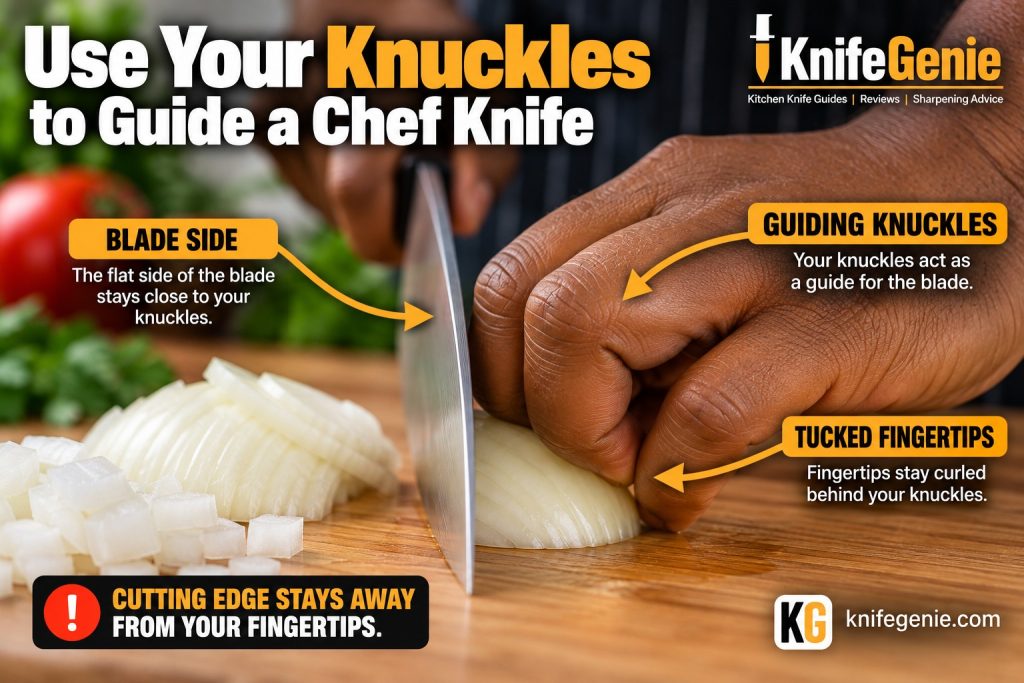
Your knuckles are what make the claw grip particularly useful.
With your fingers curled inward, the middle sections of your fingers create a relatively vertical surface beside the knife.
The flat side of the blade can remain close to this surface while you cut.
This gives you a physical reference for the knife’s position without requiring you to stare continuously at the blade.
However, don’t deliberately press the knife hard against your hand.
The goal is gentle guidance, not pressure.
Keep your guiding hand relaxed enough to move but firm enough to control the food.
🧠 Remember
BLADE SIDE → near the knuckles
KNUCKLES → guide the blade
FINGERTIPS → tucked behind
CUTTING EDGE → away from fingertips
🔁 How to Move the Claw While Cutting
Forming the claw is only half the technique.
You also need to move it correctly.
A common beginner mistake is forming a perfect claw for the first cut and then straightening the fingers while repositioning the food.
Instead, try to preserve the claw shape as you gradually move your hand backward.
Imagine your guiding hand retreating from the blade a little at a time:
KNIFE ADVANCES → CLAW RETREATS
Then repeat.
Your guiding hand and knife hand should move together in a controlled rhythm.
Don’t try to imitate the speed of an experienced cook.
🎯 Control comes first. Speed comes later.
🥕 Foods to Practice With
Some ingredients are much easier for learning the claw grip than others.
🥒 Cucumber — excellent for practicing repeated slices.
🥕 Carrot — useful for learning consistent spacing once the ingredient is stabilized.
🥬 Celery — easy to hold while making repeated crosswise cuts.
🧅 Onion halves — excellent once you’re comfortable with the basic position.
🥒 Zucchini — large enough to hold comfortably while practicing.
⚠️ Avoid starting with very small ingredients. They give your guiding hand less room and can make the technique unnecessarily difficult.
Our How to Cut an Onion With a Chef Knife guide shows how the claw grip fits into a complete everyday cutting task.
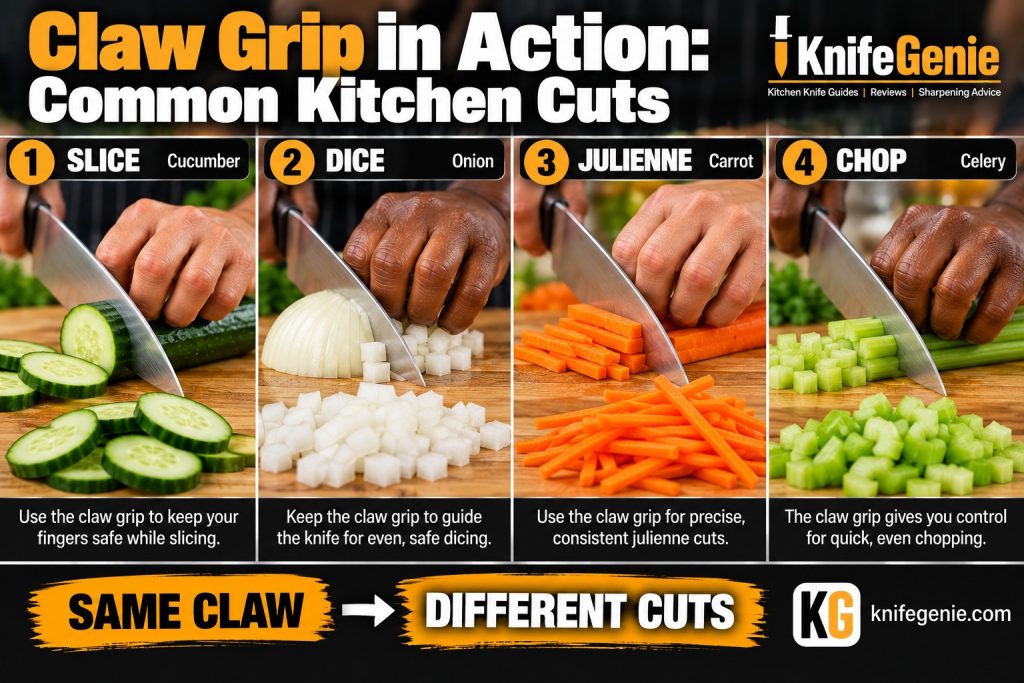
🥒 Claw Grip in Action
Once you’ve learned the basic hand position, the same claw principle can be used across many everyday cutting tasks.
The ingredient and knife movement may change, but the guiding-hand principle remains essentially the same:
Curl the fingers → tuck the fingertips → guide with the knuckles.
🔪 Slice — Cucumber
Hold the cucumber steadily while the claw retreats after each slice.
🧅 Dice — Onion
Keep your guiding fingertips curled as the onion becomes progressively smaller.
🥕 Julienne — Carrot
Use the claw to help guide consistent strips while maintaining control of the stabilized carrot.
🥬 Chop — Celery
Move the guiding hand gradually backward as the knife works along the stalk.
💡 The important lesson
Different ingredient. Different cut. Same basic claw.
🆚 Claw Grip vs Exposed Fingers
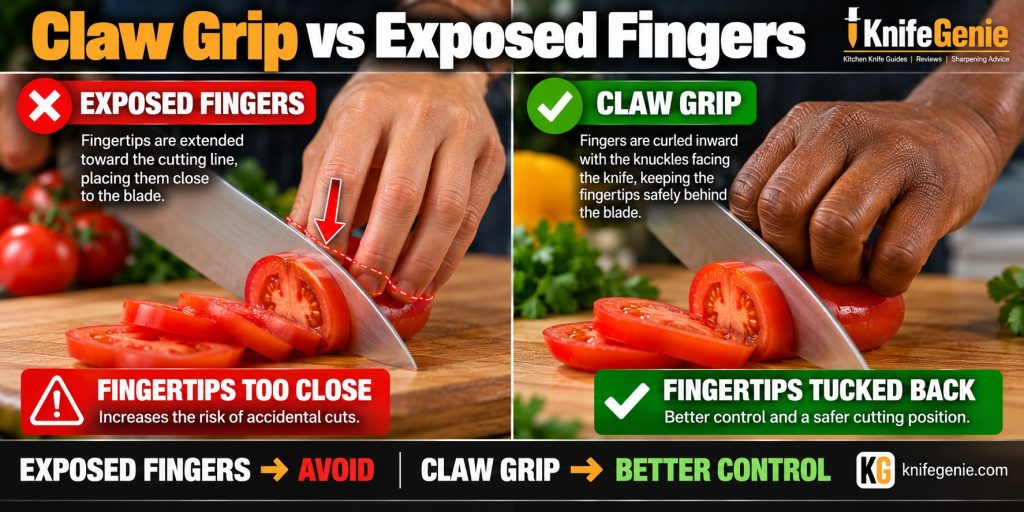
One of the easiest ways to understand the claw grip is to compare it with the position you’re trying to avoid.
❌ Exposed Fingers
When your fingers remain straight, the fingertips can extend toward the cutting board and sit unnecessarily close to the knife’s path.
FINGERTIPS TOO CLOSE
That gives you less margin between your fingers and the cutting edge.
✔️ Proper Claw Grip
Curling your fingers inward moves your fingertips behind your knuckles.
FINGERTIPS TUCKED BACK
The knuckles now face the blade while the fingertips remain farther from the cutting line.
🧠 Easy rule to remember
FINGERTIPS FORWARD → STOP
KNUCKLES FORWARD → CLAW
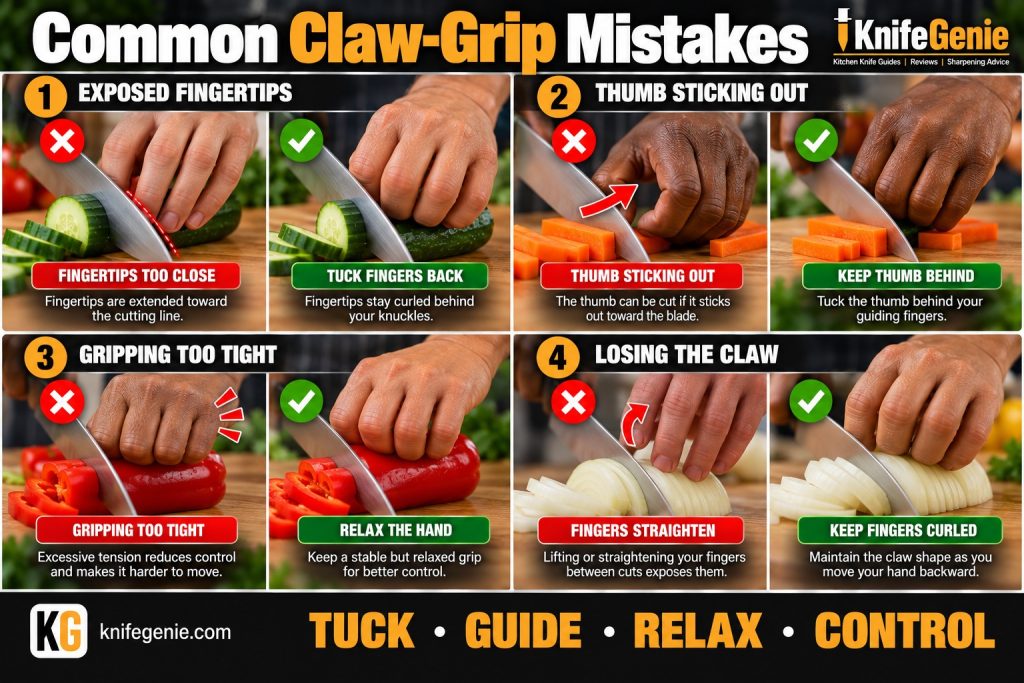
⚠️ Common Claw-Grip Mistakes
Learning the shape is fairly simple. Maintaining it while cutting takes more practice.
Here are four mistakes worth watching for.
❌ 1. Leaving Your Fingertips Exposed
Curling only the upper part of your fingers isn’t enough if your fingertips still point toward the cutting board beside the blade.
✔️ Correction: Curl the fingertips completely behind the knuckles.
❌ 2. Letting Your Thumb Stick Out
The thumb can be forgotten because most of your attention is focused on your fingers.
A thumb protruding toward the blade defeats part of the purpose of forming the claw.
✔️ Correction: Keep your thumb tucked behind your guiding fingers.
❌ 3. Gripping the Food Too Tightly
The claw should stabilize the ingredient, but it doesn’t need to crush it.
Too much tension can make your hand stiff and make repositioning more difficult.
✔️ Correction: Keep your hand stable but relaxed.
❌ 4. Losing the Claw Between Cuts
Beginners sometimes curl their fingers for the actual cut and then straighten them while moving the food.
That can bring the fingertips back toward the cutting line.
✔️ Correction: Maintain the claw as your hand gradually moves backward.
🤝 Claw Grip and Pinch Grip
The claw grip describes what your guiding hand does.
The pinch grip describes one way your knife hand can control the chef knife.
Used together, they create a simple two-hand system:
🔪 KNIFE HAND → PINCH GRIP
✋ GUIDING HAND → CLAW GRIP
⬇️
🥕 FOOD → STABILIZED AND GUIDED
⬇️
🎯 RESULT → BETTER CONTROL
This is why the claw-grip article fits naturally into the KnifeGenie knife-skills cluster:
How to Use a Chef Knife
↓
How to Hold a Chef Knife
↓
Pinch Grip + Claw Grip
↓
Rock Chop vs Push Cut
↓
Individual cutting techniques
If you’re unfamiliar with the knife-hand side of this combination, see How to Use a Pinch Grip With a Chef Knife.
🔪 Claw Grip and Cutting Motion
The claw grip doesn’t dictate how the knife itself must move.
Depending on the knife, food and task, you may use techniques such as a rock chop or push cut.
With a rock chop, the knife typically uses a rocking movement while the guiding hand controls the ingredient.
With a push cut, the knife travels forward and down through the food while the claw continues to keep the fingertips tucked.
Our Rock Chop vs Push Cut guide explains these two cutting motions in more detail.
The important point here is:
The knife movement may change. Your guiding fingertips still stay tucked.
🪵 Don’t Forget the Cutting Board
Even good hand technique becomes less safe if the cutting board slides underneath you.
✔️ Use a stable cutting surface.
✔️ Stabilize the board if necessary.
✔️ Create a flat surface on rolling foods where appropriate.
❌ Don’t scrape chopped food across the board with the sharpened cutting edge.
Good cutting-board habits aren’t only about knife control. Follow appropriate food-safety practices to prevent cross-contamination, particularly when switching between produce and raw meat, poultry or seafood.
If you’re choosing a surface for everyday knife work, see Best Cutting Board for Kitchen Knives: Wood vs Plastic.
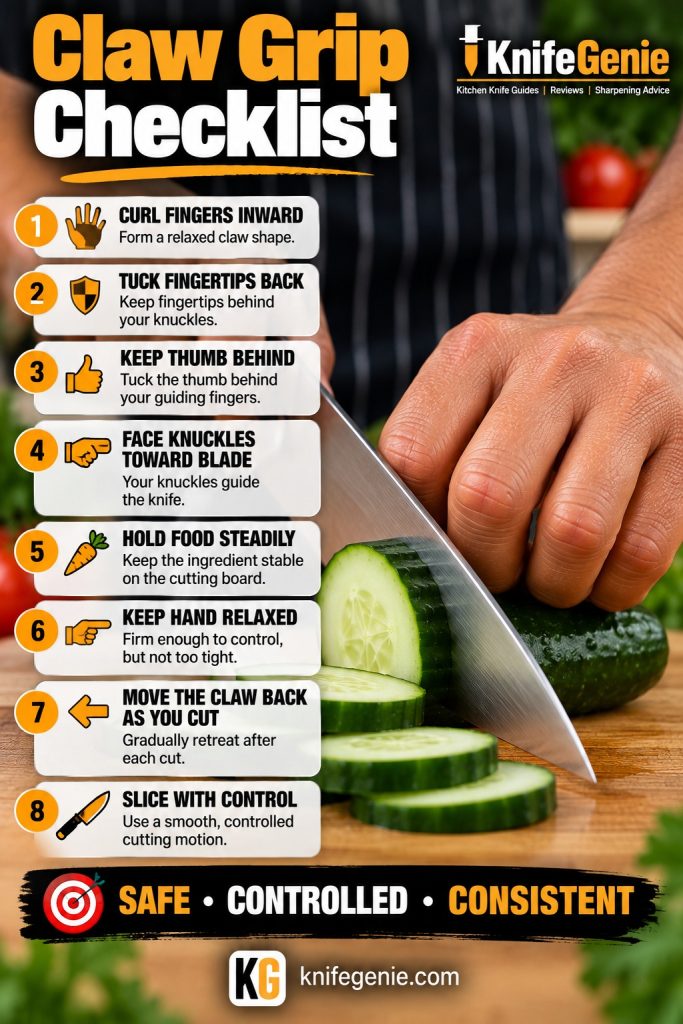
✅ Claw Grip Checklist
Before increasing your cutting speed, check the fundamentals.
✔️ Curl your fingers inward
✔️ Tuck your fingertips back
✔️ Keep your thumb behind
✔️ Face your knuckles toward the blade
✔️ Hold the food steadily
✔️ Keep your hand relaxed
✔️ Move the claw backward as you cut
✔️ Slice with control
🎯 Remember
TUCK • GUIDE • SLICE • MOVE
Control and consistency matter much more than speed.
❓ Frequently Asked Questions
What is the claw grip when using a knife?
The claw grip is a guiding-hand position in which the fingers curl inward so the fingertips remain behind the knuckles. The knuckles provide a reference for the side of the knife blade while cutting.
Is the claw grip safer?
The claw grip is intended to keep the fingertips farther from the knife’s cutting path and can improve control. However, it does not eliminate the possibility of injury. Proper knife handling, a stable cutting surface and controlled movements remain important.
Should the knife touch your knuckles?
The flat side of the blade can remain close to or lightly reference your guiding knuckles, but you shouldn’t force the knife against your hand. The cutting edge should remain away from your fingertips.
Where should my thumb go in the claw grip?
Keep your thumb tucked behind your guiding fingers rather than allowing it to stick out toward the blade.
How tightly should I hold the food?
Firmly enough to stabilize it, but not so tightly that your hand becomes rigid. A relaxed claw is easier to reposition as you cut.
Does the claw grip work for cutting onions?
Yes. The claw grip is particularly useful when slicing and dicing onions because the guiding hand can stabilize the onion while the fingertips remain tucked. See How to Cut an Onion With a Chef Knife for the complete cutting technique.
Can I use the claw grip when chopping vegetables?
Yes. The basic claw position can be adapted to many slicing, chopping and dicing tasks as long as the ingredient gives you enough room to position your guiding hand properly.
Should beginners use the claw grip?
It’s a useful foundational knife skill for beginners. Practice slowly and concentrate on keeping the fingers tucked and coordinating both hands before trying to increase speed.
Do professional chefs use the claw grip?
Variations of the claw technique are commonly taught as part of standard kitchen knife skills. Exact hand position can vary depending on the cook, ingredient and cutting technique.
Should I use a claw grip with very small foods?
Use extra caution with very small ingredients because there may not be enough space to form a comfortable claw. Beginners are better off learning the technique with larger, stable foods first.
🎯 Final Thoughts
Learning how to use the claw grip with a chef knife is really about teaching your guiding hand to work together with your knife hand.
Remember the basic sequence:
✋ CURL YOUR FINGERS
↓
🛡️ TUCK YOUR FINGERTIPS
↓
🤚 GUIDE WITH YOUR KNUCKLES
↓
🔪 SLICE WITH CONTROL
↓
🔁 MOVE THE CLAW BACK
At first, that sequence may require conscious thought. That’s normal.
Practice slowly with stable ingredients until maintaining the claw begins to feel natural.
Then continue building your technique with our guides on How to Use a Chef Knife, How to Hold a Chef Knife, How to Use a Pinch Grip With a Chef Knife, How to Cut an Onion With a Chef Knife, and Rock Chop vs Push Cut.