
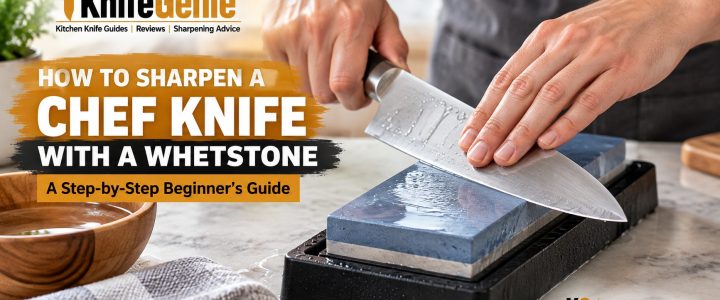
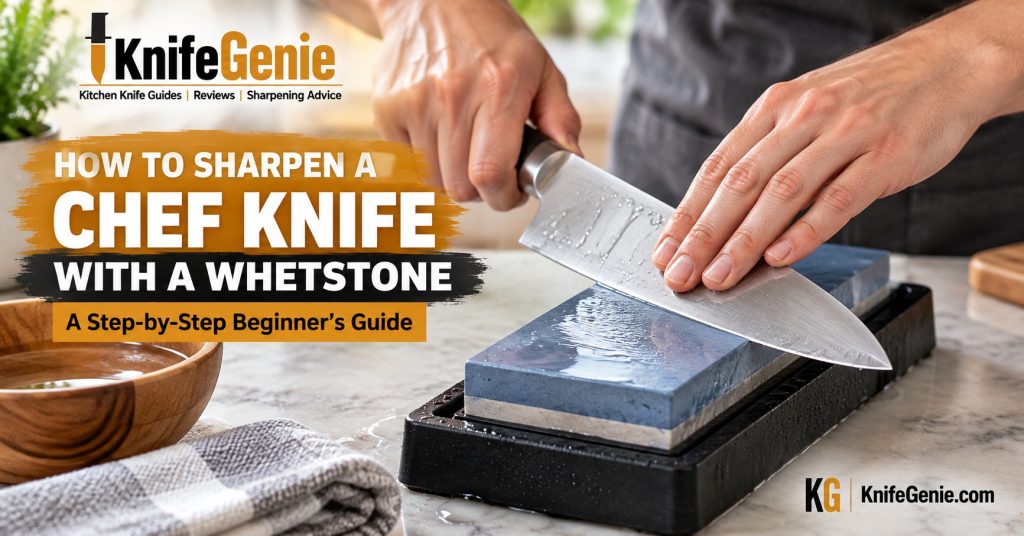
A sharp chef knife makes everyday cooking easier, whether you’re chopping vegetables, slicing meat, or preparing ingredients for dinner.
But even a good-quality chef knife gradually loses its edge. Tomatoes become harder to slice, onions require more pressure, and cutting tasks that once felt effortless become frustrating.
A whetstone, also called a sharpening stone, offers a controlled way to restore a dull cutting edge. Unlike some fixed-angle sharpening devices, a whetstone allows you to work with the bevel angle recommended for your particular knife.
The technique takes a little practice, but the basic principles are straightforward.
In this guide, you’ll learn how to choose and prepare a whetstone, maintain the correct sharpening angle, work from heel to tip, identify and remove a burr, and test your finished edge safely.
Research note: This KnifeGenie guide is based on published sharpening principles and knife-manufacturer guidance. It is intended for educational purposes and does not claim personal testing of any whetstone or knife mentioned.
🔽 Jump to What You Need
👉 Quick Answer
👉 Choose and Prepare Your Whetstone
👉 Find the Correct Sharpening Angle
👉 Sharpen Your Chef Knife Step by Step
👉 Identify and Remove the Burr
👉 Finish and Test the Edge
👉 Common Sharpening Mistakes
👉 Frequently Asked Questions
🏆 How to Sharpen a Chef Knife With a Whetstone: Quick Answer
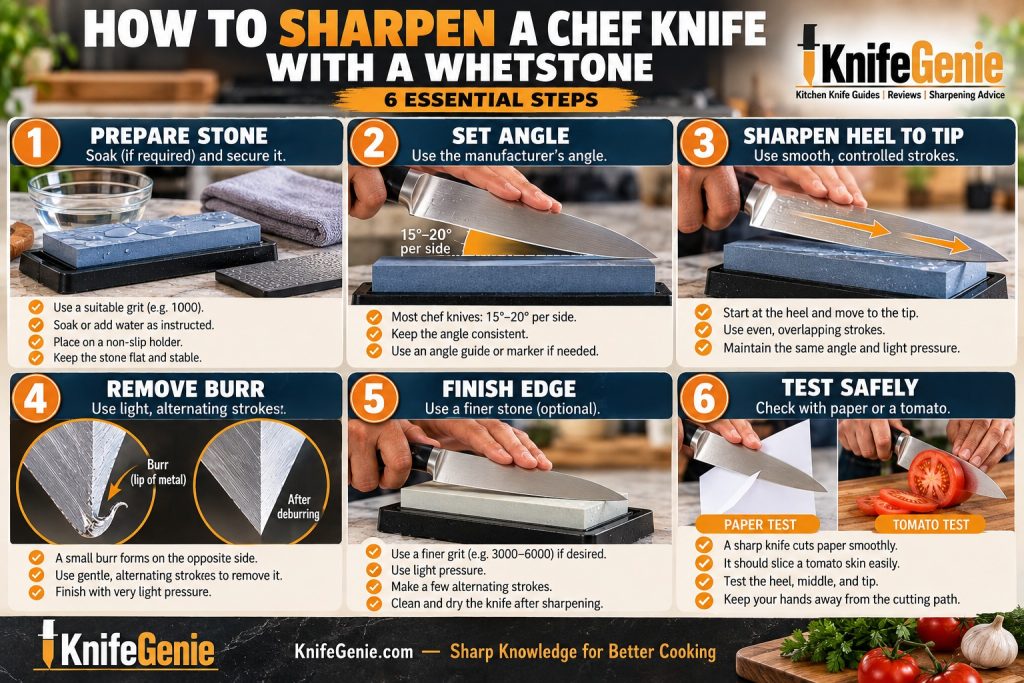
To sharpen a chef knife with a whetstone, prepare a suitable sharpening stone, secure it on a non-slip surface, and position your knife at the manufacturer’s recommended bevel angle.
Then follow these seven steps:
- Choose the right grit. A 1000-grit whetstone is a practical starting point for many ordinarily dull chef knives.
- Prepare and secure the stone. Follow its soaking or lubrication instructions and make sure it cannot move.
- Set the correct angle. Maintain the knife manufacturer’s recommended bevel angle throughout sharpening.
- Sharpen from heel to tip. Use smooth, controlled strokes that cover the entire cutting edge.
- Work both sides. Develop a small burr along the edge, then repeat on the opposite bevel.
- Remove the burr and finish. Use lighter alternating strokes and a finer stone if appropriate.
- Test safely. Check the knife’s performance by cutting paper or slicing a tomato.
The most important lesson is simple: a consistent sharpening angle and controlled technique matter more than speed or excessive pressure.
🧙 KnifeGenie Quick Verdict
- 🪨 Best beginner starting grit: Approximately 1000.
- 📐 Most important skill: Maintaining a consistent bevel angle.
- 🔪 Most important sharpening goal: Working the entire cutting edge evenly.
- ✨ Most important finishing step: Removing the burr.
- 🍅 Best practical test: Clean, controlled cutting through food.
A properly sharpened and deburred chef knife should cut predictably without requiring excessive force.
🪨 Choose and Prepare Your Whetstone
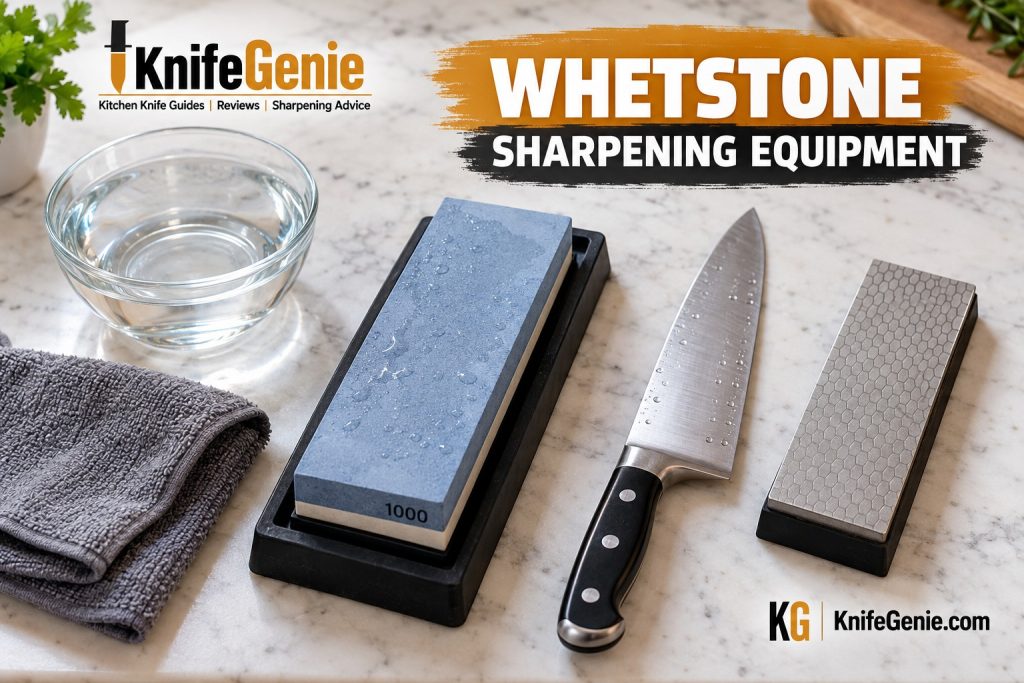
Before you begin sharpening, it’s important to choose the right stone and prepare a safe working area.
You don’t need a large collection of sharpening equipment. For most beginners, a suitable medium-grit water stone and a secure holder are enough to start learning.
What You’ll Need
Gather the following items:
- 🪨 Whetstone: A suitable sharpening stone, preferably medium grit for routine sharpening.
- 🧱 Non-slip holder: A rubber base or stable stone holder to prevent movement.
- 💧 Water: If required by your particular stone.
- 🧻 Clean towel: For drying the knife and keeping your workspace tidy.
- 🔪 Chef knife: Preferably a conventional double-bevel knife for your first sharpening session.
- 📄 Paper or tomato: For testing cutting performance afterward.
A flattening plate is also useful for keeping your whetstone level over time.
Understanding Whetstone Grit
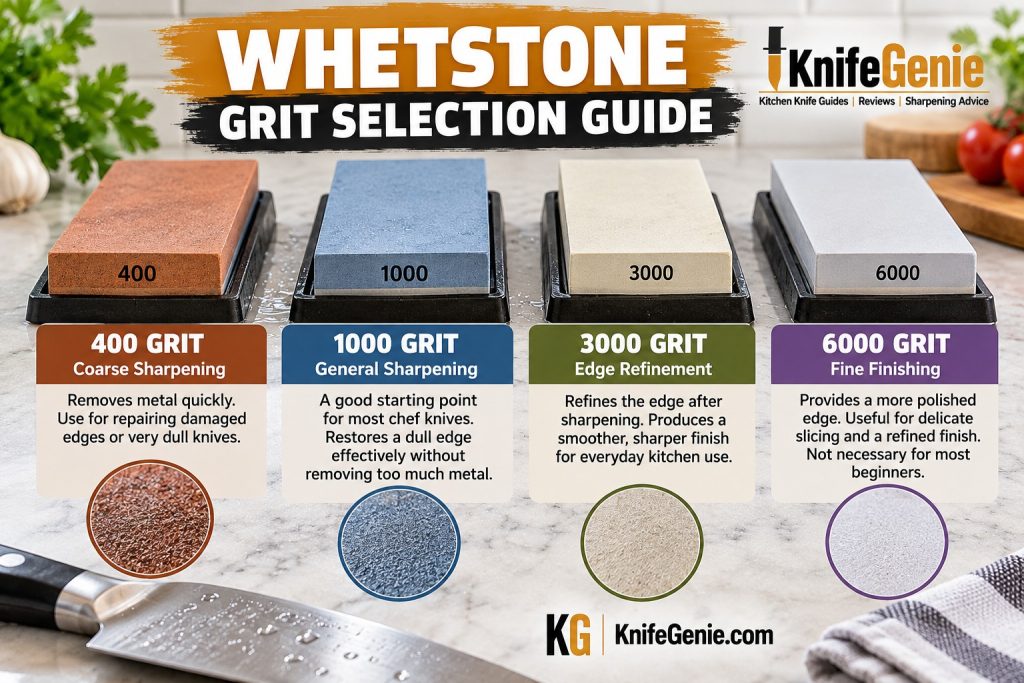
Whetstones come in different grit ratings. The grit indicates how aggressively the stone removes metal.
Lower-grit stones remove metal faster. Higher-grit stones produce a finer surface finish.
| Whetstone grit | Main purpose | Typical use |
|---|---|---|
| 220–400 | Coarse sharpening | Repairing damaged or very dull edges |
| 800–1200 | General sharpening | Restoring ordinary dull chef knives |
| 2000–3000 | Edge refinement | Refining the edge after sharpening |
| 4000–6000 | Fine finishing | Producing a more polished cutting edge |
| 8000+ | Specialized polishing | Very fine finishing where appropriate |
These ranges are approximate. Different manufacturers use different grit scales, and stones with similar grit ratings may behave differently.
Which Whetstone Should a Beginner Choose?
For many home cooks, a 1000-grit water stone is an excellent starting point.
It removes enough metal to restore an ordinarily dull cutting edge without being as aggressive as a coarse repair stone.
A combination stone with approximately 1000 grit on one side and 3000–6000 grit on the other can also be convenient.
However, you don’t need a high-grit finishing stone immediately. A well-sharpened, properly deburred edge from a 1000-grit stone can perform very well in everyday kitchen tasks.
Water Stones vs Oil Stones vs Diamond Stones
Although they’re all sharpening stones, they don’t necessarily work the same way.
Water stones use water as directed by the manufacturer. Some require soaking, while others need only water applied to the surface.
Oil stones use the lubricant specified by their manufacturer.
Diamond stones contain abrasive diamond particles attached to a plate. Their lubrication requirements vary by product.
This guide focuses primarily on water stones because they’re a popular choice for learning chef knife sharpening.
How to Prepare Your Whetstone
Step 1: Read the manufacturer’s instructions.
Some traditional water stones require soaking before use. Others are splash-and-go stones that should not be immersed for extended periods.
Never assume every water stone needs soaking.
Step 2: Secure the stone.
Place the whetstone in a non-slip holder on a stable countertop.
Make sure it cannot slide when light pressure is applied.
Step 3: Check the stone’s surface.
A badly worn or hollowed stone makes consistent sharpening more difficult.
Flatten the surface with a suitable flattening plate if necessary.
Step 4: Add the recommended lubricant.
For water stones, maintain the amount of surface water recommended by the manufacturer.
As you sharpen, a mixture of water, abrasive particles, and removed metal may form on the stone. This is commonly called slurry.
🧙 KnifeGenie Tip: Avoid using an extremely coarse stone for routine sharpening. Coarse abrasives remove metal quickly and can make beginner mistakes harder to correct.
Shapton — Preparing the Whetstone
Not all water stones require prolonged soaking. Shapton explains that its stones generally need only surface water during normal use, although its instructions recommend a short initial soak for certain stones.
📐 Find the Correct Sharpening Angle
The sharpening angle is one of the most important parts of using a whetstone correctly.
It’s the angle between the side of the knife blade and the surface of the stone.
Most conventional chef knives have a double-bevel cutting edge, meaning both sides of the blade are sharpened.
The angle specified by a knife manufacturer is often measured per side, rather than across the entire cutting edge.
Typical Chef Knife Sharpening Angles
| Knife type | Approximate angle per side |
|---|---|
| Many Western/German-style chef knives | 15°–20° |
| Many Japanese-style double-bevel chef knives | 10°–16° |
| Specialty or asymmetric knives | Manufacturer-specific |
These are general examples, not universal rules.
Some German knives use narrower angles, while some Japanese knives use angles similar to Western knives.
Always prioritize the manufacturer’s recommendation for your exact knife model.
Our German vs Japanese Kitchen Knives guide explains the differences in blade construction, steel, and edge geometry.
How to Hold the Correct Angle
Place the cutting edge against the stone.
Raise the spine until the blade reaches its intended sharpening angle.
Keep your wrist comfortable and maintain the same angle as you move the knife.
Beginners may find an angle guide helpful, provided it’s suitable for their knife and stone.
Another useful technique involves applying a small amount of permanent marker to the existing bevel, allowing it to dry, and making a careful sharpening stroke.
The pattern of removed marker can help show whether the stone is contacting the intended bevel.
If the marker disappears only near the shoulder of the bevel, the angle may be too low.
If it disappears only at the cutting edge, the angle may be too high.
Why Angle Consistency Matters
If you repeatedly raise and lower the knife during sharpening, you can round the cutting edge instead of producing a clean, defined bevel.
You don’t need to achieve laboratory-level precision.
A steady, repeatable angle is more useful than constantly stopping to calculate the exact number of degrees.
🧙 KnifeGenie Tip: Focus on maintaining the knife’s intended edge geometry. Don’t change the bevel angle simply because another angle is popular online.
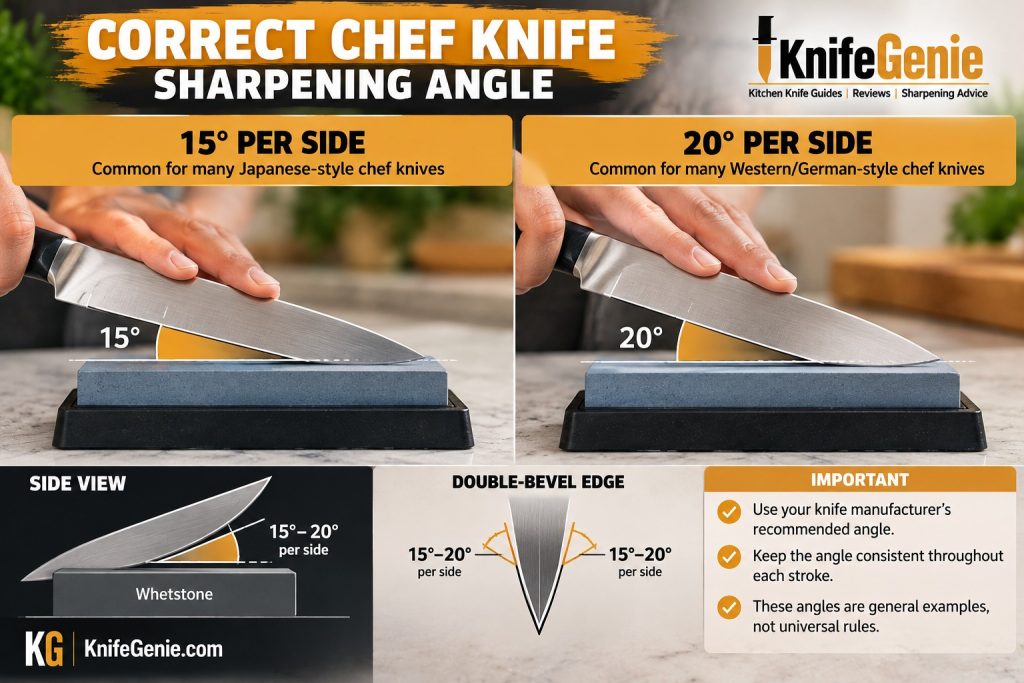
Maintain the manufacturer’s recommended sharpening angle throughout each stroke.
WÜSTHOF — Correct Sharpening Angle
WÜSTHOF’s official sharpening instructions specify a 14-degree angle for its standard knife blades, illustrating why it’s important to follow the manufacturer’s guidance rather than assuming all Western knives use the same angle.
🔪 Sharpen Your Chef Knife Step by Step
Now that your whetstone is prepared and your sharpening angle is established, you’re ready to begin.
These instructions apply to a conventional double-bevel chef knife.
Traditional single-bevel Japanese knives and specialty blades may require different techniques.
Step 1: Position the Knife on the Stone
Hold the knife handle securely with your dominant hand.
Use the fingers of your other hand to apply gentle, controlled pressure to the flat of the blade, safely above the cutting edge.
Begin near the heel, the section of the blade closest to the handle.
Keep your fingertips away from the cutting edge and the stone’s travel path.
Step 2: Set the Correct Sharpening Angle
Raise the knife to the manufacturer’s recommended bevel angle.
Keep your wrist relaxed and avoid gripping the handle excessively tightly.
If you’re learning, begin with slow movements.
Your goal is to maintain a stable angle throughout the stroke.
Step 3: Sharpen From Heel to Tip
Move the knife across the whetstone using smooth, controlled strokes.
One common method uses a sweeping movement that brings successive sections of the cutting edge into contact with the stone.
Start near the heel and work toward the tip.
Another method involves sharpening the blade in overlapping sections.
Both approaches can work when performed correctly.
The important points are to maintain the intended bevel angle and sharpen the entire cutting edge evenly.
As you approach the curved tip, adjust the blade’s position to follow its shape without abruptly changing the sharpening angle.
Avoid twisting the cutting edge against the stone.
Step 4: Apply Controlled Pressure
You don’t need to force the blade into the stone.
Use enough pressure for the abrasive surface to work effectively while maintaining control.
The appropriate pressure depends on the stone, steel, knife size, and sharpening stage.
Reduce pressure as you approach the finishing stage.
There is no universal number of strokes required.
A lightly dulled knife may need relatively little work, while a significantly worn edge may require more attention.
Step 5: Check Your Progress
After several strokes, stop and inspect the cutting edge.
You’re looking for signs that sharpening has reached the edge apex.
A small burr may begin to develop on the opposite side of the blade.
A burr is a thin lip of displaced metal that forms during sharpening.
You don’t need to create a large burr. A small, continuous burr can be enough to confirm that you’ve reached the edge along its full length.
Step 6: Sharpen the Opposite Side
Turn the knife over and repeat the process on the opposite bevel.
Maintain the correct angle and work carefully from heel to tip.
For a symmetrical double-bevel knife, aim to sharpen both sides evenly.
If the knife has an asymmetric edge, follow the manufacturer’s specific instructions.
Step 7: Check the Entire Cutting Edge
Inspect the heel, middle, and tip.
A common beginner mistake is concentrating on the center of the blade while leaving other sections insufficiently sharpened.
The goal is a properly formed cutting edge along the full usable blade length.
If one section needs more work, return to it with careful, controlled strokes rather than increasing pressure across the entire knife.
🧙 KnifeGenie Tip: Slow, consistent strokes are more valuable than trying to sharpen quickly. Develop control first; speed can come with practice.
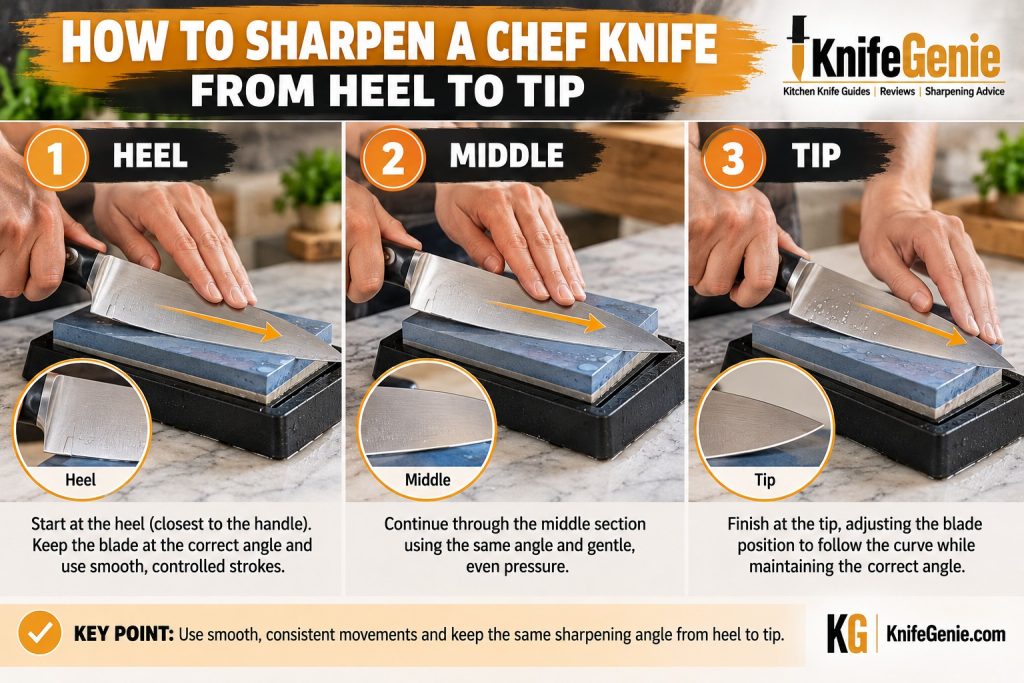
ZWILLING — Step-by-Step Sharpening
ZWILLING’s sharpening guide explains how to prepare a water stone, maintain a consistent angle, work both sides of the blade, remove the burr, and check sharpness using paper.
🔬 Identify and Remove the Burr
Understanding the burr is an important part of successful whetstone sharpening.
It’s also one of the steps beginners frequently overlook.
What Is a Knife Burr?
As the whetstone removes steel from one bevel, a thin lip of metal can form at the cutting edge and bend toward the opposite side.
This is called a burr.
A burr often indicates that you’ve sharpened far enough to reach the edge apex.
However, a burr doesn’t automatically mean the knife is finished.
If a large or unstable burr remains attached, the knife may initially feel sharp but lose cutting performance quickly.
How to Identify a Burr
Inspect the edge under good lighting.
A burr may appear as a thin reflective line, especially when viewed with magnification.
Experienced sharpeners sometimes detect it by carefully moving a finger pad from the blade face toward the edge, never along the cutting edge.
However, this technique carries a cut risk and isn’t necessary for beginners.
If you’re unsure, use visual inspection or magnification rather than touching the edge.
How to Remove the Burr
Once both bevels have been sharpened:
- Reduce sharpening pressure substantially.
- Make gentle alternating strokes, switching between the two sides.
- Maintain the correct bevel angle.
- Continue reducing pressure until you’re using very light finishing strokes.
- Inspect the edge again for any remaining burr.
For many conventional double-bevel knives, light alternating edge-leading strokes can help remove the burr.
Avoid repeatedly bending a large burr from one side to the other.
If the burr persists, you may need to adjust your technique rather than continuing with heavy strokes.
Why Deburring Matters
A properly sharpened knife should have a clean, stable cutting edge.
Leaving a burr attached can produce inconsistent cutting performance and poor edge retention.
Removing it is just as important as forming the edge itself.
🧙 KnifeGenie Tip: Don’t chase a larger burr. The goal is a clean cutting edge, not the largest possible strip of displaced metal.
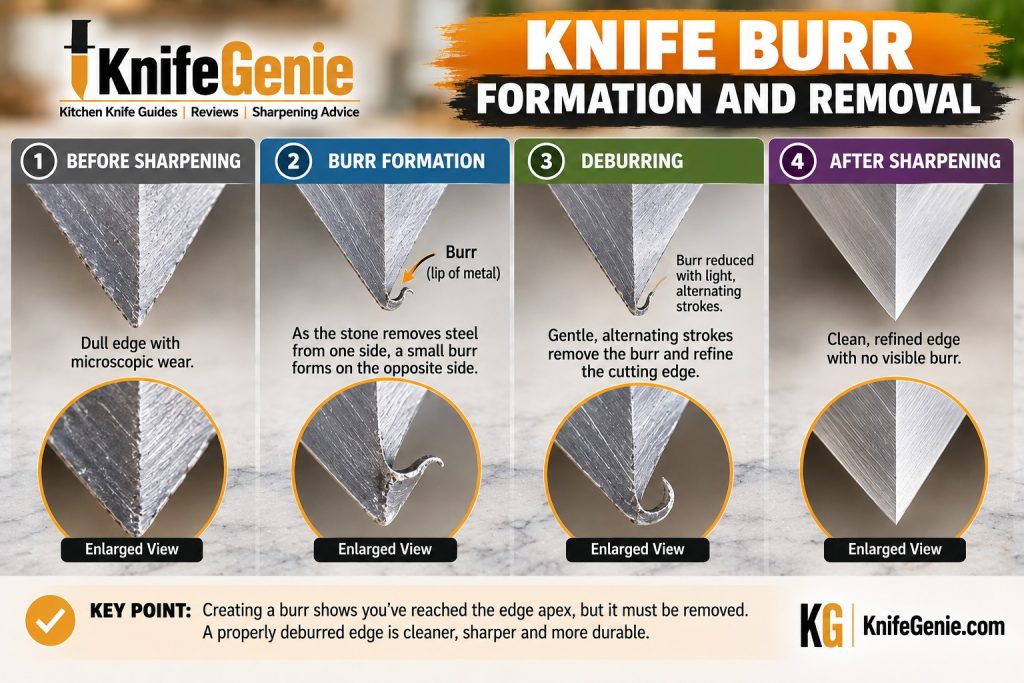
Removing the burr is essential to producing a clean, stable cutting edge.
✨ Finish and Test the Edge
Once the knife has been sharpened and the burr removed, you can refine the cutting edge.
For many ordinary kitchen tasks, a medium-grit edge is already sufficient.
However, some cooks prefer a finer finish for certain cutting applications.
Should You Use a Finer Whetstone?
A 3000-grit stone can be a useful next step after sharpening on a 1000-grit stone.
Finer stones remove smaller amounts of metal and refine the scratch pattern left by coarser sharpening.
A more polished edge may be desirable for delicate slicing.
However, an extremely polished edge isn’t automatically better for every kitchen task.
Some cooks prefer the cutting feel of a moderately refined edge when slicing foods with resistant skins, such as tomatoes.
There’s no single ideal finishing grit for every chef knife.
How to Finish the Edge
If you’re using a finer stone:
- Prepare it according to its manufacturer’s instructions.
- Maintain the intended bevel angle.
- Use lighter strokes than during the main sharpening stage.
- Alternate sides carefully.
- Avoid forming another large burr.
The purpose is to refine the cutting edge, not repeat the entire sharpening process.
Clean the Knife and Stone
After sharpening, carefully remove any abrasive residue and metal particles from the blade.
Dry the knife immediately, including the handle and heel area.
Clean and dry your whetstone according to its manufacturer’s instructions.
Avoid storing a damp stone in an airtight container unless the manufacturer specifically recommends that practice.
How to Test Sharpness Safely
You don’t need an elaborate test to determine whether your sharpening session worked.
The most useful test is whether the knife performs ordinary kitchen cutting tasks cleanly and predictably.
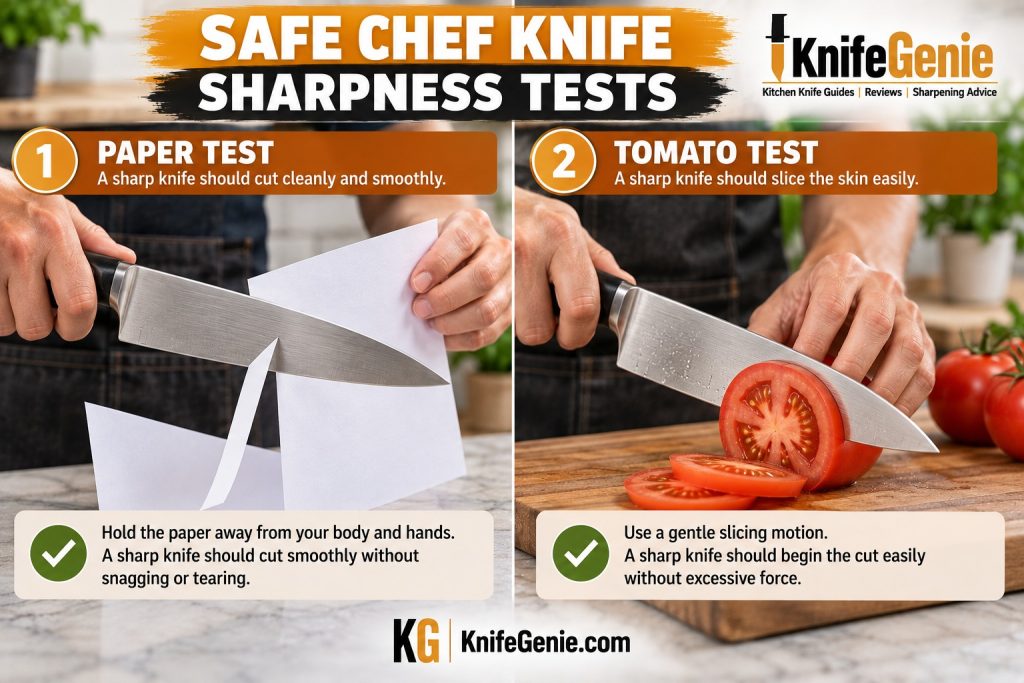
Test 1: The Paper Test
Hold a sheet of ordinary paper away from your body and hands, leaving a clear cutting path.
Make a controlled cut through the free edge.
A properly sharpened chef knife should cut reasonably smoothly rather than repeatedly snagging or tearing the paper.
Paper cutting is only a rough indicator of sharpness. It doesn’t measure every aspect of edge geometry or food-cutting performance.
Test 2: The Tomato Test
Place a tomato on a stable cutting board.
Use a controlled slicing motion and observe how easily the knife cuts through the skin.
A sharp chef knife should begin the cut readily without excessive downward force.
Test 3: Check Different Sections of the Blade
Test the heel, middle, and tip using a controlled cutting task.
If one section cuts cleanly while another struggles, you may have sharpened unevenly.
Return to the affected section carefully if additional work is necessary.
⚠️ Important Safety Reminder
Never test sharpness by running your finger along the cutting edge or attempting to shave hair from your arm.
Keep your guiding hand clear of the blade’s path and use a stable cutting board.
A newly sharpened knife may cut more readily than you expect.
For additional handling guidance, read How to Use a Chef Knife.
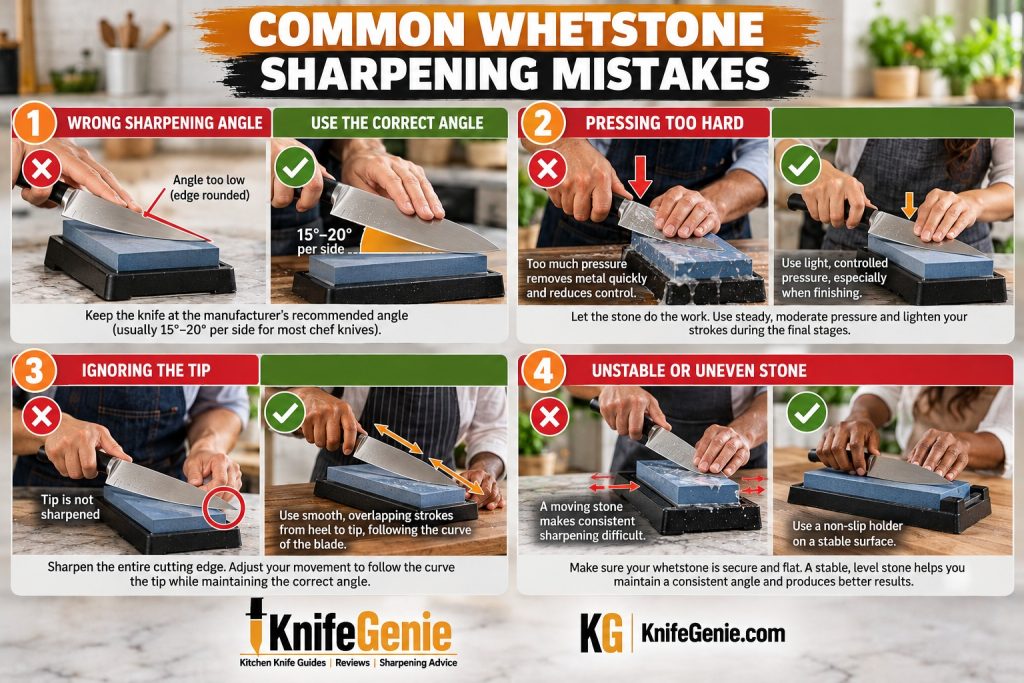
❌ Common Sharpening Mistakes
Whetstone sharpening mistakes are usually caused by poor angle control, excessive pressure, or misunderstanding the sharpening process.
Fortunately, most can be corrected with practice.
1. Using the Wrong Sharpening Angle
Changing the bevel angle unintentionally can produce uneven geometry and poor cutting performance.
Fix: Check the manufacturer’s recommendation and practice maintaining a consistent angle.
2. Pressing Too Hard
Excessive pressure makes it harder to control the knife and may contribute to unwanted burr formation.
Fix: Use controlled pressure and lighten your strokes during finishing.
3. Ignoring the Tip
The curved tip requires deliberate attention.
Fix: Adjust your sharpening movement to follow the blade’s curve while maintaining the intended bevel angle.
4. Leaving the Burr Attached
A remaining burr can create an edge that initially seems sharp but performs inconsistently.
Fix: Finish with carefully controlled, light alternating strokes and check that the burr has been removed.
5. Using an Unstable or Uneven Stone
A moving or badly dished stone makes accurate sharpening more difficult.
Fix: Secure the stone properly and flatten it when necessary.
6. Sharpening Too Frequently
Every sharpening session removes some metal.
Unnecessary sharpening gradually reduces blade material and may alter the knife’s geometry.
Fix: Sharpen when the cutting edge actually needs restoration, rather than following an unnecessarily aggressive schedule.
Our guide to How Often Should You Sharpen Kitchen Knives? explains how to judge sharpening frequency based on use and edge condition.
🇩🇪 🇯🇵 Sharpening German vs Japanese Chef Knives
The basic principles of whetstone sharpening apply to many German and Japanese chef knives, but there are important differences.
German-Style Chef Knives
Traditional German-style chef knives often use comparatively tough steel and relatively robust edge geometry.
Many respond well to medium-grit sharpening stones and conventional double-bevel techniques.
Some German chef knives have full bolsters that extend toward the heel.
These can make it difficult to sharpen the entire cutting edge evenly.
Avoid grinding or modifying a bolster without the appropriate equipment and experience.
Japanese-Style Chef Knives
Many Japanese chef knives use harder steel and thinner cutting edges.
These knives can deliver excellent cutting performance but may be less forgiving of excessive pressure, twisting, or inappropriate sharpening angles.
Some traditional Japanese knives also have asymmetric or single-bevel geometry requiring specialized techniques.
Never assume every Japanese chef knife should be sharpened at the same angle.
🧙 KnifeGenie Recommendation
For beginners, practice first on an ordinary double-bevel chef knife whose sharpening requirements you understand.
If you own an expensive handmade knife, a traditional single-bevel knife, or a knife with significant edge damage, consider manufacturer-specific guidance or professional sharpening before attempting major corrections.
Shun — German vs Japanese Chef Knives
Shun recommends maintaining a 16-degree sharpening angle for its knives and identifies whetstones as a preferred method for restoring their cutting edges.
🧙 KnifeGenie Pro Tips
🔪 Practice slowly. Controlled movements help you develop consistent sharpening technique.
🪨 Keep the stone flat. An even surface makes it easier to maintain the correct angle.
📐 Respect the existing bevel. Don’t change the sharpening angle without understanding the knife’s edge geometry.
💧 Follow the stone manufacturer’s instructions. Soaking, lubrication, cleaning, and storage requirements vary.
✋ Keep your fingers safe. Maintain a secure grip and never place fingertips in the edge’s travel path.
✨ Finish lightly. Reducing pressure during deburring helps produce a cleaner edge.
🪵 Use an appropriate cutting board. Avoid cutting directly on glass, stone, or similarly hard surfaces that can damage the edge.
🧼 Maintain your knife between sharpenings. Proper washing, drying, storage, and appropriate honing can help reduce unnecessary sharpening.
Our How to Hone a Kitchen Knife guide explains how routine edge maintenance differs from sharpening with an abrasive stone.
❓ Frequently Asked Questions
What grit whetstone should I use for a chef knife?
Around 1000 grit is a practical starting point for many ordinarily dull chef knives. Coarser stones are more appropriate for significant repair, while finer stones can be used to refine the edge after sharpening.
How long does it take to sharpen a chef knife with a whetstone?
There is no fixed time. It depends on the knife’s condition, steel, stone, and your technique. Beginners should concentrate on maintaining the correct angle and producing a clean edge rather than finishing within a particular number of minutes.
What angle should I sharpen a chef knife at?
Use the manufacturer’s recommended bevel angle for your particular knife. Many Western-style chef knives use angles around 15°–20° per side, while some Japanese-style knives use more acute angles. These ranges aren’t universal.
Do I need to soak my whetstone?
Only if the stone manufacturer instructs you to do so. Some water stones require soaking, while others are designed for splash-and-go use.
Can I sharpen a Japanese chef knife with a whetstone?
Yes. Whetstones are widely used for Japanese kitchen knives. However, sharpening angles, abrasive selection, and techniques should match the knife’s steel and edge geometry. Traditional single-bevel knives require specialized handling.
Do I need a 6000-grit whetstone?
Not necessarily. A properly sharpened and deburred edge from a 1000-grit stone may be entirely suitable for everyday food preparation. Higher-grit stones are useful for additional refinement but aren’t essential for every knife.
How do I know when I’ve sharpened enough?
Look for evidence that you’ve sharpened the full cutting edge, removed the burr, and restored clean cutting performance. Don’t rely on stroke counts alone.
Is a whetstone better than a pull-through sharpener?
A whetstone provides greater control over the edge angle and amount of metal removed when used correctly. Pull-through sharpeners can be convenient, but their fixed geometry and abrasives may not suit every knife.
The better choice depends on the knife and the user’s skill.
See our Best Knife Sharpeners for Beginners guide for more information about sharpening options.
Should I hone my knife after whetstone sharpening?
Not automatically. Proper whetstone sharpening should leave the knife with a finished, deburred edge. Honing may be useful later for certain knives, but the appropriate method depends on the steel and manufacturer recommendations.
For a fuller explanation, read Honing vs Sharpening.
Can a whetstone damage my chef knife?
Yes, if used incorrectly. An inappropriate angle, excessive metal removal, an unstable setup, or poor technique can damage the edge or alter its geometry.
Start carefully and follow manufacturer guidance.
🏆 Final Verdict: Is Whetstone Sharpening Worth Learning?
For home cooks who want greater control over their kitchen knives, learning to use a whetstone is a valuable skill.
It takes patience, particularly at the beginning.
But the fundamentals are straightforward:
Choose the right stone. Secure it properly. Maintain the correct bevel angle. Sharpen the full edge. Remove the burr. Test the result safely.
You don’t need to become a professional sharpener to maintain a useful chef knife.
You simply need to understand what you’re trying to achieve and practice without rushing.
🧙 KnifeGenie Overall Recommendation
For most beginners with a conventional double-bevel chef knife, start with a suitable medium-grit water stone and the sharpening angle recommended by the knife manufacturer.
Learn to create and remove a burr before worrying about ultra-fine polishing stones or complicated sharpening systems.
And remember that sharpening is only part of knife care.
Proper cutting technique, a suitable cutting board, sensible storage, and regular edge maintenance all help keep your chef knife working well for longer.
A well-maintained chef knife isn’t just more pleasant to use. It also makes controlled, predictable cutting easier.
Whetstone Sharpening Checklist
Editorial disclosure: KnifeGenie provides research-based knife education. Product and technique information is informed by published sources and manufacturer instructions, not by claimed personal testing of the products discussed in this guide.